If you have gotten your hands on Windows 8.1, the final version (build 9600) or on any of the leaked builds, you can install it using this step by step guide. We will cover each step of the process and share useful information regarding more special installation scenarios.
What to Expect from Windows 8.1
There are many new things in Windows 8.1. Some were presented in this article based on the Windows 8.1 Preview while other things are new to the RTM itself: What's New in Windows 8.1 Public Preview (codename "Blue")?.
Below you can view a video that shares some of the novelties introduced in a leaked build that is very similar to the final Windows 8.1 version - the RTM:
We will present a more detailed overview ourselves, in the next few days.
Things to Keep in Mind
You can install Windows 8.1 on your computer or in a virtual machine. At this moment, the latest version of VirtualBox doesn't work well with Windows 8.1. The only virtual machine software that works without issues is VMware Player.
Before you start the installation, you need to have a product key available. Make sure you have it before moving forward with this guide.
Next, it is best to have a working internet connection available, so that Windows 8.1 can double check your Microsoft account details and download the latest updates available. A Microsoft account is requested by Windows 8.1. Unlike during the Windows 8 setup process, you are not given the option to create and use a local user account. The only exception to this rule is when you don't have a network connection available or something went wrong with the validation your Microsoft account. Only then are you given the option to create a local user account.
Windows 8.1 uses approximately 10GB of space without any special extras installed. If you want to install other applications, you should make a larger partition for it. My recommendation is to go for a minimum of at least 20 - 25 GB.
Windows 8.1 RTM - The Installation Procedure
First, you need to boot your computer using the Windows 8.1 installation disc. If you are using a virtual machine, boot from the .iso disc installation image. Windows 8.1 takes a while to load the setup files.
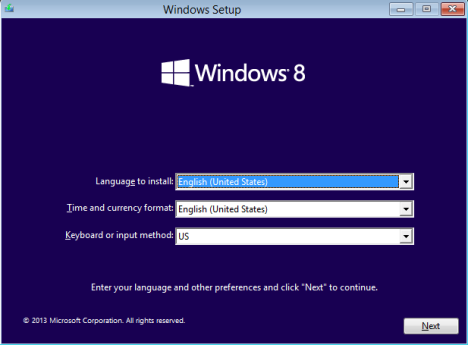
Once the necessary files are copied, the setup starts by asking what language, time, currency and keyboard input settings you want to use. Make the selections you prefer and click Next.
Windows 8.1, RTM, Setup, Installation, Personalization
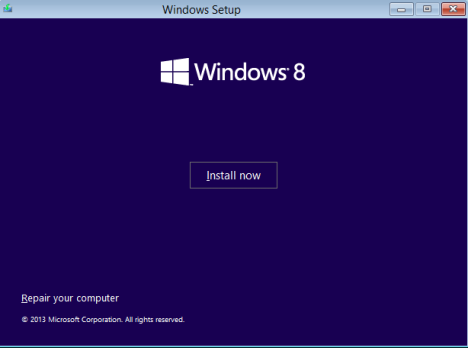
Click the Install now button to start the installation.
Windows 8.1, RTM, Setup, Installation, Personalization
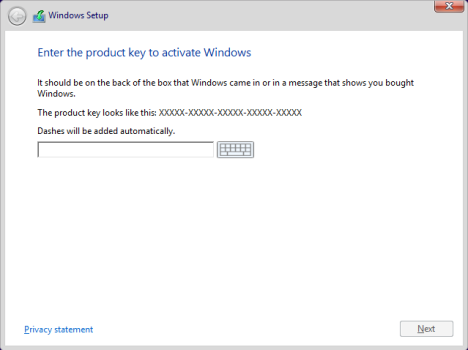
You are asked to enter the product key required to activate your Windows 8.1. Type it and click Next.
Windows 8.1, RTM, Setup, Installation, Personalization
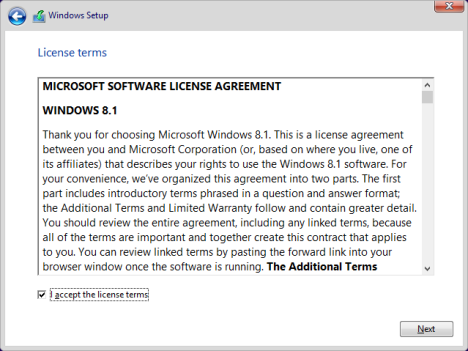
You are asked to read the license agreement. Check the "I accept the license terms" box and click Next.
Windows 8.1, RTM, Setup, Installation, Personalization
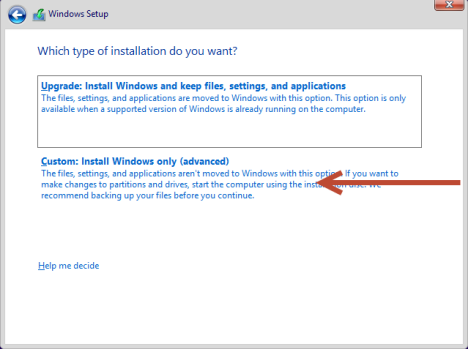
You are asked to choose between making an upgrade or a custom installation. If you want to make a clean installation (it is best that you do that), pick "Custom: Install Windows only (advanced)".
Windows 8.1, RTM, Setup, Installation, Personalization
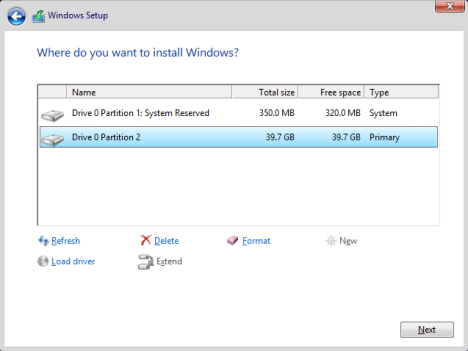
Now you are asked to select where you want to install Windows. Select the partition you want to use for Windows 8.1 and click Next.
Windows 8.1, RTM, Setup, Installation, Personalization
NOTE: If you are installing Windows 8.1 in a virtual machine or on a new computer, you first need to create the partition where you want to install it. Therefore click on Drive Options. Then, create the partition using the New button. Specify the size of the partition and click Apply. At this step, you may be asked to confirm if you are OK with Windows 8.1 creating an additional partition for its system files, that will be used for boot and recovery. If you are asked, click OK.
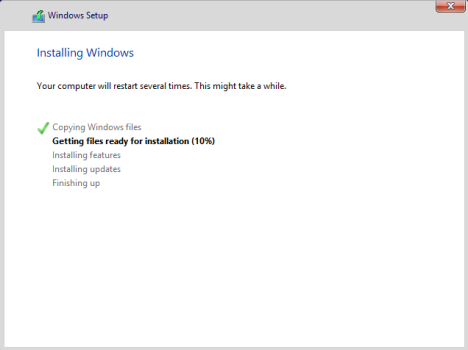
The installation starts. The setup will take a few minutes to copy all the required files and install the operating system.
Windows 8.1, RTM, Setup, Installation, Personalization
Once the installation is done, the Windows 8.1 setup will automatically reboot your system. Then, you will see the progress of the preparations made for your first login. In order for this process to finish, you might need to go through another reboot, depending on your computer's hardware configuration.
How to Personalize the Windows 8.1 Installation
After the restart, Windows 8.1 starts the customization process.
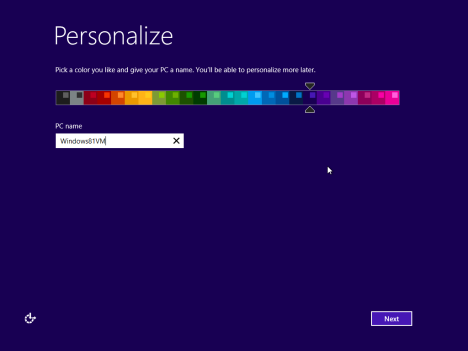
Start by giving a name for your computer. If you type some "unauthorized" characters like $, %, &, you will be notified appropriately. Also, choose the background color you prefer. When done, click Next.
Windows 8.1, RTM, Setup, Installation, Personalization
If you are installing Windows 8.1 on a laptop or device with a wireless network card, you are asked to select the wireless network to connect to and type the appropriate password for connecting to it. On a computer or device connected via cable to the network, you won't go through this step.
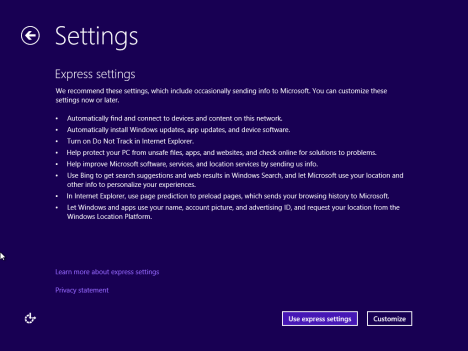
Next, you need to choose if you want to use the express settings Windows 8.1 comes bundled with, or you want to customize your installation. Let's get our hands dirty and see what happens if you click Customize.
Windows 8.1, RTM, Setup, Installation, Personalization
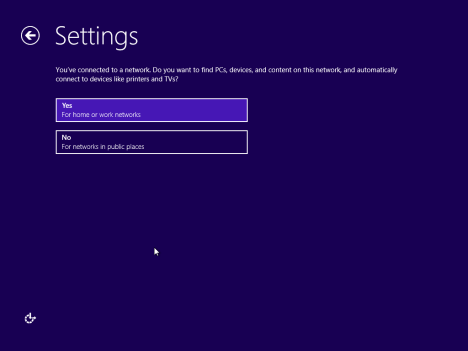
First, you are asked if you want to turn on file sharing and network discovery or not. Select the option you prefer.
Windows 8.1, RTM, Setup, Installation, Personalization
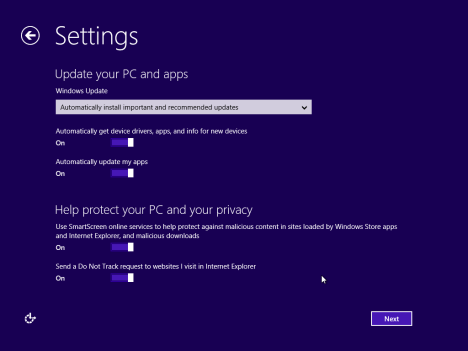
Then, you are asked about the default behavior of Windows Update and that of security features like Windows SmartScreen. Change the things you are interested in and click Next.
Windows 8.1, RTM, Setup, Installation, Personalization
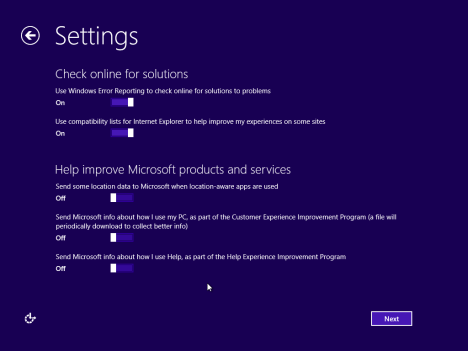
Then, you are asked about troubleshooting options and what you want to turn on. You can set whether you want to send different types of information to Microsoft. Set things according to your preference and click Next.
Windows 8.1, RTM, Setup, Installation, Personalization
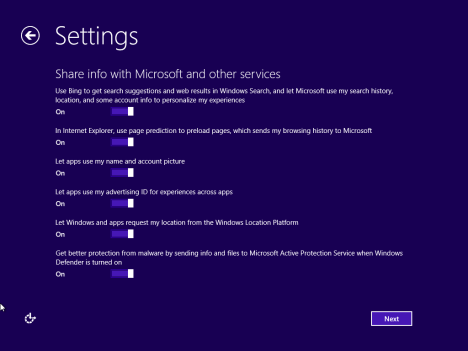
Next, you are asked if you want to send different types of information to Microsoft and whether apps can use your name, account picture and if they are allowed to access your location. Set things according to your preference and click Next.
Windows 8.1, RTM, Setup, Installation, Personalization
Finally, you get to sign in to your PC with your Microsoft account. Type your Microsoft account details and click Next.
Windows 8.1, RTM, Setup, Installation, Personalization
If you have not used your Microsoft account to install Windows 8 or Windows 8.1 until now, you may be asked to provide an alternate e-mail and phone number to recover your account password, in case you forget it or it is changed by unwanted guests. Provide the requested details and click Next.
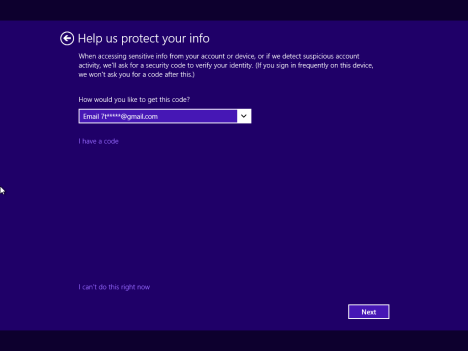
If you have used your Microsoft account before, to install Windows 8 or Windows 8.1, you will be asked to use a security code to verify your account. Select how you would like to receive that code: via a text message on your phone, via a phone call or via email. Then, click Next.
Windows 8.1, RTM, Setup, Installation, Personalization
NOTE: The options displayed for getting this code depend on how you have set your Microsoft account and if you provided your phone number.
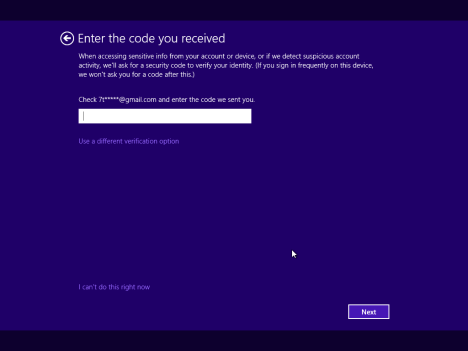
Now you are asked to enter the security code you just received, using the method you selected. Type it and click Next.
Windows 8.1, RTM, Setup, Installation, Personalization
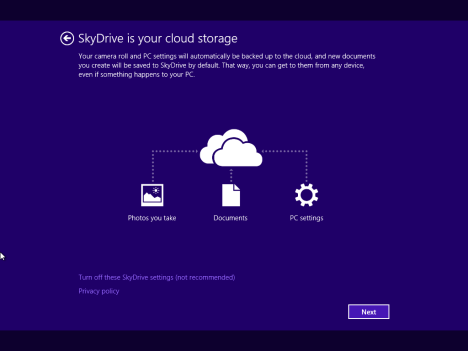
Next, you are asked to select whether you would like to use SkyDrive in Windows 8.1. For the best computing experience, it is best to click Next and leave SkyDrive turned on. If you want to turn it off, you should click "Turn off these SkyDrive settings".
Windows 8.1, RTM, Setup, Installation, Personalization
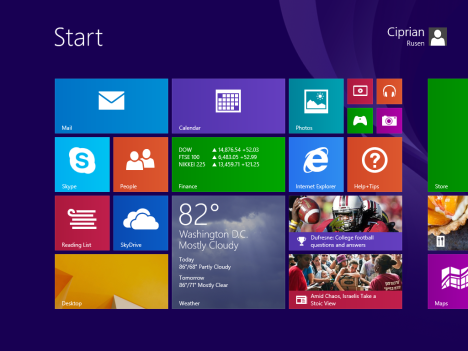
Windows 8.1 takes a while to prepare your computer, your apps and all the settings. The process may also involve a restart. When done, you are logged into Windows 8.1 and you can view the Start screen.
Windows 8.1, RTM, Setup, Installation, Personalization
Welcome to Windows 8.1!
Exceptions to the Above Installation Procedure
The procedure shared above is not always exactly the same on every computer. There are some exceptions to it.
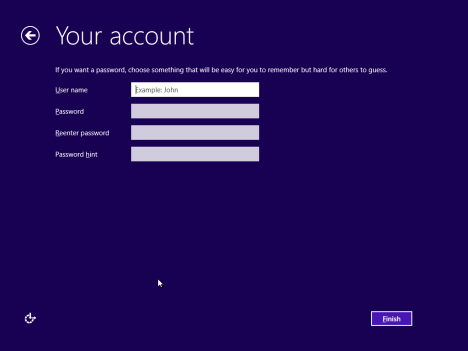
For example, if the Windows 8.1 setup doesn't detect a working internet connection, you won't be asked to login using a Microsoft account. You are given the option to create a local user account. Then, the personalization process ends without entering any security code and without setting up whether to use SkyDrive or not.
Windows 8.1, RTM, Setup, Installation, Personalization
Another exception is when you are using your Microsoft account to perform a second or third installation of Windows 8.1. Instead of being asked whether to use SkyDrive or not, you are asked whether you want to set up this PC using the settings synchronized from other installations you have made.
Windows 8.1, RTM, Setup, Installation, Personalization
Make your choice and follow the setup wizard.
Conclusion
I noticed that the Windows 8.1 installation process is slightly simpler and faster than that of Windows 8. The changes are not major but they do streamline the process. If you noticed other changes and novelties don't hesitate to leave a comment. I hope you found this guide useful and, if you have any questions, don't hesitate to ask using the comments form below.
VirtualBox did not work for me until I changed some hardware simulation parameter from the command line. Thus my recommendation to use VMware Player.
Justin ·
I just downloaded Build 9600 and it appears that you can create a local account in Windows 8.1, it’s just a bit hidden.
On the “Sign in to your Microsoft account” page, click “Create a new account” under “Don’t have an account?” and then click “Sign in without a Microsoft account”.
Justin ·
Just a couple things:
1. The latest version of VirtualBox worked for me with Build 9431 and 9471.
What changed about RTM to apparently brake this?
2. I read somewhere that requiring a Microsoft account would not be part of Windows 8.1 Final.
Did this change?
3. When I tested Build 9471, I found that when you tell it to “Turn off these SkyDrive settings” the only things that are turned off is the “Save to SkyDrive by Default” setting and the “Use SkyDrive Camera Roll” Setting.
It doesn’t actually disable the SkyDrive integration.
The only way I found to turn it off was to use a Group Policy Setting.
Ciprian Adrian Rusen ·
VirtualBox did not work for me until I changed some hardware simulation parameter from the command line. Thus my recommendation to use VMware Player.
A Microsoft account is required for Windows 8.1
Regarding SkyDrive – I need to do a bit more research in order to answer your question.


Discussion (4)
VirtualBox did not work for me until I changed some hardware simulation parameter from the command line. Thus my recommendation to use VMware Player.
I just downloaded Build 9600 and it appears that you can create a local account in Windows 8.1, it’s just a bit hidden.
On the “Sign in to your Microsoft account” page, click “Create a new account” under “Don’t have an account?” and then click “Sign in without a Microsoft account”.
Just a couple things:
1. The latest version of VirtualBox worked for me with Build 9431 and 9471.
What changed about RTM to apparently brake this?
2. I read somewhere that requiring a Microsoft account would not be part of Windows 8.1 Final.
Did this change?
3. When I tested Build 9471, I found that when you tell it to “Turn off these SkyDrive settings” the only things that are turned off is the “Save to SkyDrive by Default” setting and the “Use SkyDrive Camera Roll” Setting.
It doesn’t actually disable the SkyDrive integration.
The only way I found to turn it off was to use a Group Policy Setting.
VirtualBox did not work for me until I changed some hardware simulation parameter from the command line. Thus my recommendation to use VMware Player.
A Microsoft account is required for Windows 8.1
Regarding SkyDrive – I need to do a bit more research in order to answer your question.