WiFi is everywhere. We use it daily, but it does not always work well. Sometimes we are in places with a weak signal, and we get frustrated by low speeds and instability. If that is the case for you, and you have a Windows laptop, tablet or hybrid device with an Intel processor, then you can improve your speed quite a lot, by fiddling with just two settings, if that device also has an Intel wireless network card. Here's how to enjoy faster WiFi, on Windows devices with Intel wireless network adapters:
Two wireless network card driver settings that can seriously enhance your speed on WiFi
Laptops, tablets and hybrid devices with wireless network cards made by Intel have two driver settings that, when enabled and configured correctly, can enhance the speed you get in areas where your WiFi tends to be slow. The two are Throughput Booster and Transmit Power.
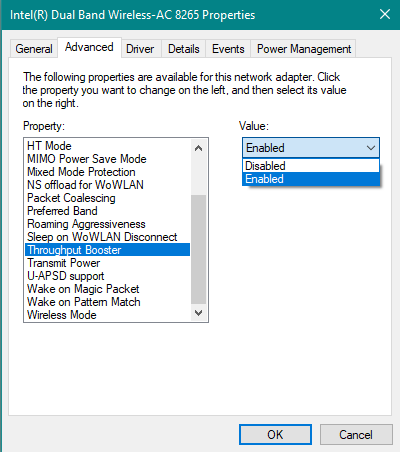
Throughput Booster enhances the wireless transmission throughput by enabling packet bursting. The default setting is Disabled. When activated, your wireless network card does not allow for other clients to have equal access to the available wireless bandwidth. Therefore, you get more bandwidth while others get less. Streaming video, uploading large files, and sharing content, are examples of applications that would benefit from enabling Throughput Booster. If you need the maximum throughput, you should enable this setting, especially if you are in an area with a small number of wireless clients. It should be disabled in an environment where equal access by all clients is a priority or in wireless networks that use older networking standards like 802.11b or 802.11g.
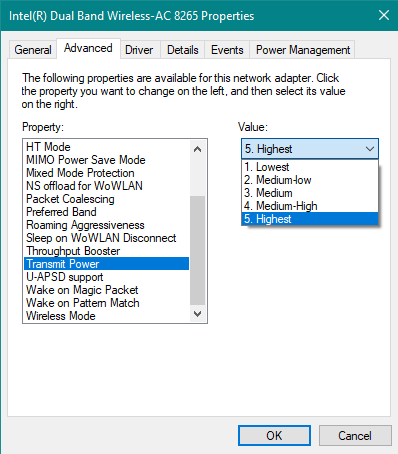
Transmit Power sets the transmission power for the wireless signal from your network card. Intel sets the transmission power at the lowest possible level still compatible with wireless communication quality. The setting allows the maximum number of wireless devices to operate in dense areas. It reduces interference with other devices that share the wireless radio spectrum. If you decrease the transmit power, you reduce the radio coverage of your network card. If you increase the transmit power, you get better radio coverage from your network card. You can choose between five levels of transmission power:
- Lowest: Sets your WiFi network card to the lowest transmission power. You should use this level in high traffic areas to improve overall transmission quality and avoid congestion or interference with other devices. This will work well if you are relatively close to the router or the access point emitting the wireless signal that you are connected to.
- Medium-low, Medium, or Medium-high: this achieves the best balance between transmission power and network congestion. These levels are usually set based on the legal requirements in each country where devices are sold.
- Highest: sets the transmission level of your wireless network adapter to its maximum. This way you achieve the maximum possible performance and range from your network card. Intel advises users to use this setting in environments with a limited number of wireless devices.
If you would like to learn more about Intel wireless adapter settings, go to this page: Advanced Intel® Wireless Adapter Settings.
Real-life test: You can double the speed of WiFi by enabling and configuring these settings!
We wanted to see the real-life impact of fiddling with these settings, so we took two different laptops with Intel network cards and Windows 10 installed: Lenovo Legion Y520 with an Intel Dual Band Wireless-AC 8265 network card and an HP Spectre 13t with an Intel Dual Band Wireless-AC 8260 network card.
We first tested the wireless network speed with Throughput Booster disabled and Transmit Power set to Lowest. We used both laptops in different apartments, with different wireless routers, in the rooms were we had the lowest speed on WiFi, in each of the two apartments. The speed measurements were made with SpeedTest. The Lenovo Legion Y520 had a speed of 43.81 Mbps for the download and 10.01 Mbps for the upload.
We then enabled Throughput Booster and set Transmit Power set to Highest. The same laptop, in the same room, enjoyed a considerable increase in speed, up to 101.77 Mbps for the download and 56.38 Mbps for the upload. Also, the ping reply decreased considerably from 30 ms to 4 ms. It is a big improvement!
We then took the HP Spectre 13t, and we used it in a different apartment, with Throughput Booster disabled and Transmit Power set to Lowest.
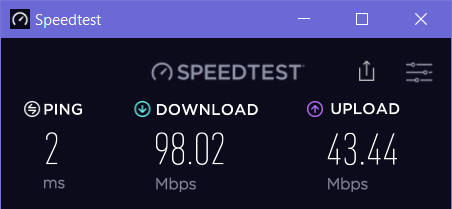
We went to the room where we tend to have the lowest speed, and the laptop had a good result but lower than what our WiFi can deliver in other rooms: 98.02 Mbps for the download and 43.44 Mbps for the upload.
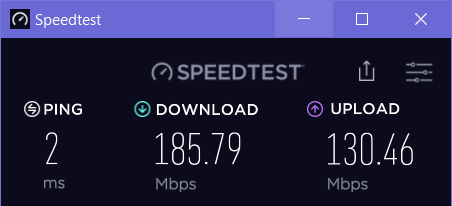
We then enabled Throughput Booster and set Transmit Power to Highest. The same laptop, in the same room, went to 185.79 Mbps for the download and 130.46 Mbps for the upload. Again, a massive increase in speed.
We made the same measurements in other rooms that are closer to the router and noticed a crucial trend: these settings improve your WiFi speed only in areas where the wireless signal is weaker. When we went to the rooms where the two routers were placed, both laptops did not enjoy an increase in speed. In those rooms, there was no noticeable difference when we fiddled with these settings.
How to enable Throughput Booster and set Transmit Power set to Highest
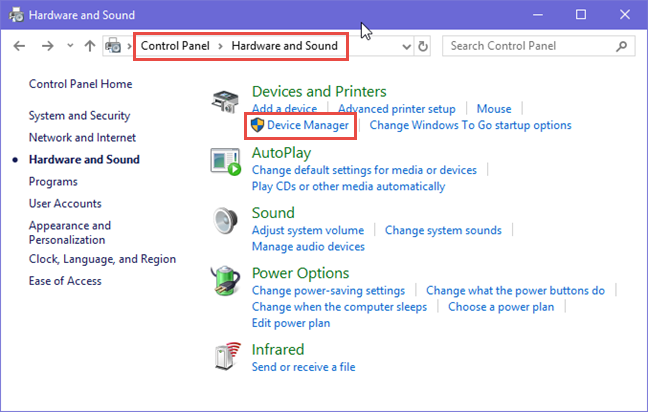
To find these two settings and fiddle with them, you need to edit the properties of your wireless network card. The quickest method (but not the only one) is to open the Device Manager. To do that, go to "Control Panel -> Hardware and Sound -> Device Manager." Please note that you have to be logged in with an administrator user account, for this to work.
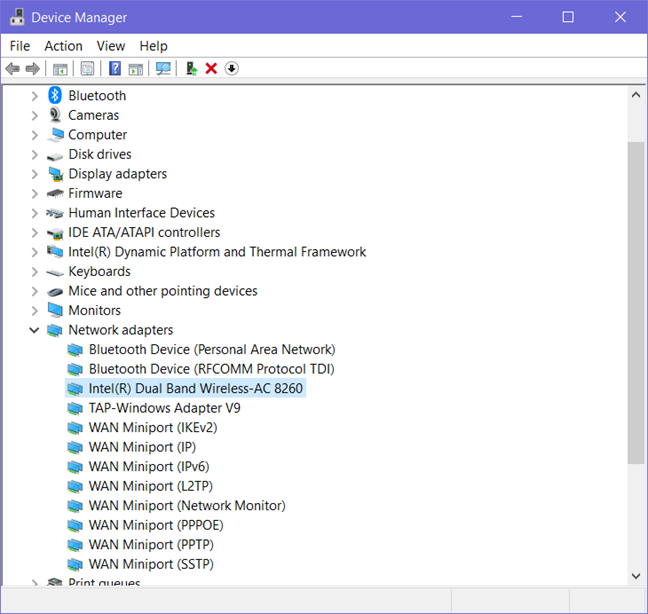
In the Device Manager window, scroll down to Network adapters and double click on it. Then, find your wireless network card and double-click (or double-tap) on it.
NOTE: At this step you see the name of your wireless network card. It may be Intel Dual Band Wireless-AC followed by a number, like it is for us, or something else like Realtek Wireless LAN Adapter or Broadcom Wireless LAN adapter.
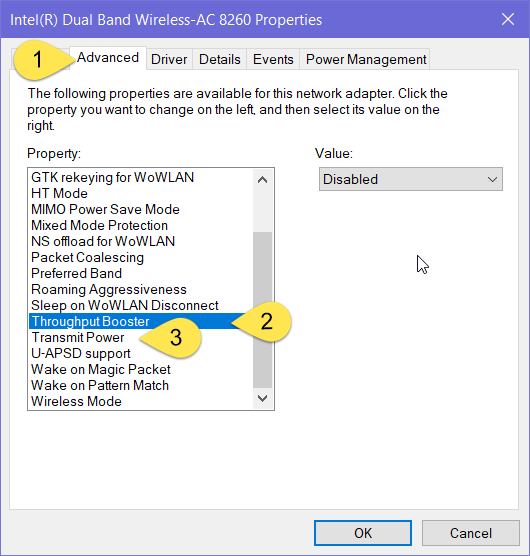
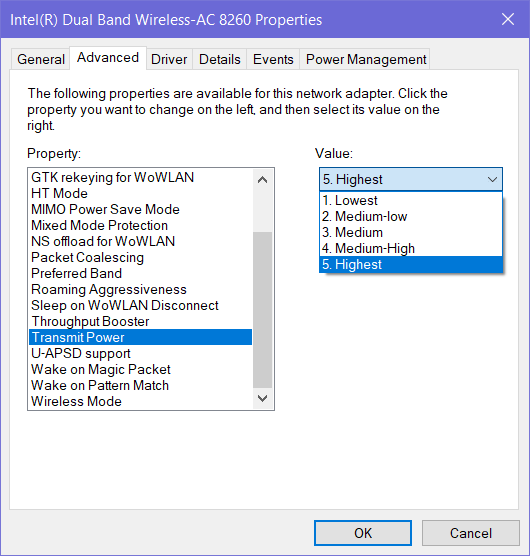
The properties window opens for your wireless network card. Its name might be different than what you see in our screenshots. There, go to the Advanced tab. You then see a list of settings for your network card. The list of settings may vary on your Windows laptop or device. Scroll down until you find Throughput Booster and Transmit Power, highlighted below.
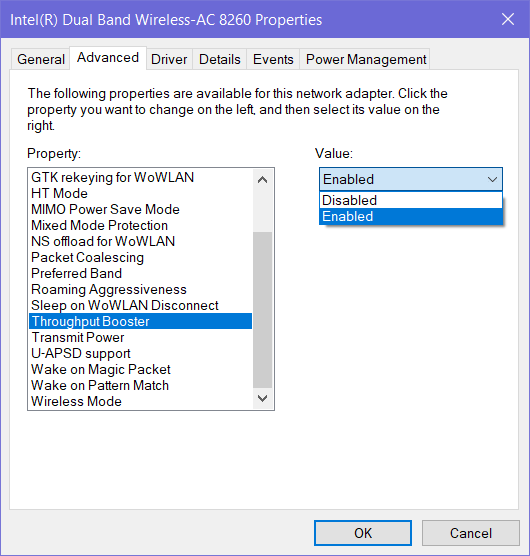
Use the drop-down list of values for Throughput Booster and choose Enabled.
Use the drop-down list of values for Transmit Power and choose Highest.
When you are done setting things the way you want to, click or tap OK to apply your changes. Your wireless network card will reset and stop working for a couple of seconds. After it resets, it connects automatically to the same WiFi as before, and you can enjoy the benefits of changing these settings. Test your speed on WiFi and see if it works better.
What if I do not have an Intel wireless network card?
Other manufacturers of wireless network cards may or may not have similar settings in their Windows drivers. You should use our tutorial to access all the available properties for your network card and see if there are similar settings for you to change. If there are, test your changes as we did: before and after. If you see an improvement leave your changes enabled. If you do not, revert to the default settings. If your wireless network card starts misbehaving, you can reset it back to its defaults, using this tutorial: How to reset all your Windows 10 network adapters with just 6 clicks.
Did you enjoy an increase of speed on WiFi?
We recommend that you follow our tutorial and make tests before and after making these changes. Did you notice an increase in speed? Again, the trend we identified is that these changes provide meaningful improvements only in areas were your WiFi signal tends to be weaker. Do not hesitate to leave a comment and share your experience with other readers and us.


 17.01.2018