

An ISO file (or an IMG file) is a disk image that stores a disk’s content and structure, whether it’s a CD, DVD, Blu-Ray disc, hard disk drive, or USB flash drive, into a single file. Windows 10 and Windows 11 have a built-in app named Windows Disc Image Burner, which can be used to burn disc images. The app is easy to use and helpful, eliminating the need for third-party apps to complete the task. Here is how to burn ISO files (and other disc images) to Blu-Ray, DVD, or CD in Windows 10 and Windows 11:
TIP: To understand what disc images are and how they work, you should first read: What is a disc image file (ISO, NRG, BIN)?
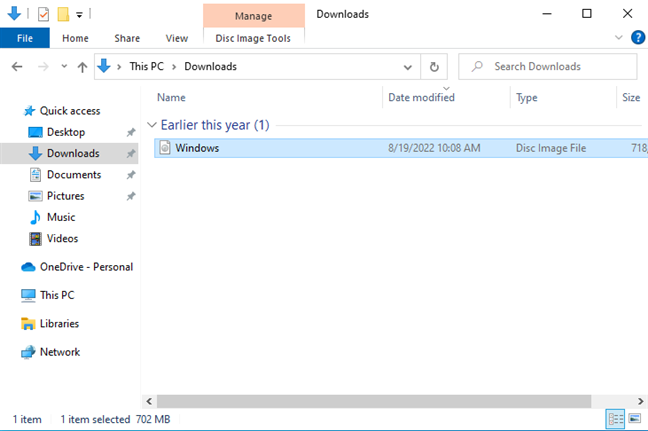
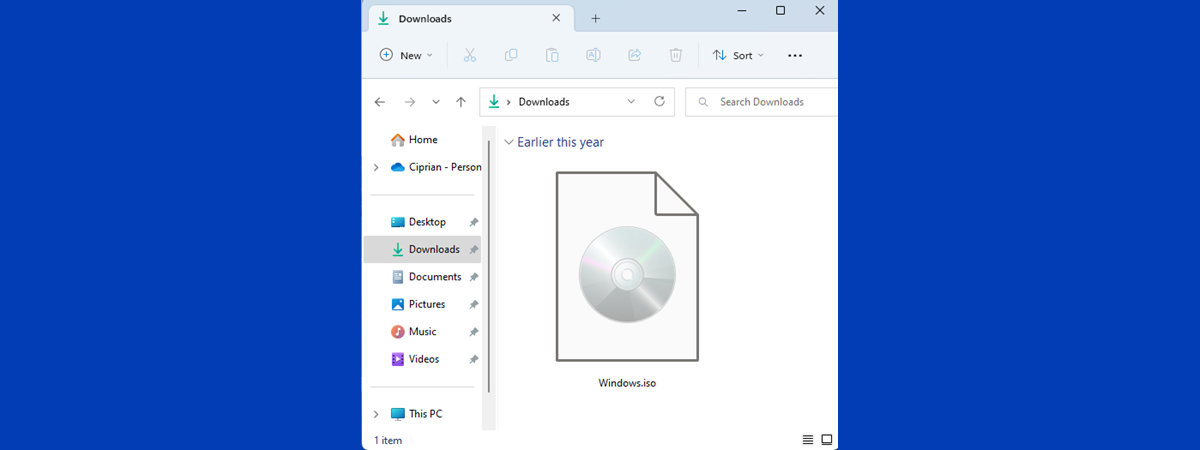
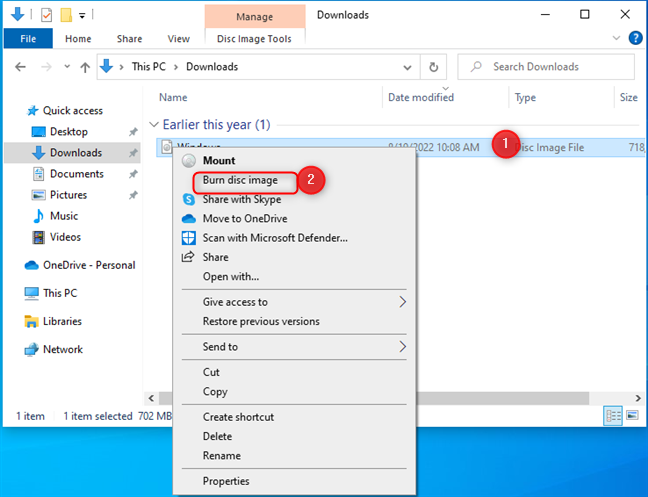
 Navigate to the ISO file in File Explorer
Next, click or tap the Disc Image Tools tab on the ribbon and then the Burn button.
Navigate to the ISO file in File Explorer
Next, click or tap the Disc Image Tools tab on the ribbon and then the Burn button.
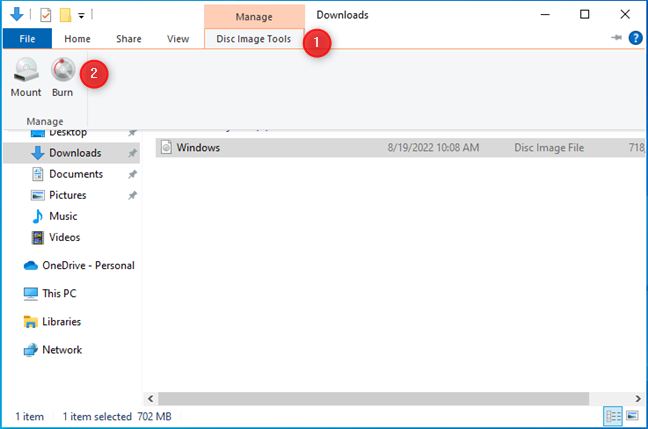
 Click Disc Image Tools > Burn
This action opens the Windows Disc Image Burner app.
Click Disc Image Tools > Burn
This action opens the Windows Disc Image Burner app.
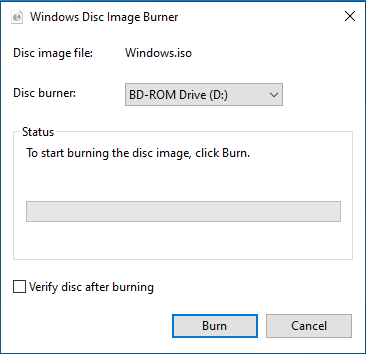
 The Windows Disc Image Burner app
Another way to open it is to right-click (or press and hold) on the ISO file and choose to Burn disc image.
The Windows Disc Image Burner app
Another way to open it is to right-click (or press and hold) on the ISO file and choose to Burn disc image.
 Right-click and choose Burn disc image
Then, skip the next section and follow the instructions for burning a disc image with Windows Disc Image Burner.
Right-click and choose Burn disc image
Then, skip the next section and follow the instructions for burning a disc image with Windows Disc Image Burner.
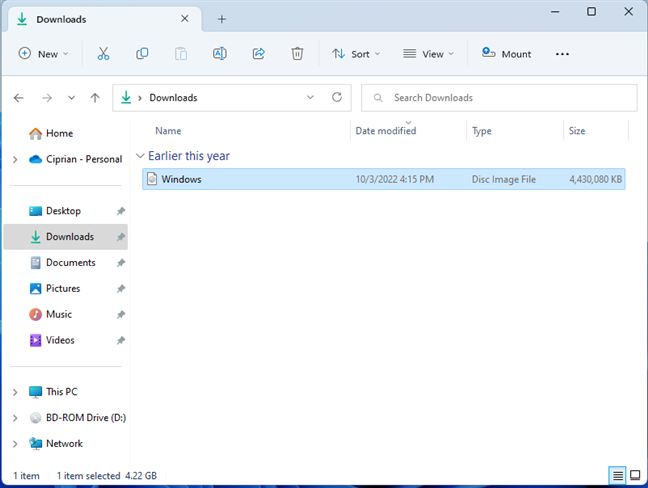
 Navigate to the ISO file in File Explorer
In the menu bar at the top, click or tap See more (three dots) and choose Burn in the menu that opens. If the File Explorer window is bigger on your screen, you might see the Burn button directly next to Mount, in the menu bar.
Navigate to the ISO file in File Explorer
In the menu bar at the top, click or tap See more (three dots) and choose Burn in the menu that opens. If the File Explorer window is bigger on your screen, you might see the Burn button directly next to Mount, in the menu bar.
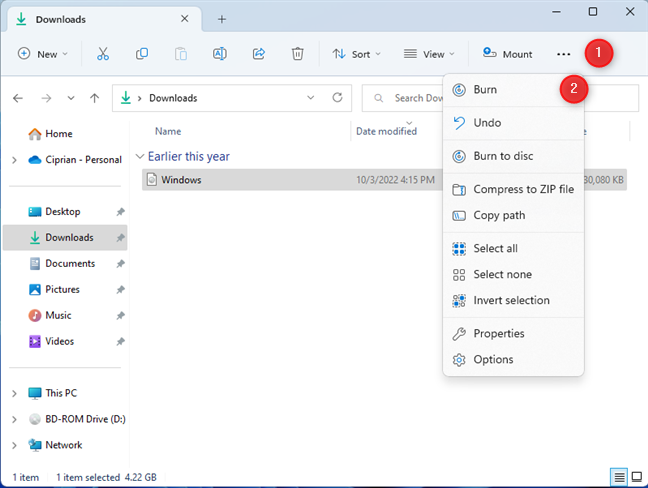 Click or tap See more > Burn
IMPORTANT: Do not choose Burn to disc. This option copies the ISO file to the disc; it doesn’t burn the contents of the ISO file onto the disc. Therefore, the result will be a DVD or Blu-Ray disc with the ISO file from your computer.
The Windows Disc Image Burner app opens, as seen in the screenshot below.
Click or tap See more > Burn
IMPORTANT: Do not choose Burn to disc. This option copies the ISO file to the disc; it doesn’t burn the contents of the ISO file onto the disc. Therefore, the result will be a DVD or Blu-Ray disc with the ISO file from your computer.
The Windows Disc Image Burner app opens, as seen in the screenshot below.
 The Windows Disc Image Burner app
Another way of opening Windows Disc Image Burner is to right-click (or press and hold) on the ISO file you want to burn and then choose to Show more options.
The Windows Disc Image Burner app
Another way of opening Windows Disc Image Burner is to right-click (or press and hold) on the ISO file you want to burn and then choose to Show more options.
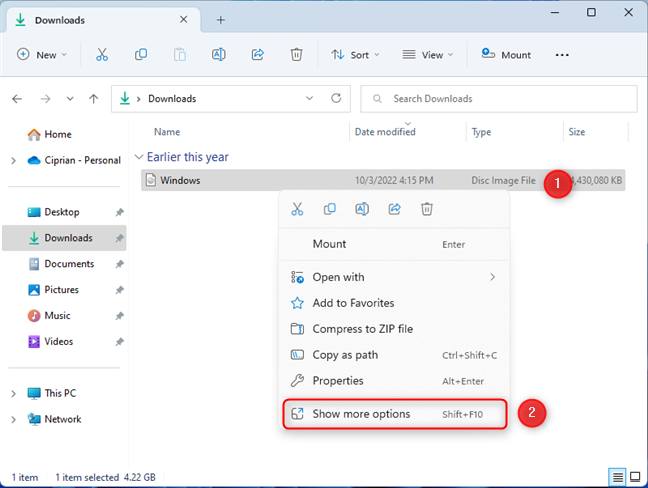 Right-click the ISO file and choose Show more options
The classic right-click menu is shown, where you find the Burn disc image option. Click or tap on it.
Right-click the ISO file and choose Show more options
The classic right-click menu is shown, where you find the Burn disc image option. Click or tap on it.
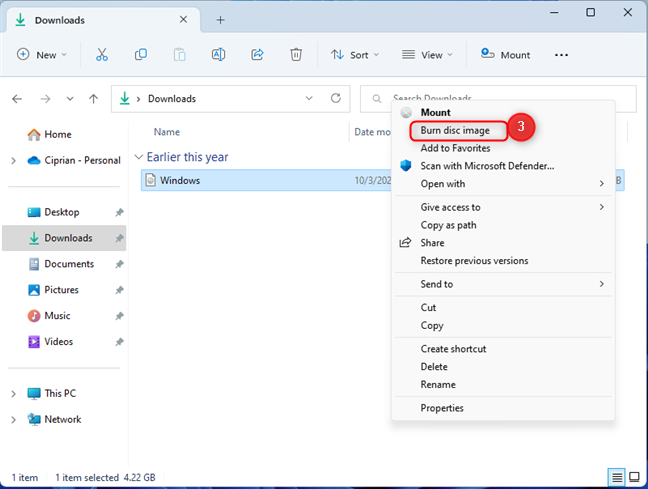
 Choose Burn disc image
TIP: If you don’t like the new right-click menu from Windows 11, here’s how to restore the old right-click menu.
Follow the instructions from the next section on how to burn the disc image you’ve selected.
Choose Burn disc image
TIP: If you don’t like the new right-click menu from Windows 11, here’s how to restore the old right-click menu.
Follow the instructions from the next section on how to burn the disc image you’ve selected.
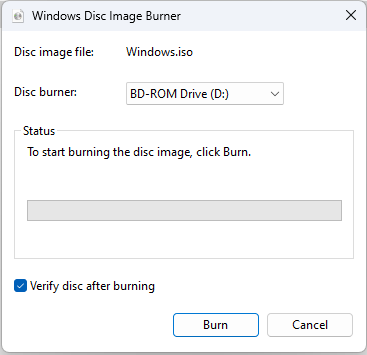
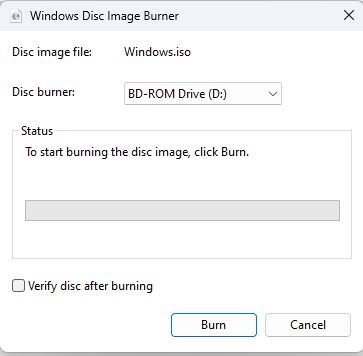
 Select Verify disc after burning and press Burn
The app first burns the disc image to the recordable disc (Blu-Ray, DVD, CD). Then, it finalizes the disc and verifies it (if you’ve selected this option). For each step, you see a progress bar similar to the screenshot below.
Select Verify disc after burning and press Burn
The app first burns the disc image to the recordable disc (Blu-Ray, DVD, CD). Then, it finalizes the disc and verifies it (if you’ve selected this option). For each step, you see a progress bar similar to the screenshot below.
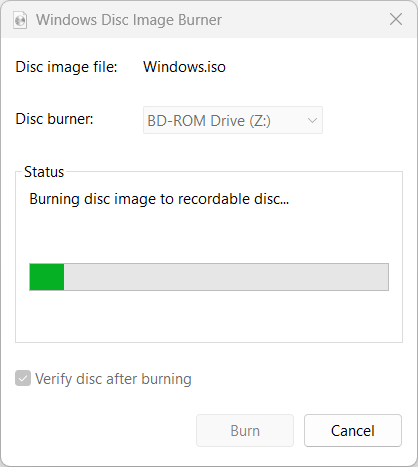
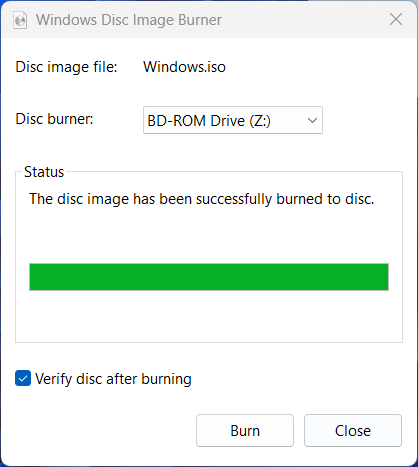
 See the progress of the burning process
When everything is done, the Status section lets you know that “The disc image has been successfully burned to disc.” You also see the progress bar reaching its end, similar to the screenshot below. Click or tap Close.
See the progress of the burning process
When everything is done, the Status section lets you know that “The disc image has been successfully burned to disc.” You also see the progress bar reaching its end, similar to the screenshot below. Click or tap Close.
 When the disc is done, press Close
Your computer automatically ejects the disc on which you’ve burned the content of the ISO file. Take it out, and close the disc burner.
When the disc is done, press Close
Your computer automatically ejects the disc on which you’ve burned the content of the ISO file. Take it out, and close the disc burner.
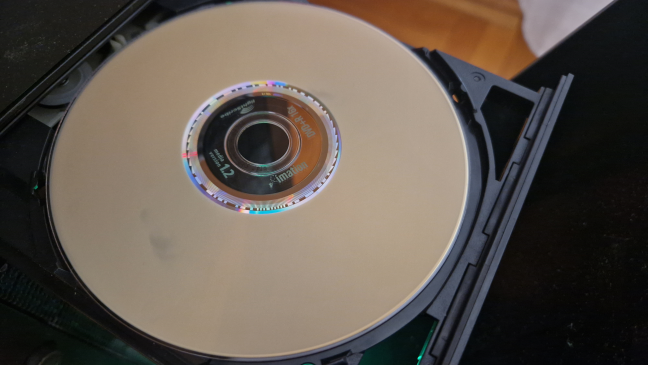
 The disc is ejected automatically
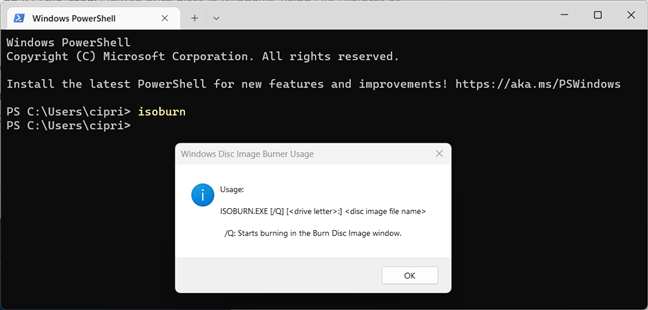
 How to use isoburn
You can start the burning process using the following parameters:
How to use isoburn
You can start the burning process using the following parameters:
 Burning an ISO file with isoburn
After you press Enter, you can watch the Windows Disc Image Burner do its thing automatically. The only downside is that you can’t use this command to verify the disc after the burning process is over. It doesn’t have a parameter for this feature.
Burning an ISO file with isoburn
After you press Enter, you can watch the Windows Disc Image Burner do its thing automatically. The only downside is that you can’t use this command to verify the disc after the burning process is over. It doesn’t have a parameter for this feature.
Windows Disc Image Burner: What is and how to open it
Windows Disc Image Burner is an app that can help you burn disc images for free without installing third-party software. The procedure for opening Windows Disc Image Burner is different in Windows 10 and Windows 11. However, the first step is to have the ISO file you want to burn available on your computer. Then, read the appropriate section depending on the Windows version you’re using.How to open Windows Disc Image Burner in Windows 10
On your Windows 10 computer, open File Explorer and navigate to the ISO file you want to burn. Select it with a click or tap on its name.How to open Windows Disc Image Burner in Windows 11
In Windows 11, open File Explorer and navigate to the ISO file you want to burn. Select it by clicking or tapping on it.How to burn a disc image (ISO file to Blu-Ray, DVD, or CD) with Windows Disc Image Burner
When you see the Windows Disc Image Burner window, select the drive you want to use for burning the disc in the Disc burner drop-down, and check whether you wish to Verify disc after burning. This check is useful because it confirms that everything went well, and you can use the Blu-Ray, DVD, or CD you’ve created on other computers and devices. To start the disc-burning process, click or tap Burn.BONUS: How to burn a disc image with isoburn (CMD, PowerShell, or Windows Terminal)
If you love the command line, you can use Command Prompt, PowerShell, or Windows Terminal to burn an ISO or IMG disc image file. First, open CMD, start PowerShell or Windows Terminal, depending on your preference. The command you use for burning disc images is:isoburn
or
isoburn.exe
If you want to familiarize yourself with its parameters, type it in and press Enter before running it to burn an ISO file to a disc. You should see a Windows Disc Image Burner Usage help message like the one below.
isoburn.exe /q [disc burning drive letter] [Path to ISO file]
The command is not case-sensitive, meaning it doesn't matter whether the path you enter has capital letters. Also, if your computer has only one drive that writes Blu-Ray discs or DVDs, you don’t need to specify the drive letter for the disc-burning drive. Windows knows it already. This letter is mandatory when you have two or more disc-burning drives.
The /q parameter is important because it tells Windows that you want to see the disc-burning window and follow the progress of the whole process. If you don’t use it, you won’t see anything.
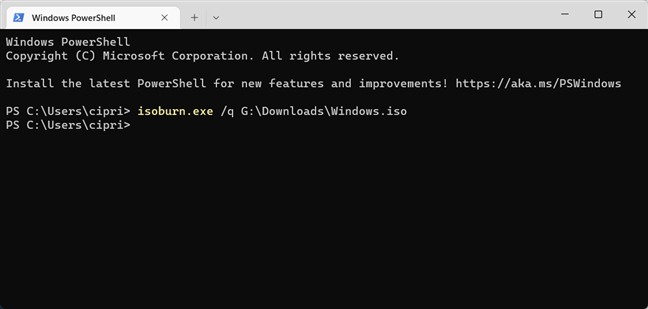
Here’s an example of how I used this command to burn an ISO file to a Blu-Ray disc:
isoburn.exe /q G:\Downloads\Windows.iso
“G:\Downloads\Windows.iso” is the path to the ISO file I wanted to be burned on a Blu-Ray disc. I didn’t specify the drive letter for the disc-burning drive.
Discussion (39)
I just burned my Dad’s funeral service video streamed on Facebook to DVD via OBS Studio to capture it from FB, and then “Burn Disc Image” in Windows 10. I just wish there was a way to specify the burn speed. I always pick a slower speed than the max, why risk rushing the process, right?
I have Windows 10, and the boxes that opened after I hit Windows + E looked nothing like the ones in the illustrations and did not have the same options. It went through the motions of writing, but rather than going to the disc it went to a queue “Waiting to be burned.” It refuses to actually write to the disc. I can play back blu ray discs on my optical drive fine, so I don’t think the problem is with the drive.
Just download and install freeware ImageBurn. THE most reliable ISO burning application,. EVER !!!
This is a great article! But alas, woe is me!
I tried to save the article to Evernote and it saves without the images?? Never had the problem before so how do I save with the images included?
A tutorial without pictures isn’t much good to me.
Thanks
When it said it was invalid, i still clicked Burn. The burn worked just fine. So happy.
even better, i went with right click and used the Open With, selected windows image burner, and it said my image wasn’t valid. but it lets me burn it anyway :/
we’ll see how it turns out when it’s done burning. 🙂
The “Burn Disc Image” prompt has disappeared from my stupid Windows Explorer.
Thank you, this article is a life saver! The “Burn Disc Image” prompt has disappeared from my stupid Windows Explorer.
Using Win 7-64 Pro.
Sorry Charlie. Trying to burn an iso to CD-R does NOT work in Win 7 x64. Maybe DVD’s work but I’m not gonna waste time finding out.
The isoburner.exe just HANGS…….you can’t kill it either…..have to reboot the computer to get access to your CD Rom drive …….z
Is it max speed? IMHO, the best speed for burning DVD is 4 X to get a good quality result.
Samuel, the feature is not gone from Windows 8.1. I’m using Windows 8.1 Professional and I can burn .iso files using this feature. Thanks
Ciprian, thanks for your prompt response. Btw, can you guess the burning speed based on your experiences using this feature? Is it max speed? IMHO, the best speed for burning DVD is 4 X to get a good quality result.
Hi Ciprian Adrian Rusen,
thanks for the guidance. Can we set the speed of burning with this program?
Samuel, the feature is not gone from Windows 8.1. I’m using Windows 8.1 Professional and I can burn .iso files using this feature.
As you can see in the screenshots above, there’s no option for setting the burning speed. 🙁
how to copy win 7 n win 8 in a single 8.4gb dvd like how win 7 32bit m 64bit exist together.
This does not apply to Windows 8.1. The feature is just gone.
Does anyone knnow if there is a way to recover the feature in 8.1?
Which feature to recover?
you can run isoburn.exe from the command line on Windows 8.1:]
isoburn [/Q] [
hi, I have dvd flick and I was wondering if anyone knew if I had to encode the same video every time I wanted to burn it onto a disc? For example….I encoded a video and it automatically burnt it after it was done encoding, if I wanted to make a second copy, would I have to do the encoding process again? or is the already encoded one saved in the computer somewhere where I can burn it again?
ye so id like to be able to select one from the command line?
Is there any way to select a DVD burner from the command line and has anyone figured out how to do it yet?
You have more than one DVD (or CD) burner installed on your computer?
hi.I have burned an image to a disk(DVD) but didn’t select the check box verify data to disk after burning.Now I have the disk and when I insert it,it shows the amount of free space it has but I don’t want to be so and I want to make like other disks(I mean I like the disk to be completely closed and not available to be written again)I’d be glad if you could help me.
I downloaded a .img file which I tried to burn into a CD, and after burning the disc, my computer cannot read it. I have tried burning the CD as .iso and .img extensions and with 3 different softwares (CD Clone, Daemon, and Roxio). Do you know what the problem could be and how could I get to burn the file correctly?
Thanks!
what is 0x80004500 error message on verify?
I was able to burn ONE whole disk successfully using this and now all subsequent burns give this error message. Doesn’t matter if data or video or img or iso.
Imgburn which once worked fine is giving me similar grief. I’m thinking some sort of DMA problem but it is controlled by my bios and if i uncheck that option, doesnt seem to make a difference. Everything updated as best as possible. <2yrs old win7 x64 Gateway but unfortunately cannot find out what brand burner. tried several methods with all generic results. So far it seems the disks burned are OK but when I try to find what this msg means all I find is Windows re-install your OS brilliant techie advice. Any idea?
Oh yea, when imgburn shows a verify error, the disk is always toast. At least the Win ones seem usable...
This error code is too generic. Can you give more info, a complete description of the error message, a picture, something more?
Without more info, I won’t be able to help you.
I am having the same problem. i have tried several different burners all certified to work with windows 7. i get the 0x80004005 error after trying to burn than verify the data and system stops responding and fails any suggestions? it doesnt matter if i use roxio 2011 or nero 10 or windows burner nothin works the dvd burner was working perfectly in fact all of them are in good working order please help i have gone thru 30 to 40 discs ruined due to this problem any help would be greatly appreciated.
It is very hard to identify a root cause for this error. It is very generic and appears in many usage scenarios, not only when burning discs. From what I’ve read about it, it looks like that it is generated by some possible corrupted files (generally files of your operating system). I think it might help (but i cannot guarantee) for you to try the following:
– Test a Partition for Errors with Check Disk – test all your partitions (starting with the one where you installed Windows 7)
– Command Prompt – Repair Missing or Corrupt Files
If these two things don’t work… then I’m out of ideas. A reinstall of your OS might help but again… cannot guarantee anything.
I was trying to burn ISO of windows but couldn’t find any free software that will do it. Anyone has clue please let me know. plz drop me an email to https://www.facejar.com/member/profile/ANNA-JADHAV/78566/
hai tq for the guide. But can Windows Disc Image Burner burn .iso file (7gb) that is using 2 dvd.
your help is much appreciated.
For that .iso file of 7GB you need a special dual-layer DVD which can be burned with up to 8 GB. You cannot burn an .iso file this big on 2 DVD without ruining it.
For more info about dual-layer, read here: https://en.wikipedia.org/wiki/DVD#Dual-layer_recording
Tq caprian for your quick reply, i will get the special dual layer dvd for my project.
but is there anyway we can split the .iso into 2 dvd. any software can handle it?
You can use Nero which does the job automatically or you can use WinRAR or 7zip (which is free) to split the 8GB ISO file into two 4,5GB archives. Also, IMGBurn (which is also free) might have this option too, but I don’t know for sure.
With 7zip this is what you have to do:
1. Right-click on the ISO file, select 7zip and then the ‘Add to archive’ option.
2. In the new window click the drop-down menu from the ‘Split to volumes, bytes’ section and select the ‘4480M – DVD’ option.
3. Click on OK and wait for the application to finish the archives.
Tq george for your quick reply.
i will take you advice, fyi i already manage to solve the problem. im using PowerISO.
thanks again.
rgds
You can’t create ISO files or copy DVD’s with Windows build-in tools. However, you can use third party freeware software like CDburnerXP for burning DVDs and ISO Recorder for creating ISO files.
Hi,
What about creating an ISO? Can it do that?
What about a simple disk copy of a non-protected DVD? I made a DVD with DVD maker, but now I want to copy it and there doesn’t seem to be a way (short of redoing it).
Thanks Basel. We try as much as possible to anticipate the problems newbies might have with Windows 7 applications. 🙂
Hello George,
That is a great post. Thank You.
I like how you ent into detail on the “Open With” part. Good anticipation for win 7 newbies.
Cheers
Basel