


Did you just buy a brand new TP-Link Wi-Fi 6 router and you want to configure it for the first time? Do you need to set up a TP-Link router without an Ethernet cable, using a laptop or a smartphone and Wi-Fi? In that case, we’ve got you covered. Here’s the most complete guide on how to set up any TP-Link Wi-Fi 6 router, so that you can start using your network as fast as possible:
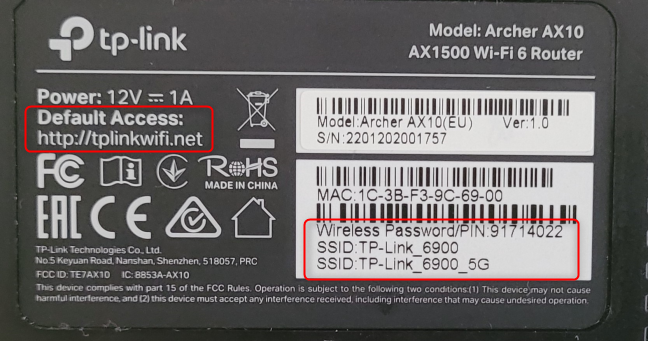
 See the Wi-Fi details on the bottom of your TP-Link router
Write down those details, as they will be helpful during the setup process. You should also know the internet connection details from your internet provider: the type of internet connection you have, any necessary username and password, and other connection details.
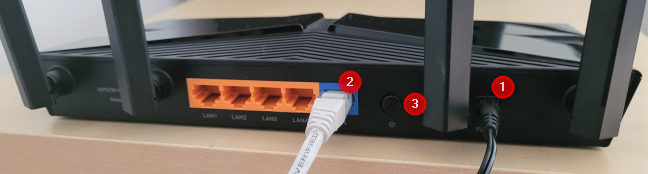
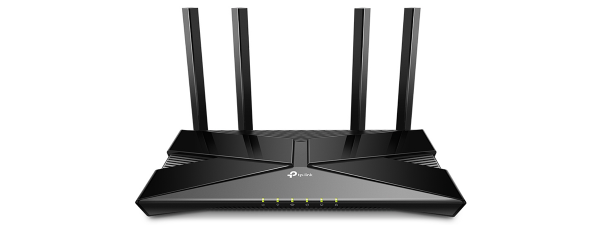
Next, take your router and connect it to a power source, using the power adapter that’s bundled with it. Use a network cable to connect your TP-Link Wi-Fi 6 router to the modem, router or the network of your internet service provider (ISP). Plug this cable into the WAN port on the back of your router, which has a different color than the other Ethernet ports. On a TP-Link Archer AX10, the WAN port is colored in blue. Last but not least, push the Power button on the back of the router to turn it on.
See the Wi-Fi details on the bottom of your TP-Link router
Write down those details, as they will be helpful during the setup process. You should also know the internet connection details from your internet provider: the type of internet connection you have, any necessary username and password, and other connection details.
Next, take your router and connect it to a power source, using the power adapter that’s bundled with it. Use a network cable to connect your TP-Link Wi-Fi 6 router to the modem, router or the network of your internet service provider (ISP). Plug this cable into the WAN port on the back of your router, which has a different color than the other Ethernet ports. On a TP-Link Archer AX10, the WAN port is colored in blue. Last but not least, push the Power button on the back of the router to turn it on.
 The first steps to perform on your TP-Link Wi-Fi 6 router
Look at the LEDs on the front of your TP-Link Wi-Fi 6 router. Wait for them to turn on and become stable. The internet connection LED should light up in orange or red because your router can’t connect to the internet.
The first steps to perform on your TP-Link Wi-Fi 6 router
Look at the LEDs on the front of your TP-Link Wi-Fi 6 router. Wait for them to turn on and become stable. The internet connection LED should light up in orange or red because your router can’t connect to the internet.
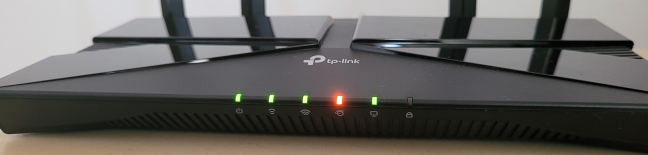
 See whether the LEDs are turned on on your TP-Link router

 Connect your PC to the TP-Link router using a cable
If you don’t have a network cable, or you prefer Wi-Fi, use your laptop to connect to the wireless network emitted by the TP-Link router. See the connection details found on the sticker mentioned earlier in this guide. If you need help connecting to wireless networks, read: How to connect to WiFi from Windows 10.
If you prefer a mobile device such as an Android smartphone or an iPhone, connect your device to the Wi-Fi broadcast by the TP-Link Wi-Fi 6 router. Here is a guide to help you with that: How to connect an Android phone to a Wi-Fi network: 3 ways.
Connect your PC to the TP-Link router using a cable
If you don’t have a network cable, or you prefer Wi-Fi, use your laptop to connect to the wireless network emitted by the TP-Link router. See the connection details found on the sticker mentioned earlier in this guide. If you need help connecting to wireless networks, read: How to connect to WiFi from Windows 10.
If you prefer a mobile device such as an Android smartphone or an iPhone, connect your device to the Wi-Fi broadcast by the TP-Link Wi-Fi 6 router. Here is a guide to help you with that: How to connect an Android phone to a Wi-Fi network: 3 ways.
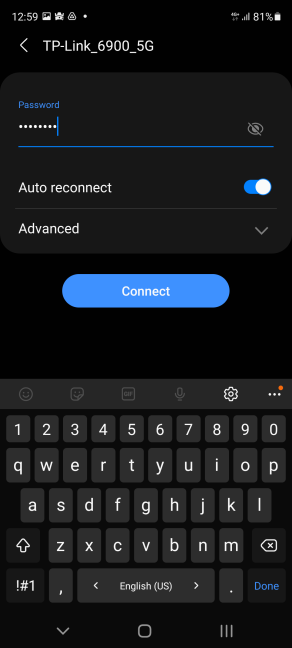
 Connect to the Wi-Fi on your smartphone
Now that you are connected to the network managed by your TP-Link Wi-Fi 6 router, you can set it up. If you are using a desktop PC or a laptop, open a web browser and follow the next section from this guide. If you are using a smartphone or a tablet, read the section dedicated to using TP-Link’s Tether app for setting up your router.
Connect to the Wi-Fi on your smartphone
Now that you are connected to the network managed by your TP-Link Wi-Fi 6 router, you can set it up. If you are using a desktop PC or a laptop, open a web browser and follow the next section from this guide. If you are using a smartphone or a tablet, read the section dedicated to using TP-Link’s Tether app for setting up your router.
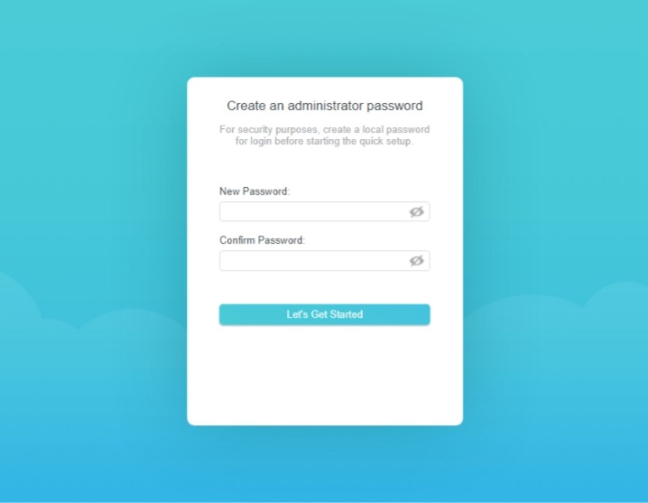
 Set up the admin password for your TP-Link router
TIP: If the setup page doesn’t load, it means your TP-Link router has a different IP address than the one we mentioned earlier. To help you find it, read: How do I find my router's IP address? The complete guide. You may also want to know how to change the language used by your TP-Link router.
At the next step, your TP-Link Wi-Fi 6 router asks you to select the time zone you’re in. This allows the router to synchronize the time and related settings to your internet service provider and also adjust its settings based on the area you are in and its legal requirements. Click inside the Time Zone drop-down list, choose the appropriate zone for your country, and press Next.
Set up the admin password for your TP-Link router
TIP: If the setup page doesn’t load, it means your TP-Link router has a different IP address than the one we mentioned earlier. To help you find it, read: How do I find my router's IP address? The complete guide. You may also want to know how to change the language used by your TP-Link router.
At the next step, your TP-Link Wi-Fi 6 router asks you to select the time zone you’re in. This allows the router to synchronize the time and related settings to your internet service provider and also adjust its settings based on the area you are in and its legal requirements. Click inside the Time Zone drop-down list, choose the appropriate zone for your country, and press Next.
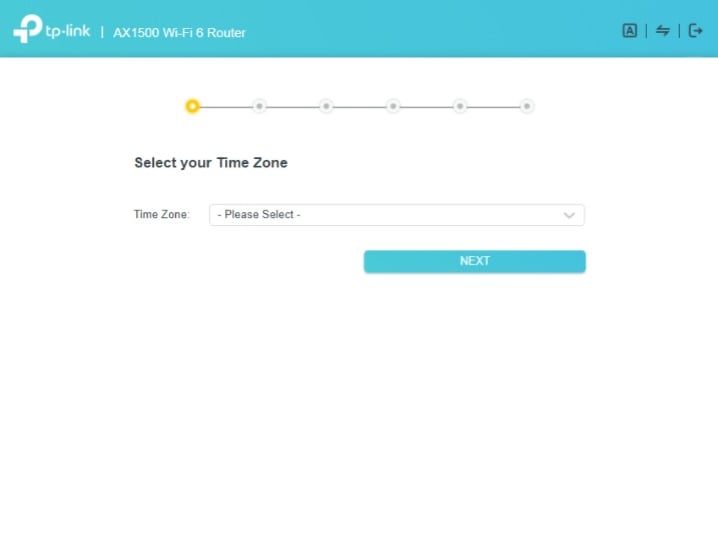
 Select the time zone for your TP-Link router
The TP-Link setup wizard asks you to select the internet connection type that you have. If you don’t know it, it is a good idea to press AUTO DETECT and wait for a couple of seconds. The router should do a good job at detecting your internet connection type. After the connection type is selected, press Next.
Select the time zone for your TP-Link router
The TP-Link setup wizard asks you to select the internet connection type that you have. If you don’t know it, it is a good idea to press AUTO DETECT and wait for a couple of seconds. The router should do a good job at detecting your internet connection type. After the connection type is selected, press Next.
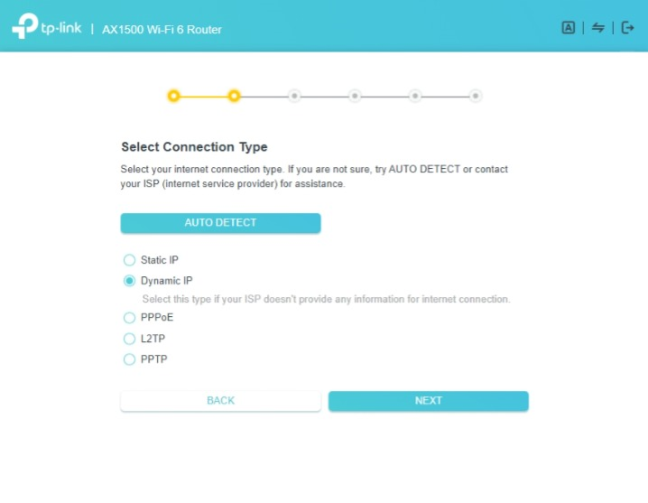 Select the internet connection type
Depending on the internet connection type, you may need to enter additional information that the TP-Link router then uses to connect to the internet:
Select the internet connection type
Depending on the internet connection type, you may need to enter additional information that the TP-Link router then uses to connect to the internet:
 Enter the internet connection information
Now it is time to personalize the wireless settings on your TP-Link router. By default, the router enables the Smart Connect feature that uses the same network name for both the 2.4 GHz and 5 GHz bands. While this is easy to use for most people, you may want to separate the Wi-Fi networks broadcast on each of the two bands. If that is the case for you too, uncheck the Smart Connect checkbox.
Enter the internet connection information
Now it is time to personalize the wireless settings on your TP-Link router. By default, the router enables the Smart Connect feature that uses the same network name for both the 2.4 GHz and 5 GHz bands. While this is easy to use for most people, you may want to separate the Wi-Fi networks broadcast on each of the two bands. If that is the case for you too, uncheck the Smart Connect checkbox.
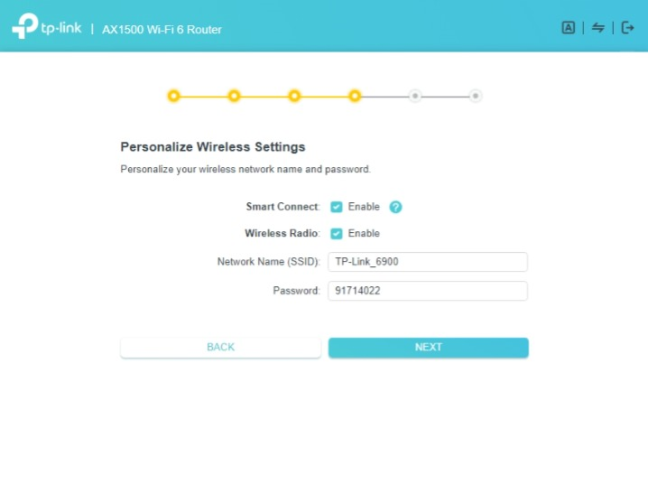 Personalize the wireless settings on the TP-Link router
Check the box that says “Set Each Band Separately,” and you can set up the Wi-Fi on each band individually. Enter the network name you want to use for the 2.4 GHz band and the password that people will use to connect to it. Then, do the same for the 5 GHz band, and press Next.
Personalize the wireless settings on the TP-Link router
Check the box that says “Set Each Band Separately,” and you can set up the Wi-Fi on each band individually. Enter the network name you want to use for the 2.4 GHz band and the password that people will use to connect to it. Then, do the same for the 5 GHz band, and press Next.
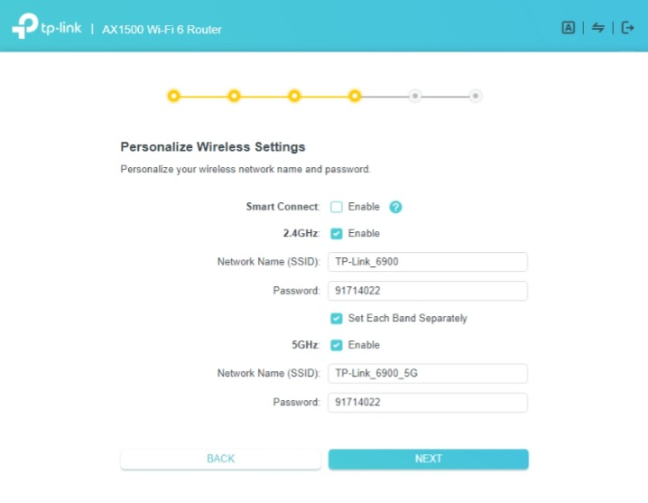 Set up each Wi-Fi band individually
NOTE: You can set up different network names and passwords for each band. However, for simplicity, you may just want to use different network names to tell each band apart and the same password on both. Again, make sure that the Wi-Fi password is not the same as the administrator password for your router. If they are the same, anyone with access to your Wi-Fi can hack or change your TP-Link Wi-Fi 6 router settings with maximum ease.
After you have set up the wireless settings, the TP-Link router tests whether it can connect to the internet. If the test is successful, the router checks for firmware updates, and if it finds any, asks you to upgrade. If you follow this recommendation, expect the upgrade to take a couple of minutes and wait for your router to reboot. Then, the setup wizard displays a summary of your settings.
Set up each Wi-Fi band individually
NOTE: You can set up different network names and passwords for each band. However, for simplicity, you may just want to use different network names to tell each band apart and the same password on both. Again, make sure that the Wi-Fi password is not the same as the administrator password for your router. If they are the same, anyone with access to your Wi-Fi can hack or change your TP-Link Wi-Fi 6 router settings with maximum ease.
After you have set up the wireless settings, the TP-Link router tests whether it can connect to the internet. If the test is successful, the router checks for firmware updates, and if it finds any, asks you to upgrade. If you follow this recommendation, expect the upgrade to take a couple of minutes and wait for your router to reboot. Then, the setup wizard displays a summary of your settings.

 A summary of your settings
IMPORTANT: If the internet connection test is not successful, the setup process fails. The TP-Link router asks you to try the same test again or go back to the step where you choose the internet connection type. If that happens, make sure that all cables are correctly connected to the router and that you enter accurate internet connection information. If you are unsure of this, it is a good idea to connect the tech support service provided by your ISP, TP-Link, or both.
After you press Next, TP-Link asks if you want to log in and bind your router to your TP-Link ID, so that you can manage your network remotely using their mobile Tether app. If you want that, enter the email address and password associated with your TP-Link ID, or press Sign Up and create a free account right away.
A summary of your settings
IMPORTANT: If the internet connection test is not successful, the setup process fails. The TP-Link router asks you to try the same test again or go back to the step where you choose the internet connection type. If that happens, make sure that all cables are correctly connected to the router and that you enter accurate internet connection information. If you are unsure of this, it is a good idea to connect the tech support service provided by your ISP, TP-Link, or both.
After you press Next, TP-Link asks if you want to log in and bind your router to your TP-Link ID, so that you can manage your network remotely using their mobile Tether app. If you want that, enter the email address and password associated with your TP-Link ID, or press Sign Up and create a free account right away.
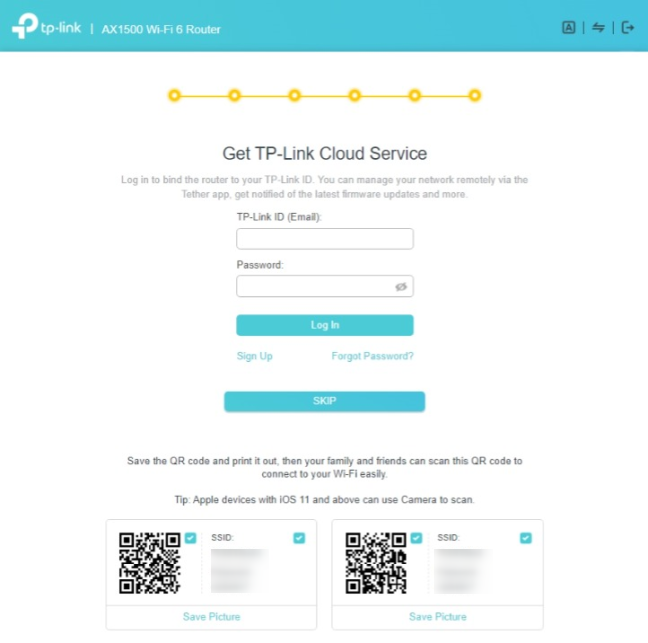
 Add a TP-Link ID to your router
The initial setup is now finally over, and you can see your router’s firmware settings and change other aspects of its functioning.
Add a TP-Link ID to your router
The initial setup is now finally over, and you can see your router’s firmware settings and change other aspects of its functioning.
 The firmware on your TP-Link router
But more on that and how to fine-tune all the settings of your TP-Link Wi-Fi 6 router in an upcoming guide. For now, your network is up and running, and you can connect all your devices to it.
The firmware on your TP-Link router
But more on that and how to fine-tune all the settings of your TP-Link Wi-Fi 6 router in an upcoming guide. For now, your network is up and running, and you can connect all your devices to it.
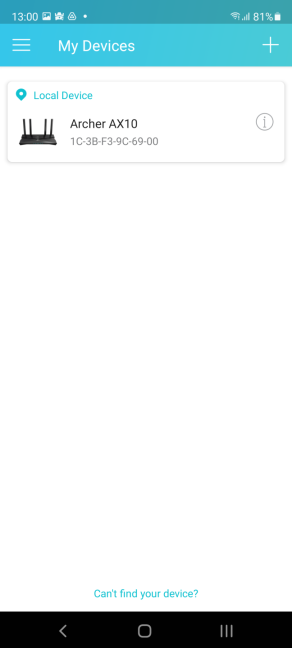 Tap on the name of your TP-Link Wi-Fi 6 router
If the app says that it has detected an unknown device listed generically as a TP-Link Router, you should try again. Also, make sure that you are connected to the Wi-Fi emitted by the router you want to set up and not to another.
Then, you are asked to create a password to manage the TP-Link router. The password must have at least six characters and include letters, numbers, or special characters. Type the password, confirm it, and then tap Create.
Tap on the name of your TP-Link Wi-Fi 6 router
If the app says that it has detected an unknown device listed generically as a TP-Link Router, you should try again. Also, make sure that you are connected to the Wi-Fi emitted by the router you want to set up and not to another.
Then, you are asked to create a password to manage the TP-Link router. The password must have at least six characters and include letters, numbers, or special characters. Type the password, confirm it, and then tap Create.
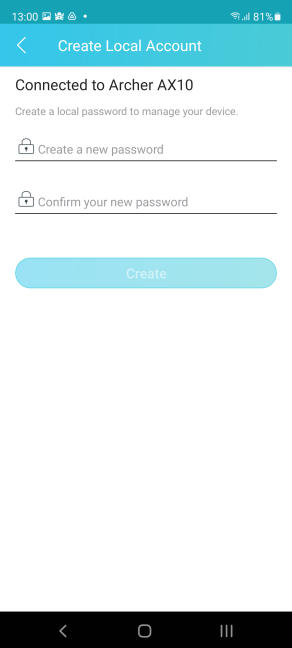 Create the admin password for your TP-Link router
You must select the internet connection type. This choice is the most important of the whole setup process. If you don’t know your exact connection type, you can press Auto Detect and have the TP-Link router detect it for you. Then, tap Next.
Create the admin password for your TP-Link router
You must select the internet connection type. This choice is the most important of the whole setup process. If you don’t know your exact connection type, you can press Auto Detect and have the TP-Link router detect it for you. Then, tap Next.
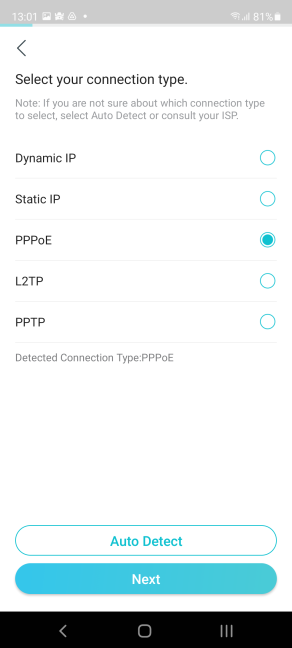 Choose your internet connection type
Enter the necessary information to connect your TP-Link Wi-Fi 6 router to the internet. This is the information that you must enter, depending on the internet connection type:
Choose your internet connection type
Enter the necessary information to connect your TP-Link Wi-Fi 6 router to the internet. This is the information that you must enter, depending on the internet connection type:
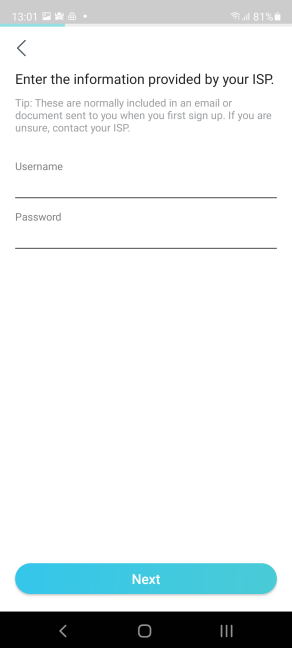 Enter the internet connection information
First, you are asked to set up the 2.4 GHz wireless band on your route. Enter the network name and the password you want to use for the Wi-Fi, and tap Next.
Enter the internet connection information
First, you are asked to set up the 2.4 GHz wireless band on your route. Enter the network name and the password you want to use for the Wi-Fi, and tap Next.
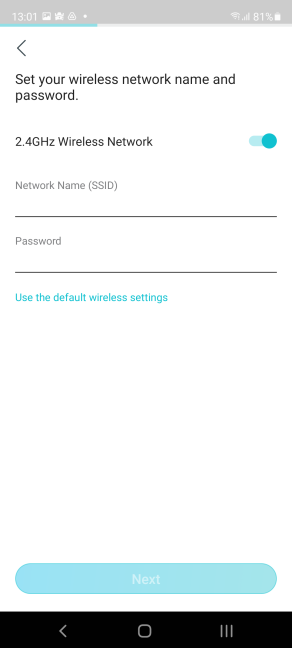 Set up the 2.4 GHz band on your TP-Link router
Next, you are asked to set up the 5 GHz band. Again, type a network name and password, and tap Next. You can use the same password as for the 2.4 GHz band, but it is better if you use a different network name to tell the two bands apart.
Set up the 2.4 GHz band on your TP-Link router
Next, you are asked to set up the 5 GHz band. Again, type a network name and password, and tap Next. You can use the same password as for the 2.4 GHz band, but it is better if you use a different network name to tell the two bands apart.
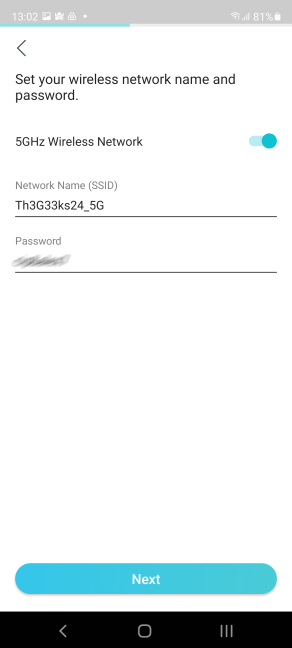 Set up the 5GHz band on your TP-Link router
You are shown a summary of your settings. Press Apply and the TP-Link router starts using them.
Set up the 5GHz band on your TP-Link router
You are shown a summary of your settings. Press Apply and the TP-Link router starts using them.
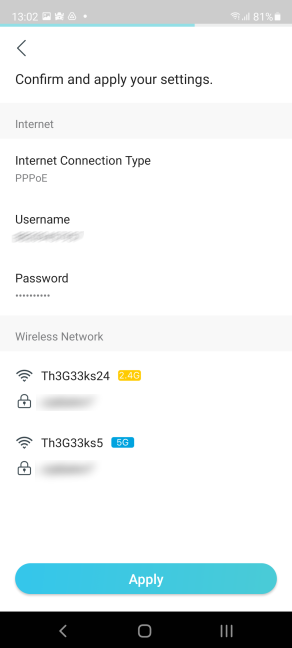 Confirm and apply your settings
Your smartphone is now disconnected from the Wi-Fi emitted by the TP-Link router because the router now uses a different network name and password. On your smartphone, connect to the Wi-Fi again, this time using the network name and password that you have set earlier. When done, go back to the Tether app and press “I’m connected.”
Confirm and apply your settings
Your smartphone is now disconnected from the Wi-Fi emitted by the TP-Link router because the router now uses a different network name and password. On your smartphone, connect to the Wi-Fi again, this time using the network name and password that you have set earlier. When done, go back to the Tether app and press “I’m connected.”
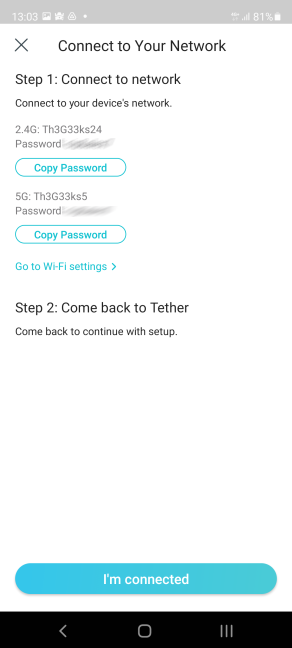 What to do to continue the setup process
The Tether app tests your network connection and, if the router was able to connect to the internet without problems, you are shown a Congratulations message. Tap Finish.
What to do to continue the setup process
The Tether app tests your network connection and, if the router was able to connect to the internet without problems, you are shown a Congratulations message. Tap Finish.
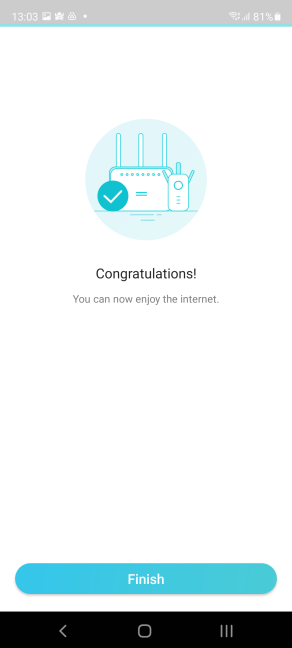 The Tether app confirms everything works well
NOTE: If the network connection test is successful, the router also checks for firmware updates, and if it finds any, asks you to upgrade. If you follow this recommendation, expect the upgrade to take a couple of minutes and wait for your router to reboot.
At the end of the setup wizard, you are asked whether you want to bind a TP-Link ID to your router, so that you can manage it remotely from anywhere on the internet, even when your smartphone is not connected to your Wi-Fi. If you press Bind Now, you are asked to enter your login information or sign up and create a free TP-Link ID right now.
The Tether app confirms everything works well
NOTE: If the network connection test is successful, the router also checks for firmware updates, and if it finds any, asks you to upgrade. If you follow this recommendation, expect the upgrade to take a couple of minutes and wait for your router to reboot.
At the end of the setup wizard, you are asked whether you want to bind a TP-Link ID to your router, so that you can manage it remotely from anywhere on the internet, even when your smartphone is not connected to your Wi-Fi. If you press Bind Now, you are asked to enter your login information or sign up and create a free TP-Link ID right now.
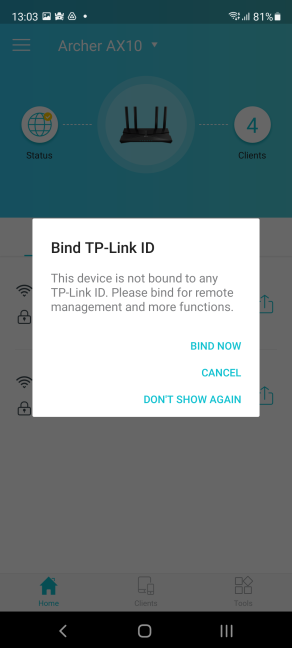 Choose to bind your router to a TP-Link ID
If you don’t want this, press Cancel, and you are done with the initial setup. You can now use the Tether app to set up other aspects of your TP-Link Wi-Fi 6 router. You can also connect all your computers and devices to the network.
Choose to bind your router to a TP-Link ID
If you don’t want this, press Cancel, and you are done with the initial setup. You can now use the Tether app to set up other aspects of your TP-Link Wi-Fi 6 router. You can also connect all your computers and devices to the network.
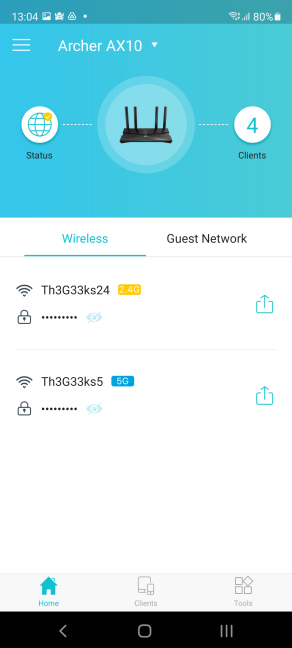 The Tether app for your TP-Link Wi-Fi 6 router
Enjoy using your TP-Link Wi-Fi 6 router!
The Tether app for your TP-Link Wi-Fi 6 router
Enjoy using your TP-Link Wi-Fi 6 router!
Before you start the setup process, do this first:
If you just bought a new TP-Link router, or you received it from someone else, look on the bottom for a sticker with technical details:- Look for the default access address. It should be something like tplinkwifi.net or 192.168.0.1.
- Look for the SSID fields that show you the names of the wireless network bands emitted by the TP-Link router.
- Look for the wireless password or PIN that is used by default.
Connect the computer, laptop, smartphone, or tablet to the network broadcast by your TP-Link Wi-Fi 6 router
If you have a desktop computer or a laptop that you plan to use for the setup of your TP-Link router, you may want to connect it to your router by plugging a network cable in one of the available Ethernet ports.How to configure your TP-Link Wi-Fi 6 router from a web browser
On your laptop or PC, open your favorite browser, and go to the address tplinkwifi.net or 192.168.0.1. This should load TP-Link’s setup wizard, which starts by asking you to create an administrator password for your router. Enter a password that you will remember (or at least write it down and keep it somewhere safe), confirm it, and press “Let’s Get Started.” This password should have at least six characters and contain at least two types of the following characters: letters, numbers, and symbols. How about MyAdm1nPa$$ for a safe password idea? We recommend this password to be different from the one you plan to use to connect everybody to the Wi-Fi.- Static IP - you need to provide the IP address, subnet masks, default gateway, and DNS servers that the TP-Link router should use to connect to the internet.
- Dynamic IP - the router automatically receives an IP address from your ISP, and it asks if you want it to use its default MAC address or a custom one.
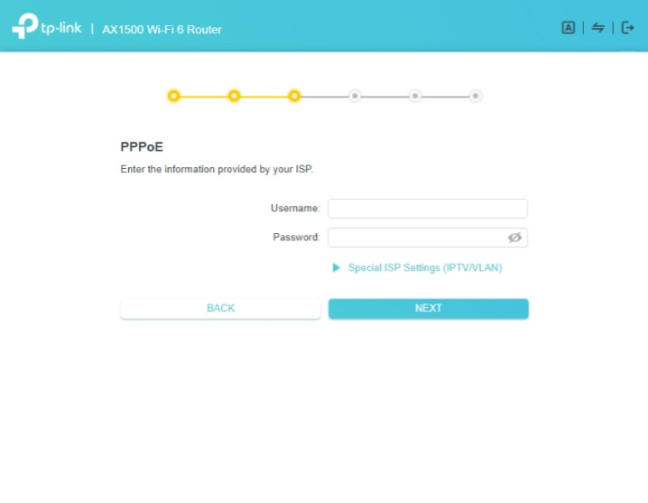
- PPPoE - you need to enter the username and password used to connect to the internet. Your ISP provides this information.
- L2TP - enter the username and password used to connect to the internet. You also need to enter the VPN Server IP or Domain Name. Your ISP can share with you this information.
- PPTP - enter the username and password used to connect to the internet. Check whether you are using a Dynamic or Static IP, and enter the VPN Server IP or Domain Name. Your ISP provides this information.
How to configure your TP-Link Wi-Fi 6 router using the Tether mobile app
Another way to set up your TP-Link router is from the Tether mobile app available for free for both Android and iOS. Install it on your smartphone, connect the smartphone to the Wi-Fi emitted by the TP-Link router, and then open the Tether app. After a couple of seconds, it should detect the exact model of your TP-Link router. Tap on the router’s name.- Static IP - you need to provide the IP address, subnet masks, default gateway, and DNS servers.
- Dynamic IP - the router automatically receives an IP address from your ISP, and it asks if you want it to use its default MAC address or a custom one.
- PPPoE - you need to enter the username and password used to connect to the internet.
- L2TP - enter the username and password used to connect to the internet, as well as the VPN Server IP or Domain Name.
- PPTP - enter the username and password used to connect to the internet. Check whether you are using a Dynamic or Static IP and enter the VPN Server IP or Domain Name.

Discussion (0)
Be the first to comment.