



In Windows 8.1 Microsoft has included a new modern app that you can use to quickly scan documents and pictures. All you need is a scanner that's connected to your Windows 8.1 PC or device and the new Scan app that's included with the operating system. Here's how this app works and how you can configure its settings.
NOTE: You cannot use the Scan app unless you have installed a scanner on your Windows 8.1 PC or device.
How To Start The Scan app
Scan is a modern app that's included in Windows 8.1 and you will find it in the Apps view. On the Start screen, move the mouse cursor to the bottom left corner of the screen and click the arrow pointing downwards. On a device with touch, flick upwards from the bottom of the screen.
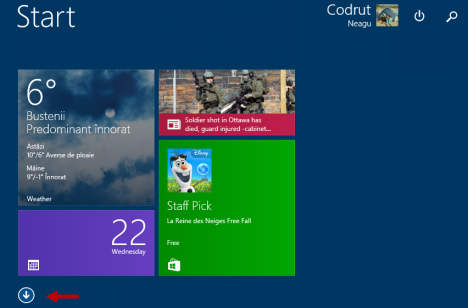
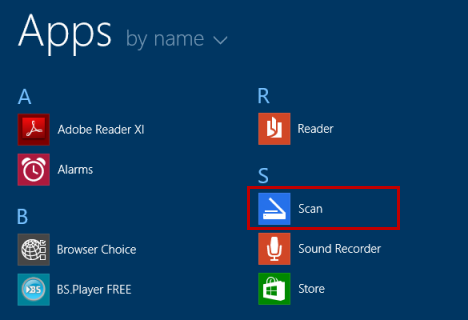
Look for the Scan app and click or tap its name to open it. Depending on how you are organizing the Apps view, you will see it in sections like S or Tools.
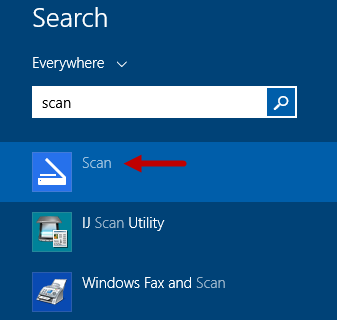
A faster way of starting the Scan app is to use search. On the Start screen, write the word "scan" and click or tap the Scan search result.
Finding Your Way When Using The Scan App
Even though the Scan app has a minimalist user interface, it offers everything you need in order to scan documents and pictures without complications. In the screenshot below, you can see how the main interface of the Scan app looks. As you can see, it is divided into two panels: left and right.
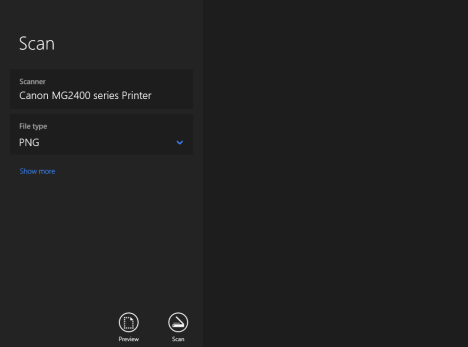
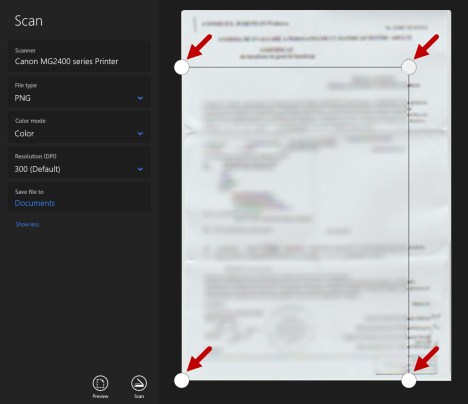
On the panel on the left you will find a few control elements like the name of your installed scanner, the file type used for saving your scanned files, a link called "Show more" that reveals additional settings and the buttons for Preview and Scan.
The panel on the right is used only for displaying and cropping your scans.
How To Configure The Scan App in Windows 8.1
The default settings used by the Scan app work well for most people in most scenarios. However, you might want to change them and improve the quality of your scans. To get access to all the settings that you can change, click or tap the "Show more" link from the left panel.
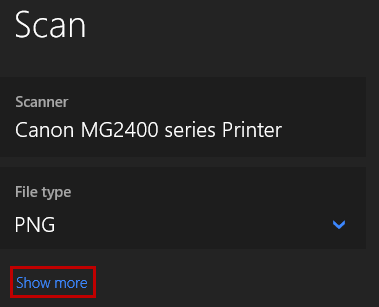
The settings that you can change are the following:
- File type - you set the file type used for saving your scans. You can choose to save them using the following formats: JPEG, PNG, TIFF, Bitmap, OpenXPS or XPS. The default file type is PNG.

Scan, App, Windows 8.1, documents, pictures, settings - Color mode - you can choose from Color, Grayscale or Black and white. Use the Color mode when you scan pictures, Grayscale when you scan documents and Black and white when you scan drawings. The default setting is Color.

Scan, App, Windows 8.1, documents, pictures, settings - Resolution (DPI) - set the resolution used for your scanning. If you need a more detailed scan, increase the resolution but keep in mind that the higher the resolution, the larger the scan file will be. If you don't need too much detail for a scan or if you need a smaller sized file, decrease the resolution. The default setting is 300 DPI and it should be enough to get a good detail/file size ratio.


Scan, App, Windows 8.1, documents, pictures, settings - Save file to - here you can set the location where your scans are saved. To change it, click or tap this option, browse your computer or device and select the new location that you want to use.

Scan, App, Windows 8.1, documents, pictures, settings
There is one important thing that you should note: the number of available settings and their values differ depending on what scanner you are using, its specifications and the drivers that you have installed. In your Scan app you may see a different number of settings than what we have shown here and that is normal.
How To Scan Documents Or Pictures Using The Scan App
In order to scan something, click or tap the Scan button, in the bottom of the left panel.
However, it's preferable that you first take a look and preview what you want to scan, before scanning it. You may learn that the default settings don't provide the quality that you want, etc. Also, you can crop the scanning area if you're scanning a smaller document or picture
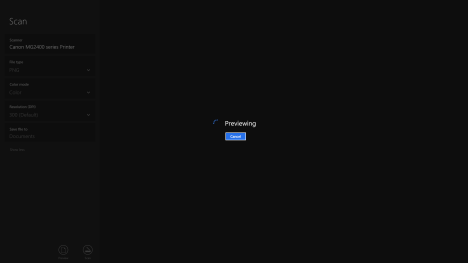
To see a preview, click or tap the Preview button. The Previewing message is displayed while the scanner makes a first quick pass.
When this first pass is done, the preview scan is displayed. To crop the scanning area, drag the selection circles shown on the corners of the preview.
When the preview looks good, click or tap Scan. The Scan app will scan and then save your file. When the scan is done, the app will display a notification on the top side of the screen, telling you that the file was saved. You'll also find a button that lets you quickly View the file and a Close button for closing this notification.

Conclusion
As you can see from this guide, the Scan app is a minimalist app for Windows 8.1. Even though it doesn't offer much in terms of customization options, it does a decent job at scanning your documents and pictures. Try it out and let us know how well it works for you, using the comments form below.

Discussion (17)
The last option to choose where to save the scanned item is stuck – sending everything to a folder for a class that I teach. How do I get the option back?
Canon printer. There is nothing to click on anymore concerning choosing location.
Thank you,
Deb Saidel
I don’t know if I’m missing something, but I’m simply trying to scan multiple pages (5 to be exact) and I don’t see the icon where it allows to add additional pages. Is it just my HP Deskjet 2540 or is it me? Ever since the upgrade, I have no idea why I can make a simple multi-page scan.
This app takes up entire screen and won’t minimize so I can do other tasks at same time. Also, new pictures folders are awkward, with no filmstrip viewing. If you want to see details, picture opens and takes over entire screen again. Anyone know how to control this take-over?
i cant get my brother MFC-J435W to connect to this app. Let me explain it shows up on the “devices” window but the scanner wont connect . It was working fine ..What happened..checked my firewall uninstalled and reinstalled…help!!! the “ultimate scanner app is the same way. I dont have ink in my printer but it was still scanning…i dont know whats caused it to stop working. it shows its connected. why does it say to connect a scanner?
When I try to save a scanned document with the scanner app there are no files or folders listed in my PC . Can anyone help please
When I scan several documents into the computer, I have them sent to a scans folder in My pictures. sometimes one or more of the scans is sent to some other location . I don’t understand why this happens even though I use the same method and process for each document.
I found no way to change the copression method for PDF files from “ZIP” to “JPEG”. With the installed settings PDF-files are about 10 times bigger than using other scan programs. I cannot use the app without having the possibility to change the settings.
Got the same problem here, mate. I scanned 6 pages in 200 dpi and the PDF file is 24 MB! My colleague used hp scanning app and the same document as a PDF is less than 3 MB with default 300 dpi. I guess I will only use that for single pages and JPEG’s/PNG’s, sadly hp software would not install on my PC for unknown reason.
Is there a way to set up multiple scanners ? I use the laptop at home and work
my scan app does not have the colour mode option. Its a new computer with new software and ideas???? Please help will scan but grayscale and no option to change.
I cannot find a way to choose the name of the file that is scanned. I can save the folder or destination, but the scan is always put in that folder under a date format. How do I assign a filename of my choosing before it is stored?
I have the same question!!!!
WELL.. I finally figured it out..
When your viewing your scan, right click on the screen and a tab appears at the bottom right hand side of your screen.. Click ‘SAVE AS’.. there you can rename your file.
When i want to send an email right after i scan it wont allow me and it says that i need to create an association in the default programs control panel. Can someone help.?
You’ll find the answers in these tutorials:
are any of the filetypes multipage?
we really need multipage pdf filetype.
the captcha on this page is too omplicated
Unfortunately no, the Scan app handles only basic tasks and multi-page scans isn’t one of them.