

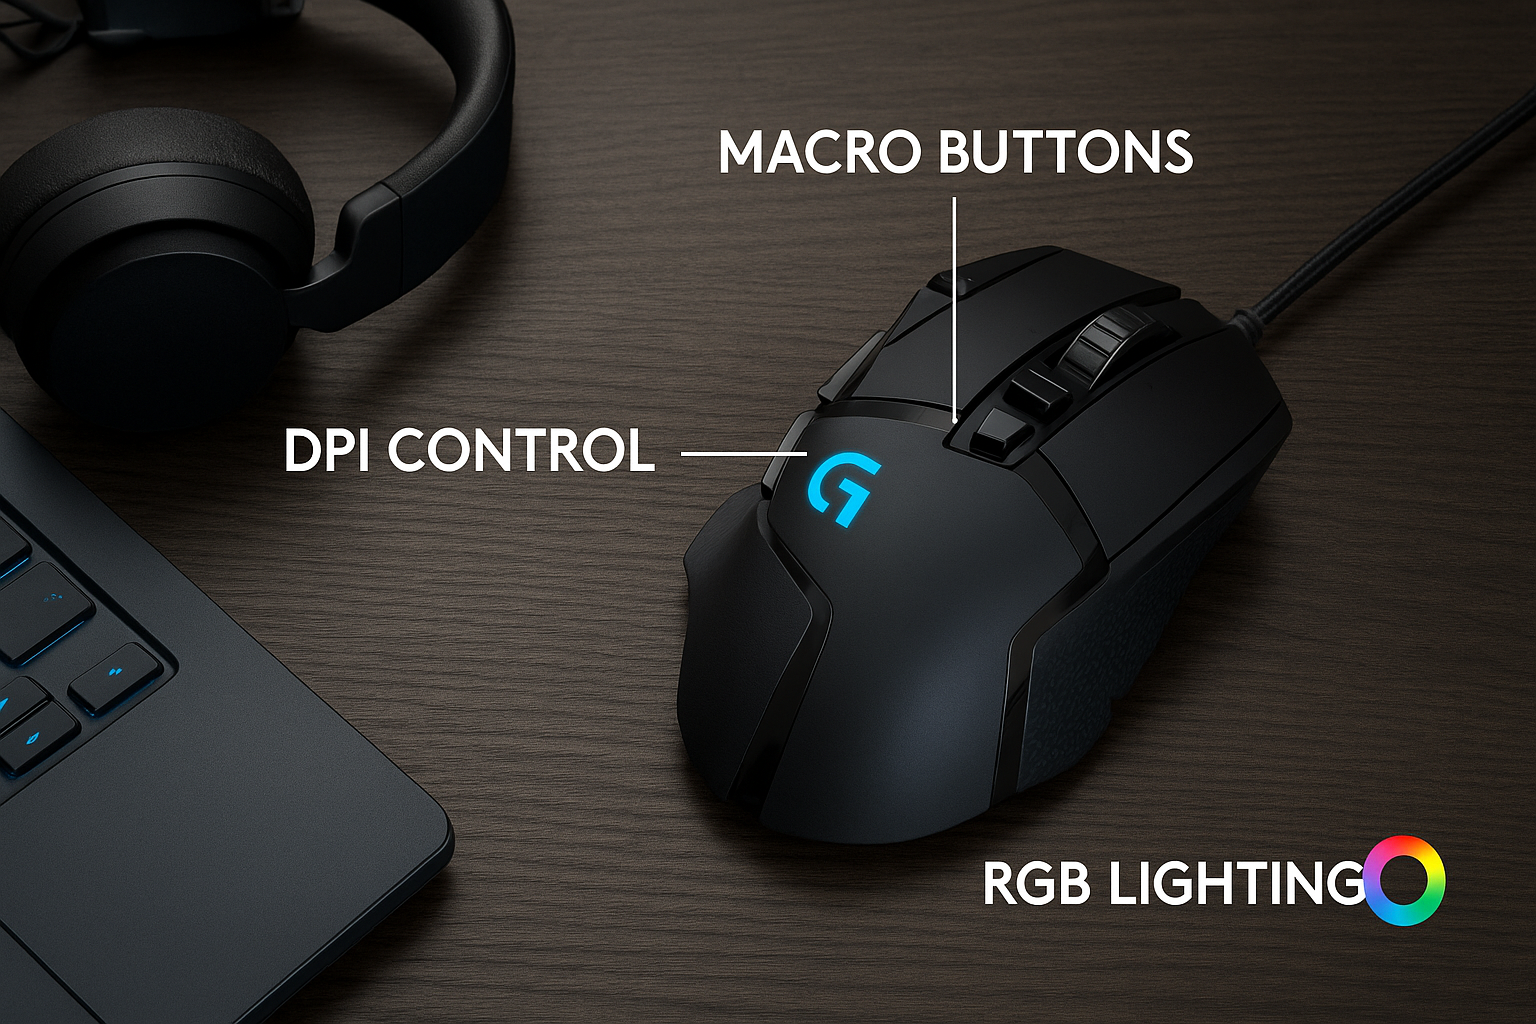
The Logitech G502 remains a fan favorite among gamers and power users alike. Its customizable buttons, adjustable weights, and precision sensor make it one of the most versatile mice on the market.
This guide shows you exactly how to set up, connect, configure, and optimize your Logitech G502 - whether you’re using the Hero, Lightspeed, or X Plus model.
Step 1: Identify your Logitech G502 model

Before starting, check which G502 version you own. The Hero connects via cable, the Lightspeed works wirelessly through a receiver, and the X Plus adds RGB lighting and USB-C charging. Knowing your model ensures you follow the right setup and avoid connectivity confusion later.
Step 2: Connect the mouse
For G502 Hero (Wired), plug the USB cable into a free USB 2.0 or 3.0 port on your PC. Windows should instantly detect the mouse and install the correct driver automatically.
With G502 Lightspeed or G502 X Lightspeed (Wireless), you only need to insert the included USB receiver into your computer. Turn the mouse on using the switch on the underside and wait a few seconds for pairing. If pairing fails, hold the connect button next to the power toggle until the indicator light flashes.
If you are using the G502 X Plus (RGB Wireless), use the USB-C cable to charge the mouse before first use. You can also keep it connected for wired play, which eliminates any input lag.
Step 3: Install Logitech G Hub software
To unlock full customization, install Logitech G Hub. It’s the control center for DPI, macros, and lighting profiles. Go to the official website and click the Download G HUB button to download the installer. Note the PC type written on each button.
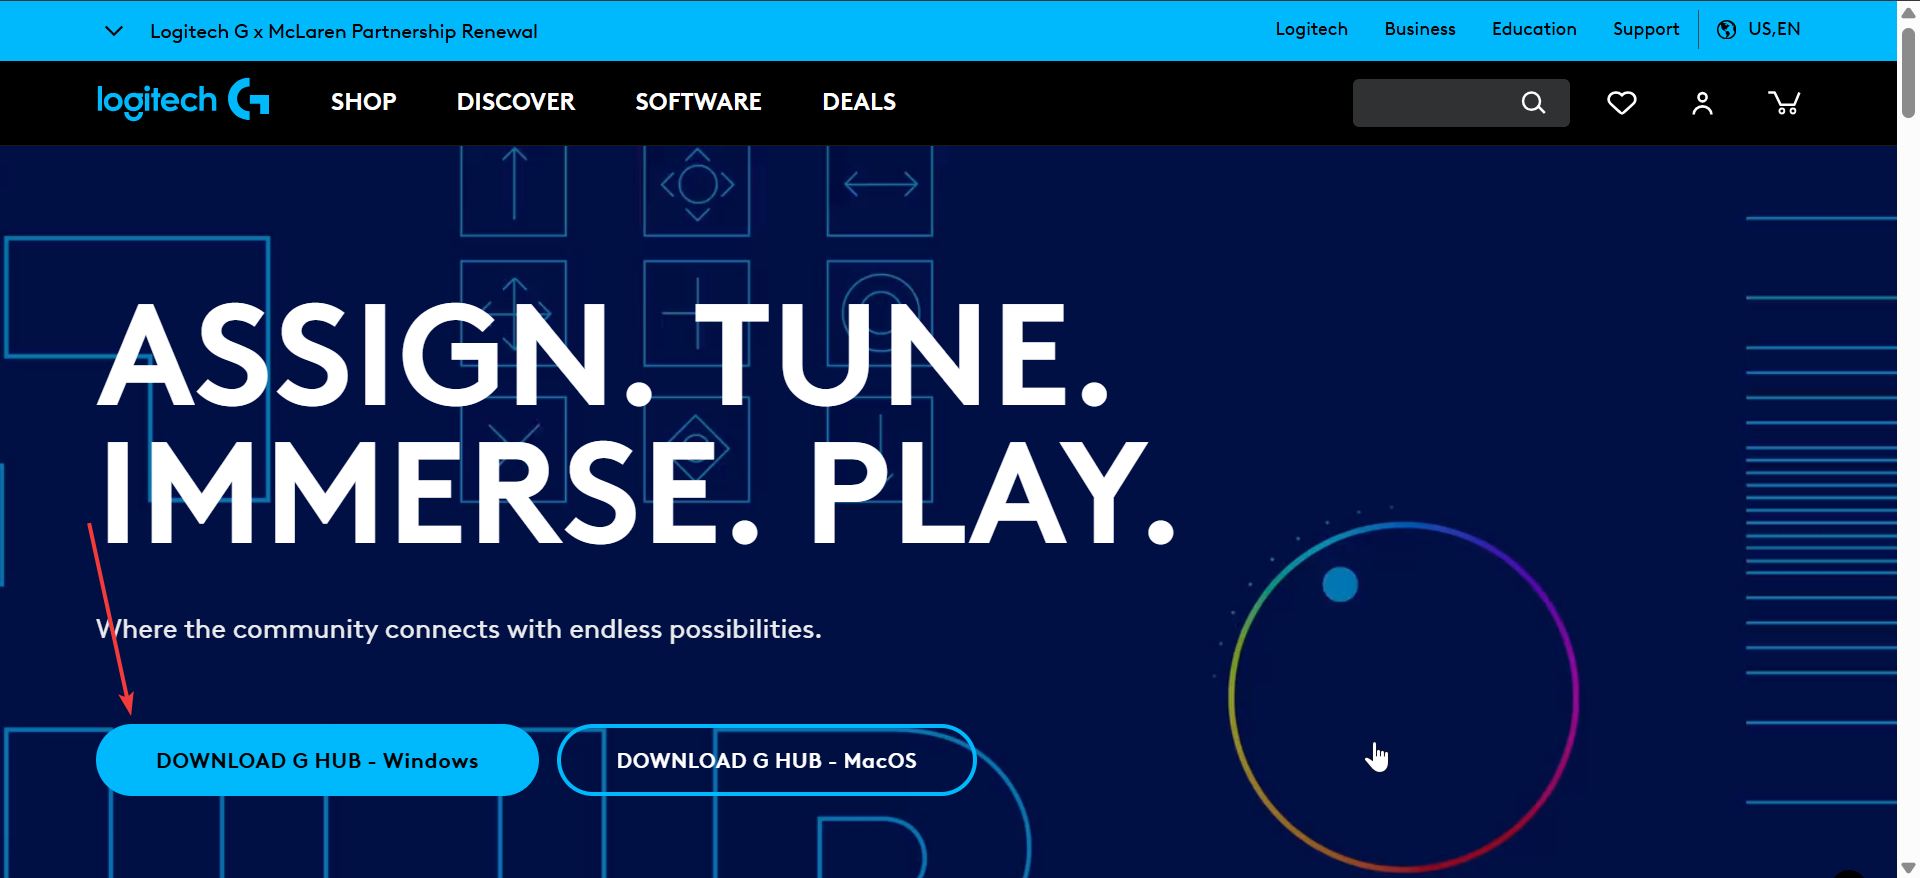
Double-click the installer in your Downloads folder and follow the onscreen instructions to complete the installation. Once installed, launch the app and confirm your G502 appears in the device list. This is where you’ll do most of your fine-tuning later.
Pro tip: Update the mouse firmware by going to Settings → Check for Updates in G Hub to fix bugs and improve performance
Step 4: Customize DPI and Sensitivity

DPI controls how fast your cursor moves relative to hand motion. In G Hub, open the DPI tab and set up multiple stages (for example, 800, 1600, 3200). You can switch between them on the fly using the DPI buttons on top of the G502 — ideal for sniping or photo editing.
Step 5: Program Buttons and Macros
Every G502 includes several programmable buttons you can remap for shortcuts or game commands.

If you are using G Hub, select your mouse, open Assignments, and drag commands to each button slot. You can bind keys, actions, or complex macros. You can also turn on Onboard Memory Mode to store profiles directly in the mouse. That way, your bindings travel with you, even if G Hub isn’t installed on another computer.
Step 6: Adjust Weight and Balance (Hero Only)
The G502 Hero ships with small 3.6 g weights. To install them, open the weight compartment underneath the mouse. Experiment with different configurations to find your ideal balance - front-loaded for faster flicks, rear-loaded for steadier aim.
Step 7: Customize RGB Lighting (Lightspeed & X Plus)

Lighting customization is found under the Lightsync tab in G Hub. You can pick colors, effects, or sync lighting with other Logitech G gear. If you prefer maximum battery life, turn the lighting off or choose a low-intensity preset.
Step 8: Create and manage profiles
Profiles let you tailor settings per app or game. Enable automatic detection in G Hub so the mouse switches configurations as you launch different programs. You can also export and back up these profiles for later use.
Step 9: Test and fine-tune
Once setup is complete, test the mouse in-game or on the desktop. Try cycling DPI levels, pressing side buttons, and scrolling to ensure each function feels right. Small adjustments now will save time during gameplay or editing sessions later.
Troubleshooting common issues
- Mouse not detected in G Hub: Reconnect the USB cable or receiver and restart the software. If detection fails, reinstall G Hub.
- Wireless lag or dropouts: Use the included receiver extension cable and place the dongle closer to your mouse. Avoid placing it near routers or metal objects.
- Buttons or DPI stopped working: Open Settings → Restore Defaults in G Hub. If that fails, perform a firmware reinstall to reset all onboard profiles.
Tips for optimizing your G502
- Assign your DPI shift button for temporary sensitivity drops during aiming.
- Save unique profiles for gaming, work, and video editing.
- Disable RGB for longer battery life on wireless models.
- Clean the sensor lens and glide feet monthly to maintain smooth tracking.
FAQs
Is G Hub required to use the G502? No, but it’s essential for customizing DPI, lighting, and macros.
Can I use one receiver for multiple Logitech devices? Yes, if both support Lightspeed multi-device pairing.
How long does the Lightspeed battery last? Roughly 60 hours with lighting off and 45 hours with RGB enabled.
Is the G502 compatible with macOS? Yes, G Hub runs on macOS, though a few advanced options may be limited.
Summary
- Identify your G502 model.
- Connect it via USB or Lightspeed receiver.
- Install and update Logitech G Hub.
- Set DPI, macros, and lighting.
- Test and fine-tune performance.
Conclusion
Setting up the Logitech G502 takes only a few minutes, but it unlocks a lot of potential. Once configured, you’ll enjoy a smooth mix of control, comfort, and customization whether you’re gaming or multitasking.
If you run into connection or sensitivity issues, revisit G Hub’s update and reset options - they fix most problems instantly. With the right profile setup, your G502 will feel tailored perfectly to you.
Discussion (0)
Be the first to comment.