


CurseForge is the easiest way to install and manage Minecraft mods. Whether you want a new shader pack, adventure mod, or complete modpack, it keeps everything organized and up to date. This guide explains how to download, install, and set up CurseForge on Windows, macOS, or Linux - plus what to do if it won’t launch or detect your game.
But before you jump right into this guide, make sure your system meets the basics before installing CurseForge.
- Operating System: Windows 10/11 (64-bit), macOS 12 or newer, or a modern Linux distro.
- RAM: At least 4 GB (8 GB recommended if running large modpacks).
- Storage: 2 GB free space for the launcher, plus extra for mods.
Most importantly, if your PC runs Minecraft smoothly, it can handle CurseForge too.
Step 1: Choose the right CurseForge version
There are two main versions of the CurseForge app. You can use the Overwolf-based launcher that integrates with Overwolf, includes ads, and has in-game overlays. The second option is the standalone app, which is cleaner, has no ads, better performance on older PCs
Tip: If you want fewer background processes, go standalone. If you already use Overwolf for other games, the integrated version is fine.
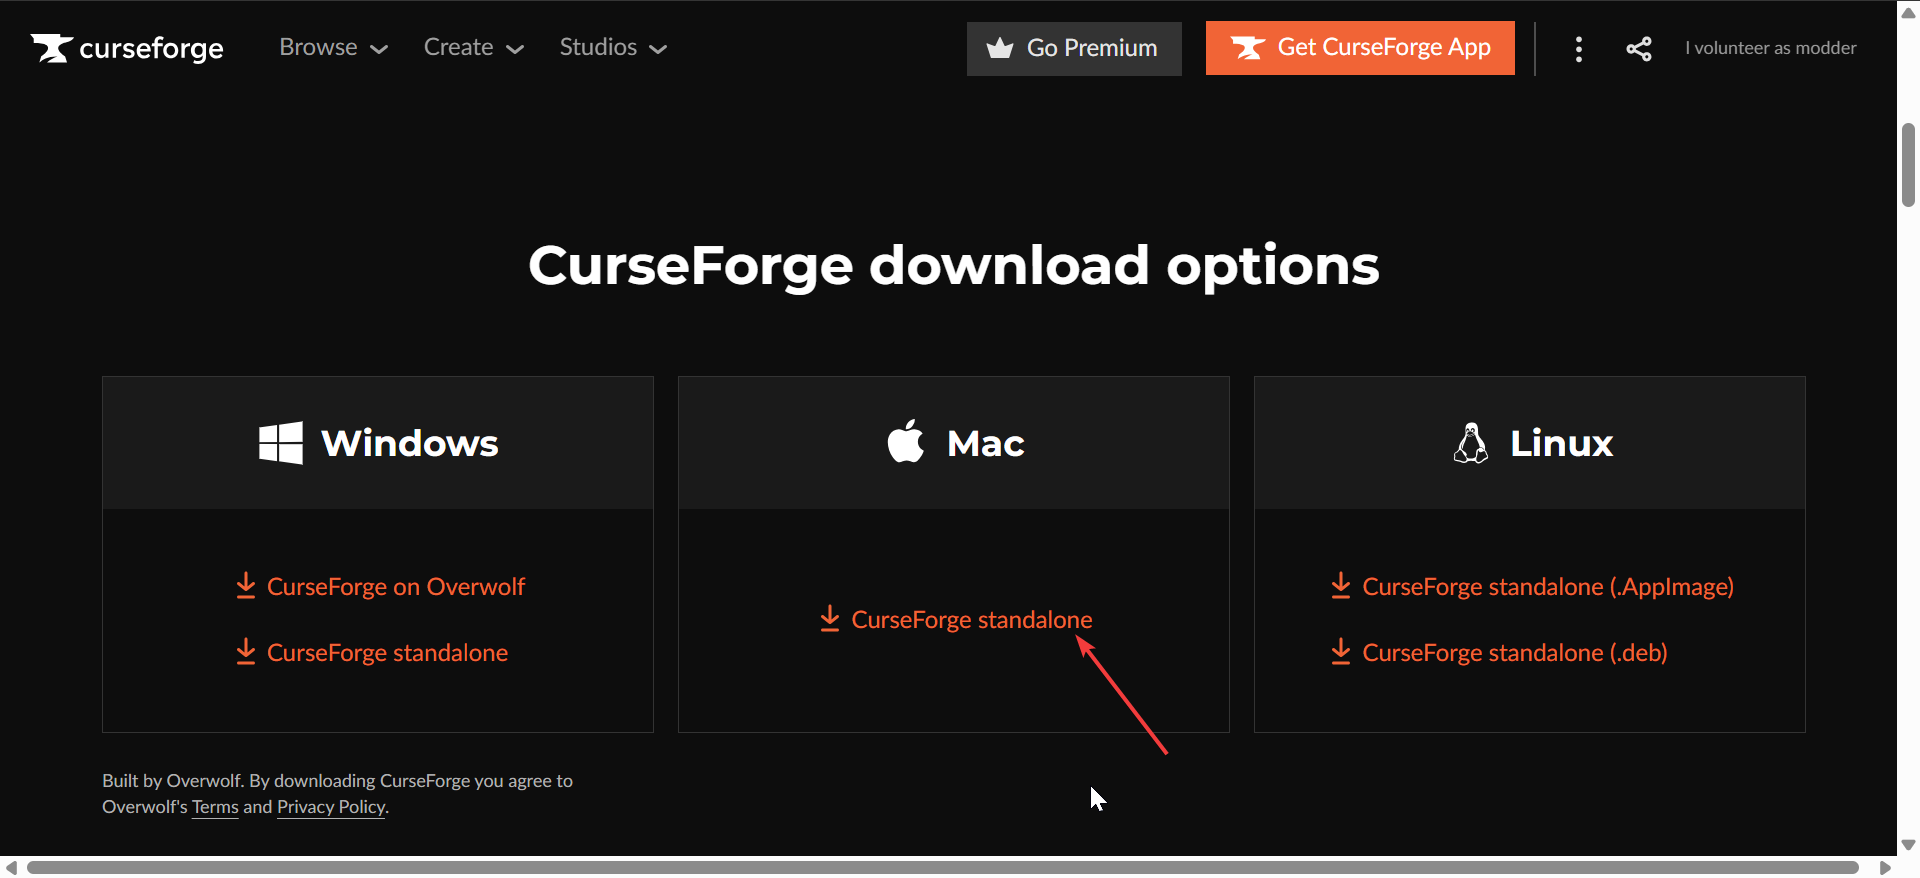
Step 2: Download and install CurseForge
Windows installation
Visit the official CurseForge download page, choose Windows and save the .exe installer, and double-click it. Next, approve the User Account Control prompt, then select an install folder. From here, wait for the setup to finish, then launch the app from your desktop.

Finally, sign in with your account if prompted. Once installed, CurseForge will scan your system for Minecraft automatically.
macOS installation
Download the .dmg file for macOS on the official CurseForge website. Next, drag CurseForge.app into the Applications folder. If macOS blocks it, open System Settings → Privacy & Security → Allow Anyway
Lastly, start the app from Launchpad or Finder.
Tip: macOS users may need to confirm a few permission dialogs before the launcher connects to Minecraft.
Linux installation
Linux users can download the .AppImage or install it manually via the terminal. Start by saving the .AppImage file. Then, right-click → Properties → Permissions → Allow executing file as program.

Now, double-click to run it. If Minecraft isn’t detected, manually set the game folder under Settings → Game Path.
Tip: Linux support may vary, but most major distros (Ubuntu, Fedora, Arch) work fine.
Step 3: Add Minecraft to CurseForge
When you first open the app, CurseForge should find Minecraft automatically. If not, click Add Game on the home screen, select Minecraft, and confirm the folder path. Choose the version (Java Edition only), and your game will be linked so CurseForge can manage mod installations correctly.
Step 4: Install Minecraft mods and modpacks
Once Minecraft is connected, you can install anything directly inside CurseForge. To install a modpack, go to the Minecraft tab → Browse Modpacks. Search by name or category and click Install, then Play when finished.
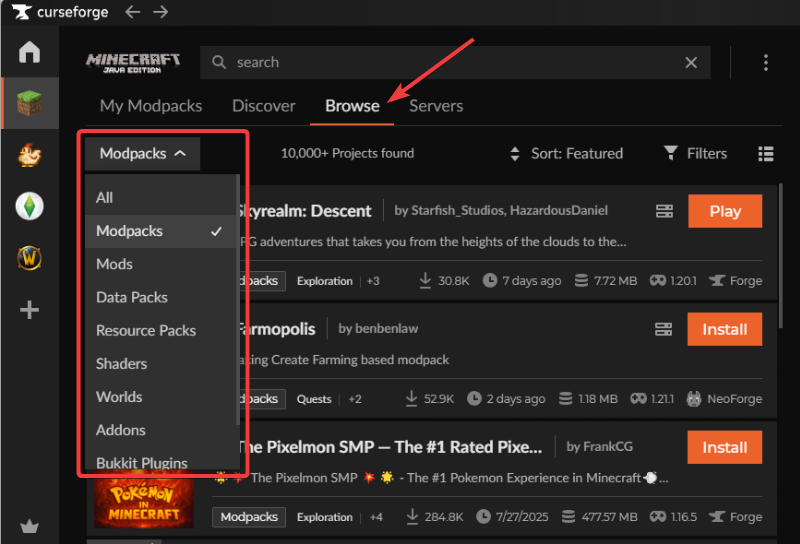
For mods installation, open Browse Mods and use filters for version, loader (Forge, Fabric, NeoForge, Quilt), or popularity. Now, select the mod, click Install, and wait for the download.
Pro tips: Each modpack includes the right modloader and settings, so you can start playing right away. Also, mods update automatically, but you can disable or remove them from the My Mods section.
Troubleshooting common CurseForge installation errors
- Launcher won’t start: Reinstall using the standalone version.
- Game not detected: Manually set the path under Settings → Game Specific.
- Modpack won’t launch: Make sure Java 17+ is installed and enough RAM is allocated.
- Overwolf error: Disable overlay or reinstall without Overwolf integration.
Tips and best practices
- Only download the launcher from the official CurseForge site.
- Avoid third-party installers or modpack downloaders that may include adware.
- Before installing big modpacks, back up your worlds and settings.
- Remember, CurseForge supports Java Edition only - it doesn’t work with Bedrock.
- If your mods break after a Minecraft update, wait for authors to post compatible versions before upgrading.
FAQs about CurseForge for Minecraft
Is CurseForge free to use? Yes, it’s 100% free. Ads appear only in the Overwolf version.
Can I use it without Overwolf? Yes. Download the standalone installer for a cleaner experience.
Does it work with Bedrock Edition? No. CurseForge supports Minecraft: Java Edition only.
How much RAM does it need? Allocate 6–8 GB if you play large modpacks; smaller setups can run on 4 GB.
Can I move modpacks to another PC? Yes. Copy your modpack folder from %AppData%\CurseForge\Minecraft and import it on your new system.
Summary: Key steps to download CurseForge for Minecraft
- Pick the right app version (standalone or Overwolf).
- Download and install it for your platform.
- Add your Minecraft game folder.
- Install modpacks or individual mods.
- Fix launch errors and stay updated.
Conclusion
CurseForge is the simplest and safest way to enjoy Minecraft mods without breaking your game. Once installed, it keeps your modpacks updated, organized, and ready to play with just a few clicks.
Whether you’re a first-time mod user or a long-time builder, following these steps ensures a smooth setup across Windows, macOS, or Linux. Keep your launcher updated, install mods from trusted creators, and back up your saves regularly for the best experience.


Discussion (0)
Be the first to comment.