The good old Disk Defragmenter tool that went through a series of changes in Windows 7 has been changed again in Windows 8.1 and Windows 10. It has a new name - Optimize Drives - and some new inner workings that make it able to deal with both hard disks and solid state drives. As a result, optimizing drives in Windows 8.1 and Windows 10 is a bit different from what it used to be in previous versions of Windows. Read on to learn how to optimize your disk drives in Windows 10 and Windows 8.1, and keep the performance of your hard disks in top shape:
When to use Optimize Drives in Windows. Defragment versus TRIM.
The traditional role of the Optimize Drives app has been to defragment hard disks, and it continues to do a great job in this area. While Windows kept defragmenting hard disks, the solid state drives (SSD's) have started to replace them, and the defragmentation does not work any more as an optimization technique. Windows has adapted, and the new Optimize Drives app can deal with both hard disks and solid state drives applying separate optimization procedures.
For hard disks, when defragmenting a disk partition, Windows rearranges the files stored on the disk so that they occupy contiguous storage locations. Doing this increases the access speed to your files by minimizing the time required to read and write files to and from the disk and by maximizing the transfer rate. You might also see improved startup times.
For solid state drives, Optimize Dives applies a technique called TRIM. While the focus of the defragmentation is to increase the speed of reading information from the disk, TRIM helps primarily with prolonging the lifespan of the solid state drive. For more details, read What is SSD TRIM, why is it useful, and how to check whether it is turned on.
When not to use Optimize Drives in Windows
Do not optimize USB drives. They have a behavior similar to the SSD's, but Windows may treat them as hard disks and try to defragment them. These types of drives have a different way of allocating files, and they have a limited number of read/write cycles before they stop working. Hence, defragmenting them decreases their lifespan. Given the high read and write speeds provided by USB memory sticks, you should not encounter slowdowns.
How to start the Optimize Drives defragmentation app in Windows
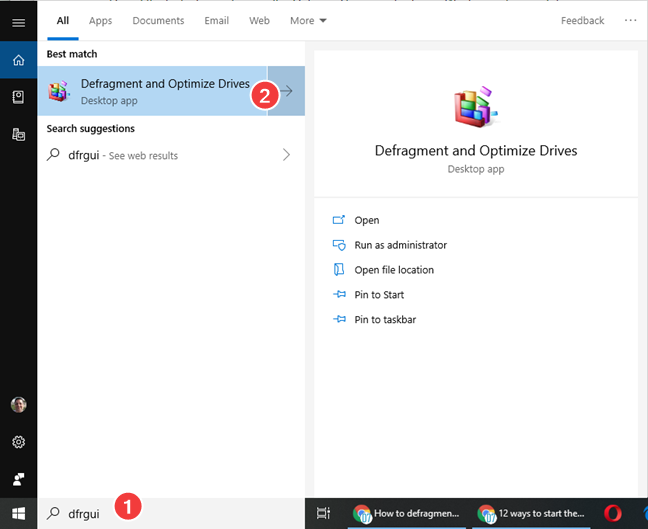
One of the fastest ways to open the Optimize Drives application in Windows is to search for "dfrgui" which is the name of the executable file for the Optimize Drives app. In Windows 10, click or tap the "Defragment and Optimize Drives" search result.
Search for drfgui in Windows 10
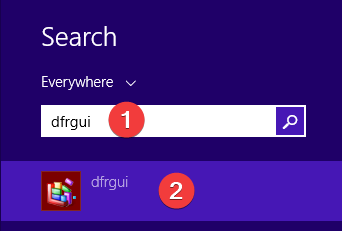
In Windows 8.1, click or tap dfrgui in the search results.
How to analyze and defragment your drives in Windows
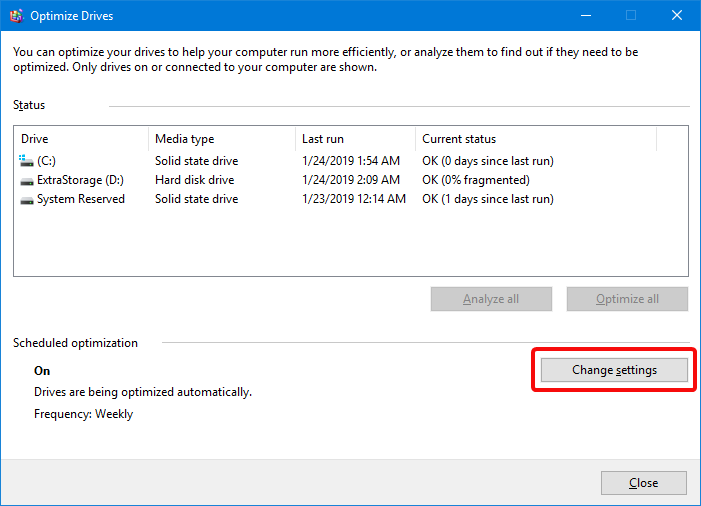
In the Status section of the Optimize Drives app window, you see a list with all the drives that exist on your Windows computer or device. For each drive you see its name, drive letter, the media type (e.g., solid state drive, hard disk drive, removable drive), when the defragmentation was last run and the current status, meaning the fragmentation status of each partition. The list includes hidden drives like the one automatically created when installing Windows. When you select an SSD, the Analyze button is dimmed because the analysis makes sense only for hard disks.
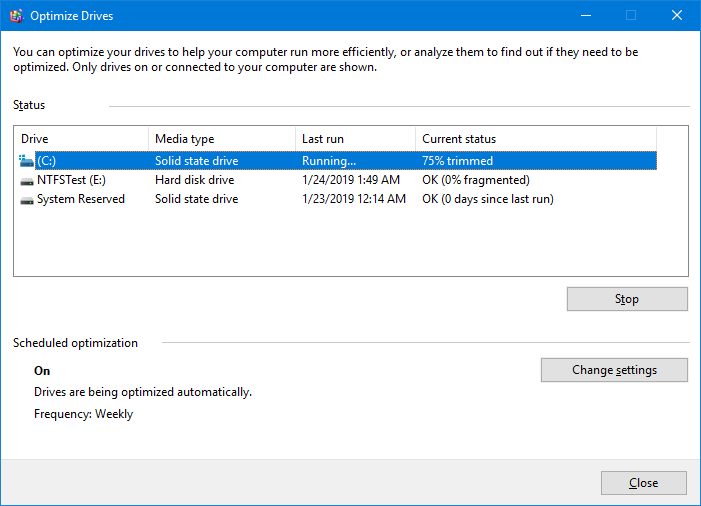
Select a solid state drive for optimization
When you press the Optimize button, the TRIM procedure is applied to the SSD immediately. A percentage with the TRIM progress is displayed in the Current status column. The procedure usually runs quite fast.
Optimize (trim) a solid state drive
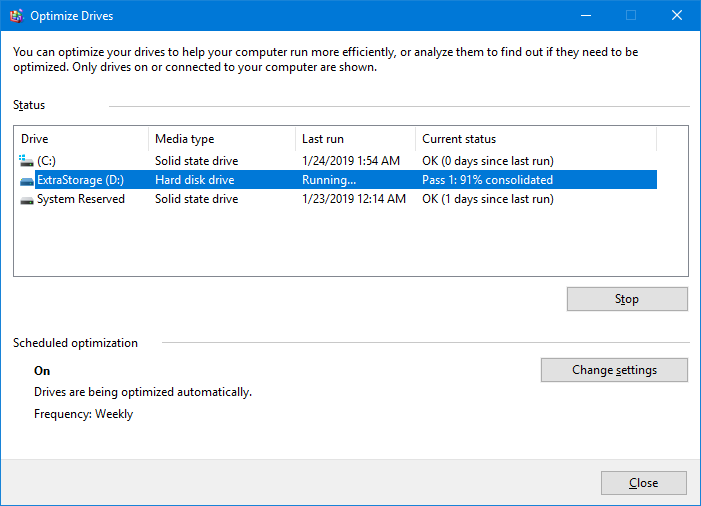
When you select a hard disk, Windows activates the Analyze button. When you press it, Windows is going to update the fragmentation status of the hard disk so that you can decide whether it is worth running the procedure. The Current status column is going to indicate the need for defragmentation. If you want to select multiple partitions, hold the Ctrl key pressed while clicking the partitions to analyze. Then, click or tap Analyze all.
Selecta a hard disk for optimization
After running the disk analysis, you see how fragmented the partition is. This information helps you decide whether you need to defragment the disk or not. It is advisable to optimize drives whenever their fragmentation status goes beyond 20%.
To defragment a partition, select it and press Optimize. You can also hold the Ctrl key while clicking the partitions to optimize. Then, click or tap Optimize all to run the optimization on multiple partitions at once. While the tool analyzes and optimizes the selected partitions, you see the running status in the Last run column and the completion percentage in the Current status column. If you want to interrupt the process, press Stop.
Optimize (defragment) a hard disk
One of the good things about this tool is that you can use the computer to do other things while running any of the available operations. Therefore, do not wait for the defragmentation to be over before doing your work on your Windows computer.
How to schedule the disk optimization in Windows
The Optimize Drives tool offers you the option of setting up a schedule for the disk optimization process. By default, this is set to run weekly, but you can also set it to daily or monthly. What the tool fails to explain is the time when that task is scheduled, which you need to know since you must have your Windows computer or device turned on at that time. To modify when and how often you want to run Optimize Drives, press the Change settings button in the Schedule optimization section.
Schedule drives optimization
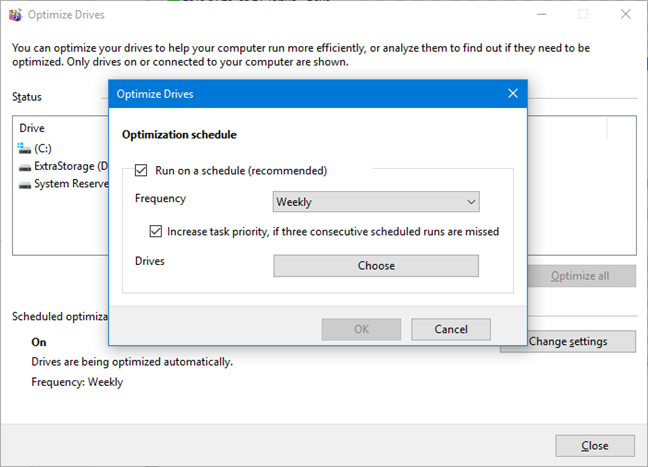
Use the Frequency drop-down list to choose the frequency of the defragmentation process: daily, weekly or monthly. Also, check the box that says "Run on a schedule," so that the schedule is turned on. If you want to be notified if three consecutive scheduled runs are missed, check the option that says so.
Optimization schedule for drives
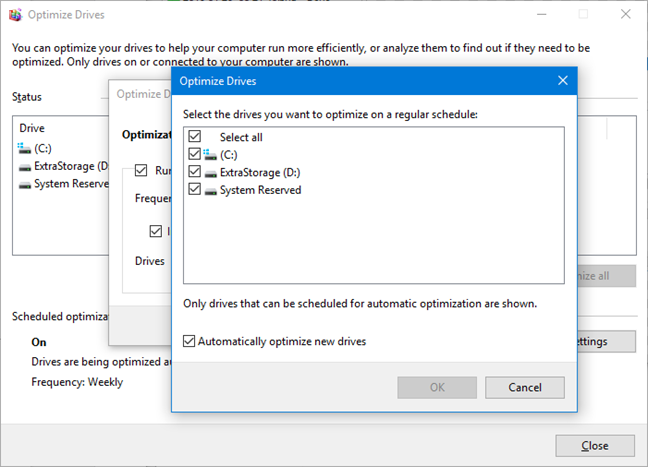
Next, press Choose to select which disks you want to include in the defragmentation schedule. Check the disks that you want to be defragmented regularly and deselect those that you don't want to be defragmented. Please remember that it is not wise to defragment SSD drives so make sure to deselect them. Select "Automatically defragment new drives" if you want to defragment the new disks found by Windows at the time of the scheduled defragmentation process.
Select drives for scheduled optimization
When you are done customizing everything, click or tap OK twice, to apply your settings.
Did you optimize your drives?
Now that you know how to defrag your drives in Windows 10 and Windows 8.1, you should not have any issues with this part of your computer's maintenance process. We advise using this every time your system slows down. We also recommend using a maintenance schedule that includes defragmentation, so that you keep your hard drives in top shape. If you have any questions on this topic, don't hesitate to leave a comment.
Windows 10, 6470b Laptop. Unable to defrag the “SYS” Partition which is 46% fragmented. The other partitions will run defrag and are 0% fragmented.
Any suggestions would be appreciated.
tazmo8448 ·
Auslogics makes a very good disk defragger.
anon ·
The app was renamed on Windows 8 and later precisely because it applies TRIM to SSDs instead of defragmenting them (which is why Windows 7 would disable the tool automatically if it detected a SSD).
Animesh Dey ·
Presently I have windows 7 Ultimate installed in my PC, wheather I install Win 8.1 Pro. in my PC. I have two HDD
ONE is 80 GB where W7 pro installed, another is 500GB in 3 partition. Which one to be install W8.1 for best. Please suggest.


Discussion (4)
Windows 10, 6470b Laptop. Unable to defrag the “SYS” Partition which is 46% fragmented. The other partitions will run defrag and are 0% fragmented.
Any suggestions would be appreciated.
Auslogics makes a very good disk defragger.
The app was renamed on Windows 8 and later precisely because it applies TRIM to SSDs instead of defragmenting them (which is why Windows 7 would disable the tool automatically if it detected a SSD).
Presently I have windows 7 Ultimate installed in my PC, wheather I install Win 8.1 Pro. in my PC. I have two HDD
ONE is 80 GB where W7 pro installed, another is 500GB in 3 partition. Which one to be install W8.1 for best. Please suggest.