


Are you tired of the constant pop-ups asking you to choose what happens every time you plug in a USB drive or insert a memory card into your Windows 11 PC? They’re managed by a feature named AutoPlay, which can either be a reliable friend or persistent annoyance, depending on how you configure it. In this guide, I share how to take control of AutoPlay in Windows 11, from setting it to automatically open USB drives to changing how it handles DVDs and Blu-Ray discs. I also show you how to completely disable AutoPlay notifications if they’re annoying you. Here’s how to customize AutoPlay in Windows 11 to work the way you want it to:
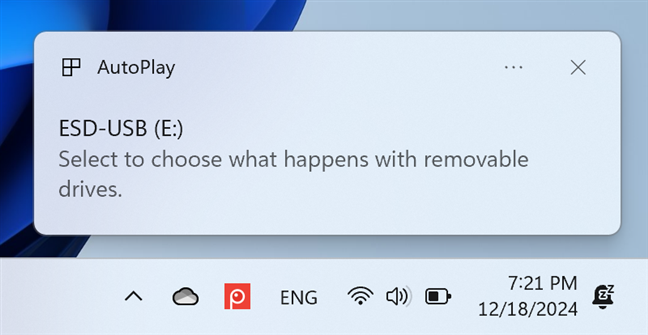
 AutoPlay asking what to do with removable drives
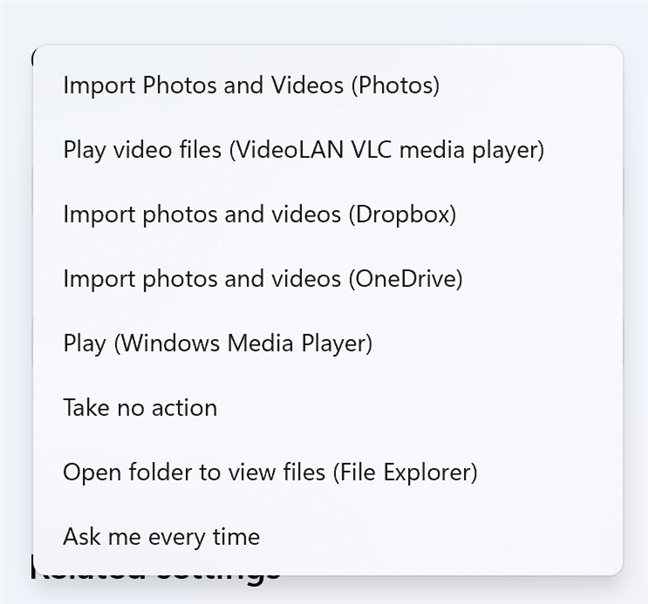
If you click or tap the AutoPlay prompt, you then see a list of options to choose from. For example, many users prefer to set Windows 11 to open USB drives automatically, without being asked each time what they want to do. For this to happen, all you have to do is select the Open folder to view files option. Then, each time you plug in a USB drive into your computer, it’s automatically opened in File Explorer.
AutoPlay asking what to do with removable drives
If you click or tap the AutoPlay prompt, you then see a list of options to choose from. For example, many users prefer to set Windows 11 to open USB drives automatically, without being asked each time what they want to do. For this to happen, all you have to do is select the Open folder to view files option. Then, each time you plug in a USB drive into your computer, it’s automatically opened in File Explorer.
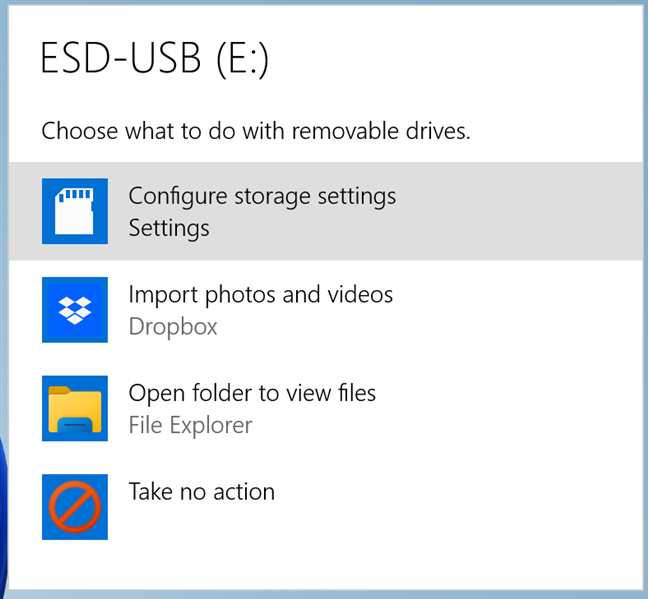
 Setting what to do with removable drives
You see a similar prompt when plugging in a microSD memory card into your Windows 11 laptop.
Setting what to do with removable drives
You see a similar prompt when plugging in a microSD memory card into your Windows 11 laptop.
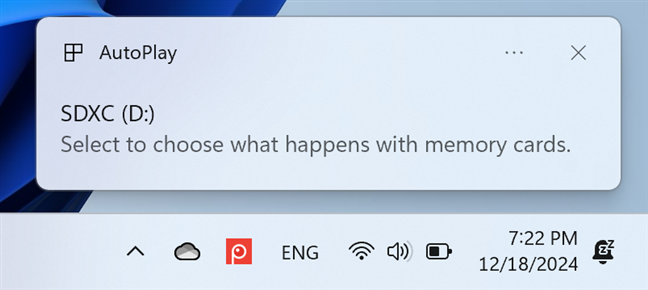
 AutoPlay asking what to do with memory cards
Clicking on the AutoPlay notification displays a menu with options in the top-right corner of the desktop. The options you see vary based on the type of device you connect to your PC, the types of files stored on it, and the apps you have installed on your Windows 11 computer.
AutoPlay asking what to do with memory cards
Clicking on the AutoPlay notification displays a menu with options in the top-right corner of the desktop. The options you see vary based on the type of device you connect to your PC, the types of files stored on it, and the apps you have installed on your Windows 11 computer.
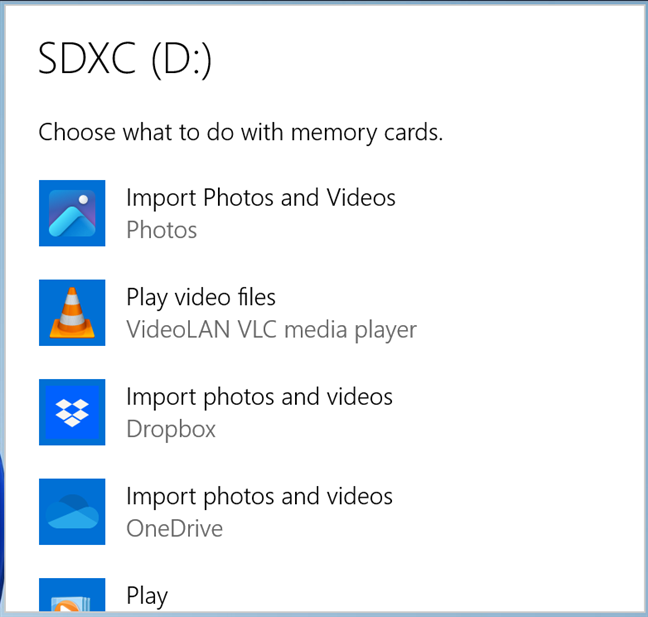
 Setting what to do with memory cards
If you have a desktop computer or a laptop with a DVD or Blu-ray drive, you can use it to read all kinds of discs, from audio CDs with the favorite bands from your youth (I have a pretty cool collection of Pink Floyd CDs, for example) to DVDs or Blu-ray discs with your favorite movies. When you plug in a disc, you see another AutoPlay prompt.
Setting what to do with memory cards
If you have a desktop computer or a laptop with a DVD or Blu-ray drive, you can use it to read all kinds of discs, from audio CDs with the favorite bands from your youth (I have a pretty cool collection of Pink Floyd CDs, for example) to DVDs or Blu-ray discs with your favorite movies. When you plug in a disc, you see another AutoPlay prompt.
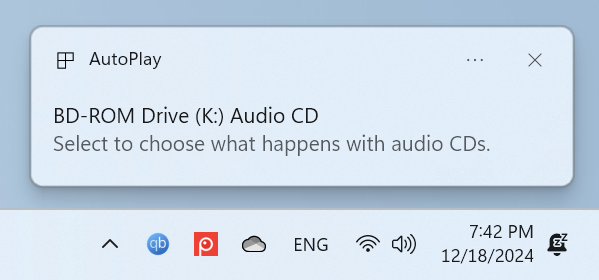
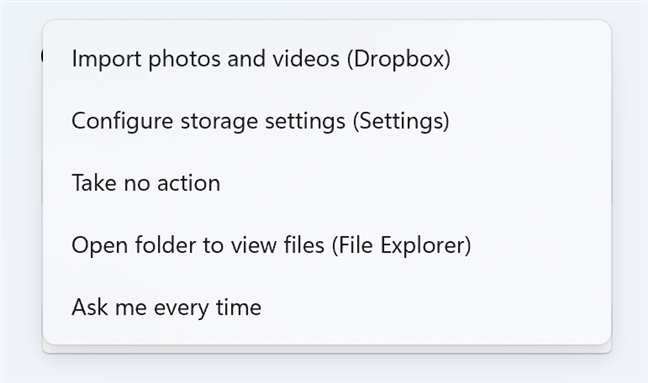
 AutoPlay asking what to do with audio CDs
Click or tap it to see a prompt with different options. When it comes to an audio CD, I have the option to play it with apps like Media Player or Windows Media Player, options that aren’t available for other types of drives.
AutoPlay asking what to do with audio CDs
Click or tap it to see a prompt with different options. When it comes to an audio CD, I have the option to play it with apps like Media Player or Windows Media Player, options that aren’t available for other types of drives.
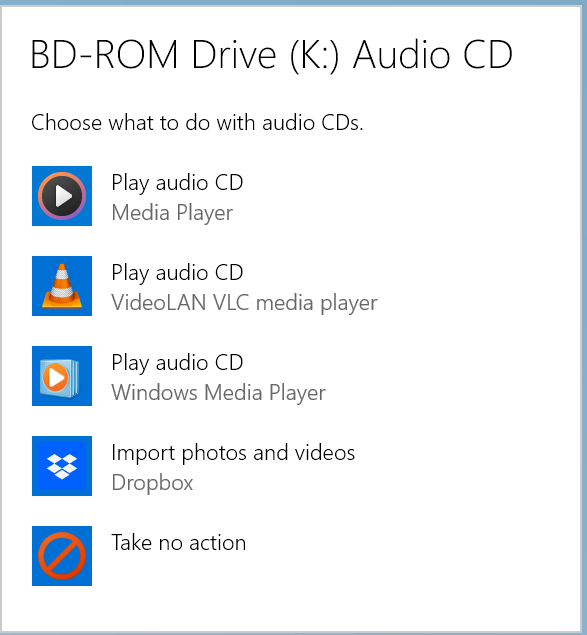
 Setting what to do with audio CDs
If you don’t want to see AutoPlay anymore for a specific type of device, all you have to do is select Take no action when you see the prompt above. Then, you no longer see AutoPlay prompts when you connect that type of device.
AutoPlay can be turned off for all types of devices and can also be personalized to suit your needs and wants. Furthermore, if you don't like your existing AutoPlay settings, you can reset it to its default behavior. Read the next sections in this article to learn how to do all these things.
Setting what to do with audio CDs
If you don’t want to see AutoPlay anymore for a specific type of device, all you have to do is select Take no action when you see the prompt above. Then, you no longer see AutoPlay prompts when you connect that type of device.
AutoPlay can be turned off for all types of devices and can also be personalized to suit your needs and wants. Furthermore, if you don't like your existing AutoPlay settings, you can reset it to its default behavior. Read the next sections in this article to learn how to do all these things.
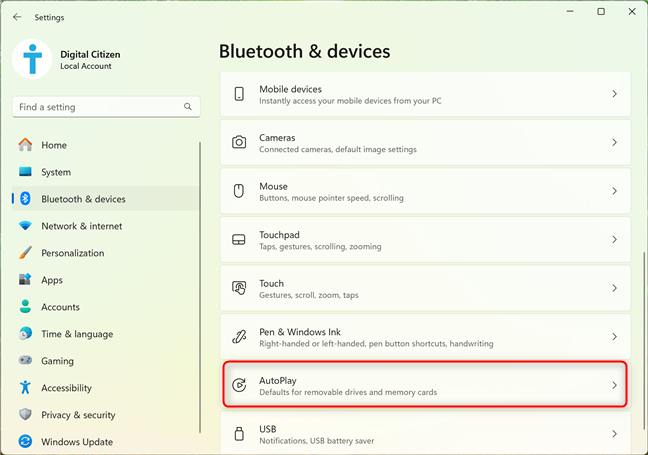
 Where to find AutoPlay in Windows 11 Settings
You then see the AutoPlay page in the Settings app and a few things that can be personalized about it.
Where to find AutoPlay in Windows 11 Settings
You then see the AutoPlay page in the Settings app and a few things that can be personalized about it.
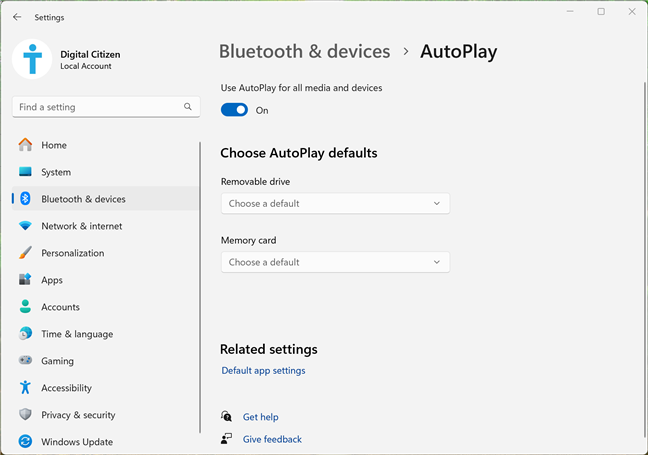 Configuring AutoPlay in Windows 11 Settings
Next, let’s see how to access AutoPlay’s settings from the Control Panel.
Configuring AutoPlay in Windows 11 Settings
Next, let’s see how to access AutoPlay’s settings from the Control Panel.
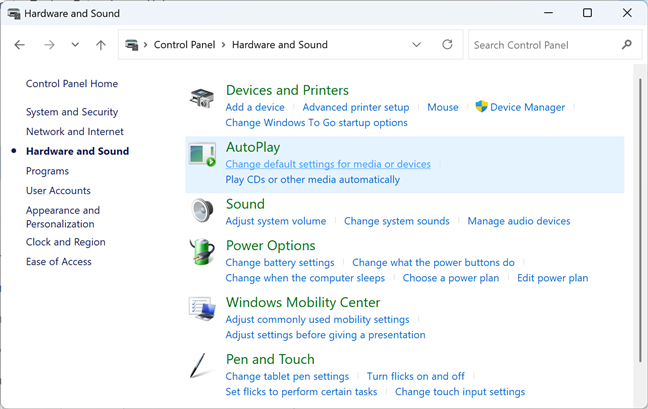
 Where to find AutoPlay in Control Panel
Now, you see all the settings available for AutoPlay in Windows 11. As you can see in the screenshot below, the list is much longer than what you find in the Settings app. One important difference is that you can set the default action based not only on the type of device you’re using, but also on the type of media found on each type of device.
Where to find AutoPlay in Control Panel
Now, you see all the settings available for AutoPlay in Windows 11. As you can see in the screenshot below, the list is much longer than what you find in the Settings app. One important difference is that you can set the default action based not only on the type of device you’re using, but also on the type of media found on each type of device.
 Configuring AutoPlay in Control Panel
Therefore, more technical users who desire granular control may want to use the Control Panel to configure AutoPlay.
Configuring AutoPlay in Control Panel
Therefore, more technical users who desire granular control may want to use the Control Panel to configure AutoPlay.
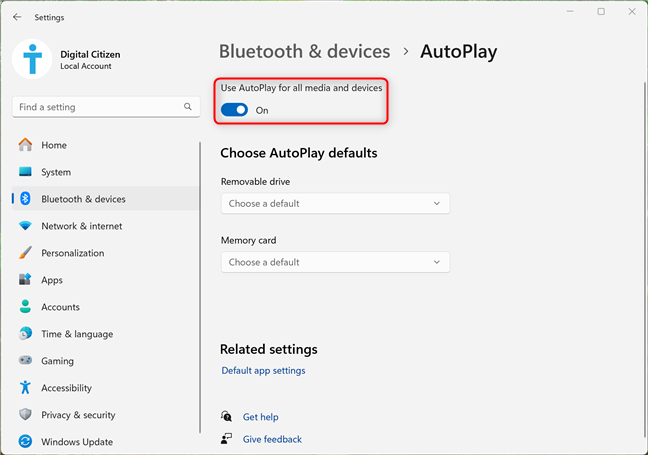 Turning AutoPlay on and off
If you don’t want to disable AutoPlay completely, keep its switch On and continue reading.
Turning AutoPlay on and off
If you don’t want to disable AutoPlay completely, keep its switch On and continue reading.
 Setting how AutoPlay handles removable drives
 Setting how AutoPlay handles memory cards
The action you select gets applied immediately.
Setting how AutoPlay handles memory cards
The action you select gets applied immediately.
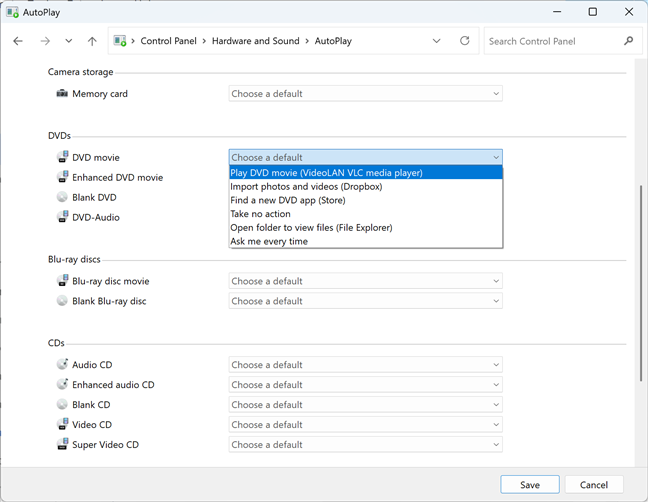
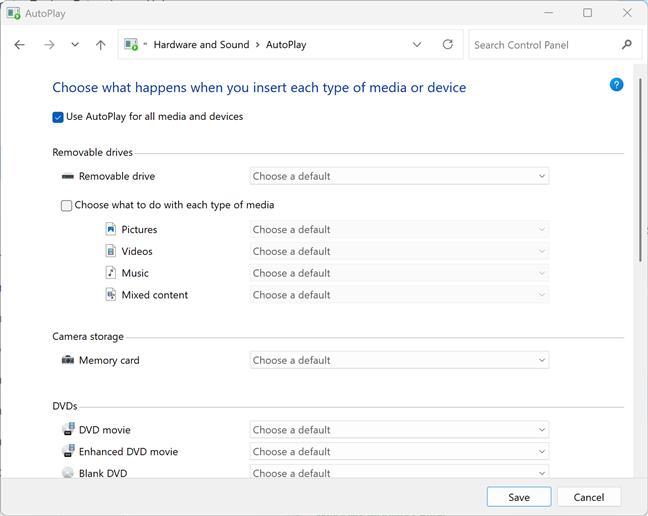
 Setting how AutoPlay handles DVDs
When you’re done setting things up, don’t forget to click or tap Save, so that your changes are remembered.
Setting how AutoPlay handles DVDs
When you’re done setting things up, don’t forget to click or tap Save, so that your changes are remembered.
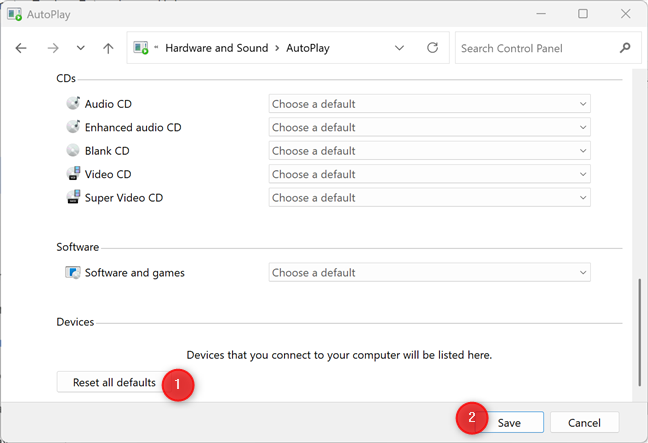
 Resetting AutoPlay to its defaults
AutoPlay is now reset, and it should resume asking how you want to handle the different devices you plug into your computer: removable drives, memory cards, etc.
Resetting AutoPlay to its defaults
AutoPlay is now reset, and it should resume asking how you want to handle the different devices you plug into your computer: removable drives, memory cards, etc.
What is AutoPlay in Windows 11?
AutoPlay is a Windows feature that lets users choose what happens when they insert a device into their computer. For example, when you plug in a USB removable drive, your PC displays in the bottom-right corner an AutoPlay prompt similar to the one below.Where is AutoPlay?
The AutoPlay feature can be accessed and configured in two places: the Windows 11 Settings app and the old Control Panel. In the Settings app, you can only configure a few AutoPlay settings, which are relevant to most modern-day Windows 11 devices. In contrast, when you open the AutoPlay settings in the Control Panel, you get access to all the options this feature offers, some of which are relevant to computers with a DVD or Blu-Ray drive. Since my goal for this article is to be as thorough as possible, I’m going to present both ways of accessing AutoPlay, each in its own section.Where is AutoPlay in the Settings app?
If you’re using a laptop with Windows 11 or a computer without a Blu-Ray or DVD drive, it makes sense to access AutoPlay from the Settings app, like this: open Settings (Windows + I) and navigate to Bluetooth & devices. Scroll down until you find AutoPlay, and click or tap it.Where is AutoPlay in the Control Panel?
On your Windows 11 computer or device, open the Control Panel. Click or tap Hardware and Sound, and then access AutoPlay.Configure how AutoPlay works in Windows 11
Configuring how AutoPlay works isn’t difficult. However, depending on what you want to do, you may need to access its settings in the Control Panel or the Settings app. To help you out, I present the quickest way to configure different aspects of AutoPlay.How to enable or disable AutoPlay in Windows 11
If you want to turn on or off AutoPlay for all types of media, access its page in the Settings app using the instructions shared earlier: go to Settings > Bluetooth & devices > AutoPlay. If this feature doesn’t work, and you want to turn on AutoPlay, click or tap the switch next to Use AutoPlay for all media and devices. When the switch is On, this feature is enabled. If you want to disable AutoPlay, set this switch to Off.Configure how AutoPlay handles USB removable drives
Under Choose AutoPlay defaults, click or tap the drop-down list for Removable drive. You now have several options for how to handle USB removable drives. If you want to set Windows 11 to open USB drives automatically, choose Open folder to view files (File Explorer). If you want to disable the auto opening of USB drives, select Take no action or Ask me every time, depending on what you prefer.Configure how AutoPlay handles memory cards
If you’re interested in setting how AutoPlay handles memory cards, click or tap the drop-down list Memory card, and select the action you prefer. Since memory cards are used mostly for storing pictures and videos, you can import them using some apps installed on your Windows 11 computer: Photos, OneDrive, Dropbox, etc.Configure how AutoPlay handles DVDs, Blu-ray discs, and CDs
If you have a computer with a DVD or Blu-Ray drive, you may want to handle how AutoPlay handles the discs you plug into your computer. To change its behavior, you must open the Control Panel and go to Hardware and Sound > AutoPlay. Scroll down the AutoPlay window until you find the options for configuring DVDs, Blu-ray discs, and CDs. Click or tap the drop-down list next to the type of media that interests you, and then select the default action you prefer.Is AutoPlay not working in Windows 11? Here’s how to reset it!
If AutoPlay is not working as you wish, the best solution is to reset it to its default settings. To reset AutoPlay in Windows 11, first open the Control Panel and go to Hardware and Sound > AutoPlay. Scroll down to the bottom of the AutoPlay window, click or tap Reset all defaults, and then Save.
Discussion (12)
Autoplay does NOT open automatically to Windows File Explorer (even when that’s selected for ALL types of devices) when an external hard drive is formatted to FAT32.
I know nothing about anything.. I got lost. I can’t burn so I was typing to fine out how to set it 8.1. I did default didn’t burn. got auto play checked still don’t burn. can you help it use to burn until I started playing around with all of this don’t know how it was at first
Is there a way to “customize” autoplay for a specific device and action? I want to start smart switch (phone sync program) when I plug my phone in to my windows 10/64 pc… or can a macro (that simply opens an app…maybe more) be triggered to run upon phone connection?
when i go to Control Panel>Hardware and Sound>Autoplay>Devices there are devices like tablets and cell phones that belonged to my friends when they downloaded music that aren’t used with my pc anymore. How to i remove them from being listed. I went into RegEdit like it said above but didnt know what to remove. Do i remove everything but the default setting?
GREAT
It was what I needed at the moment.
I have three external hard drives connected to my computer, which is running Windows 7 (64-bit) Professional. Is it possible to not get the AutoPlay pop-up option to display after boot on those drives? If I disable all AutoPlay then when I place a SD card in the reader Lightroom will not auto-import. For some reason, perhaps my stupidity, I wasn’t able to obtain results with the file in the 12/12/2010 entry above.
That default program editor worked great. I use audiograbber to rip all my cds, but the option was not listed in windows autoplay settings and there was no way to ad a custom command.
Yes this should be a default for Windows. And I see the related link here now. Thanks!
After some Google research here is what I found, tried, and confirmed it works like a charm (https://www.orangeblue.net.ms/). In fact some 15 Google search pages later, and rather unbelievably, this was the only solution I could find that was a no-brainer.
Needless to say Microshaft strikes again by deciding what the user wants instead of offering an even semi-open platform that does not require hacking.
You have got to do better than this – while the article might help someone who never bothered to explore their computer’s operating system it is far from useful. Why not expand by explaining how to change the default Autoplay options. For instance if I hate Windows Media Player and want to use KMPlayer – how do I customize my Autoplay function to show another media player?
Now that would make this a true resource!
Point taken. We will try to publish something in the future about this. Thanks for the suggestion. 😉
I completely agree! Pretty standard info you can find anywhere on the web. Useless to me – I wanna control Autoplay.