Once your OneDrive account is set up and in use, you may want to check out your options to make sure everything is configured the way you like it. While the defaults are fine for most, power users may enjoy the ability to change default file formats and tagging permissions. This tutorial will show how to change them.
How To Access the OneDrive Website Options
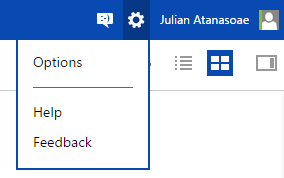
To access the Options menu, click or tap the gear icon at the top right of your OneDrive account window and select Options.
OneDrive, website, configure, storage, format, tag, photo
The Options page opens, showing a column with things to configure, on the left.
How to Manage Or Upgrade Your OneDrive Storage Space
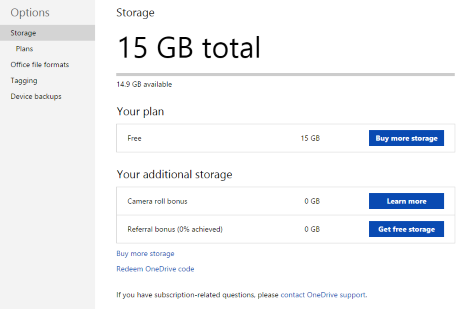
Click or tap Storage from the Options menu for a quick glance at your available storage space. If you have plenty of space available, you don't have to worry about upgrading. If you're cutting it close, you might consider paying for more space.
OneDrive, website, configure, storage, format, tag, photo
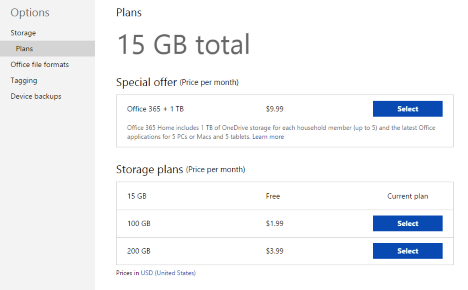
Click or tap Plans from the Options menu or "Buy more storage" from the Storage page to see your available options for a paid OneDrive account. You'll find that the prices are reasonable, the most expensive option being 200GB for $3.99/month.
Also, if you buy an Office 365 subscription, you get 1 TB of OneDrive storage at no additional cost. We consider this as a very good offer, and we strongly recommend it because you get a lot of value for a very cheap price. You can find a very good deal on Amazon.
OneDrive, website, configure, storage, format, tag, photo
Click Select next to a payment option if you want to upgrade your account.
How to Change the Format Used by Office Online
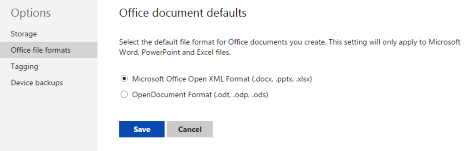
The "Office File Formats" section gives you the chance to change the default file formats for documents created using Office Online. The default selection is to use Microsoft Office Open XML Format, which will work for most Windows users with Microsoft Office products on their devices. For users with a mixed environment, or those who opt for open-source applications such as LibreOffice or AbiWord, there is a choice of the OpenDocument format.
OneDrive, website, configure, storage, format, tag, photo
Make your selection and click or tap Save to keep it.
How to Change Who Can Tag You In OneDrive Photos
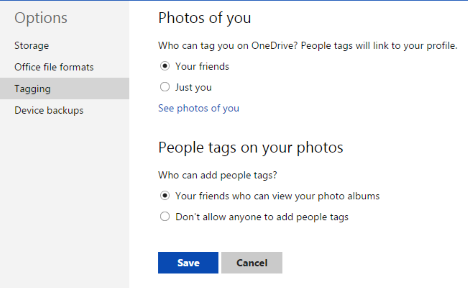
The last section, called Tagging, lets you choose who can tag you in photos, and who can tag others in your photos. While most will be fine with the default settings in this section, users who don't want crazy party pictures linking back to their profiles may want to limit permissions.
The "Photos of You" section lets you manage who can tag you in any picture that any user uploads. Choose "Just you" if you want to have full control of what pictures link to you.
The "People Tags on your Photos" section manages tags on all the photos that you upload. By default, any user who can view your albums can create tags, change that if you want to keep tagging privileges to yourself.
OneDrive, website, configure, storage, format, tag, photo
Make your selections and click or tap Save.
Conclusion
You may notice that the OneDrive website has relatively few manageable options. While tweak happy users may lament the loss of full control, we feel that the website is intuitive and it has a smart design that doesn't require much tweaking. This simple options section covers the bases well enough without making a simple tool complicated.
How do you feel Microsoft did with the OneDrive website? Do you wish you could change any major features? We'd love to hear your opinions in the comments below.
I have Onedrive on a Win 8.1 computer. However the upload speed is simply terrible. In the same network or even the same computer, I can upload to Google Drive some 10X,20X faster. Why?
Julian Atanasoae ·
The differences may be in the way Google Drive was architected and that could facilitate higher upload speeds. It ultimately depends on the quality of your Internet connection.
Burton ·
No proxy Ciprian, but thanks for giving it a try. Keep up the good work. I’ll give that bunch in the Windows Community one more chance to try to solve the problem of my misbehaving computer before I quit using Skydrive.
Burton
Ciprian Adrian Rusen ·
Thanks for the appreciation and sorry I couldn’t help more. I hope you will keep reading our website, at least from time to time. 🙂
Burton ·
I tried reinstalling the Skydrive app on both my computers and was careful to make sure that the fetch feature was enabled. Nevertheless, I am still unable to fetch files that are on my desktop computer while using my laptop,
I went to the Microsoft Community forum seeking help. All I’ve gotten from them so far is a run around and a hand off from one Moderator to another.
The funny thing is, I AM able to access ANY file on my laptop from my desktop computer. I suppose that if I can’t figure out why the fetch feature won’t work both ways for me, I can go back to using TeamViewer again and forget about using Skydrive.
Thanks Ciprian
Ciprian Adrian Rusen ·
What about your firewall? It might be blocking the access required. Disable it temporarily and see if the fetch works.
Remember – you must have the desktop application installed on both and set correctly.
Burton ·
What I would like to know is why I can fetch files from my laptop when using my desktop computer, but can’t fetch files from my desktop when using my laptop computer. I’ve tried to resolve the problem using the forum on Microsoft Answers, but the forum moderators keep passing me off to another moderator without ever really trying to help me with this problem. Have you any idea where or to whom I can get help with this problem?











Discussion (8)
I have Onedrive on a Win 8.1 computer. However the upload speed is simply terrible. In the same network or even the same computer, I can upload to Google Drive some 10X,20X faster. Why?
The differences may be in the way Google Drive was architected and that could facilitate higher upload speeds. It ultimately depends on the quality of your Internet connection.
No proxy Ciprian, but thanks for giving it a try. Keep up the good work. I’ll give that bunch in the Windows Community one more chance to try to solve the problem of my misbehaving computer before I quit using Skydrive.
Burton
Thanks for the appreciation and sorry I couldn’t help more. I hope you will keep reading our website, at least from time to time. 🙂
I tried reinstalling the Skydrive app on both my computers and was careful to make sure that the fetch feature was enabled. Nevertheless, I am still unable to fetch files that are on my desktop computer while using my laptop,
I went to the Microsoft Community forum seeking help. All I’ve gotten from them so far is a run around and a hand off from one Moderator to another.
The funny thing is, I AM able to access ANY file on my laptop from my desktop computer. I suppose that if I can’t figure out why the fetch feature won’t work both ways for me, I can go back to using TeamViewer again and forget about using Skydrive.
Thanks Ciprian
What about your firewall? It might be blocking the access required. Disable it temporarily and see if the fetch works.
Read this tutorial and set Skydrive the same on both: https://www.digitalcitizen.life/onedrive-fetch-files/
Remember – you must have the desktop application installed on both and set correctly.
What I would like to know is why I can fetch files from my laptop when using my desktop computer, but can’t fetch files from my desktop when using my laptop computer. I’ve tried to resolve the problem using the forum on Microsoft Answers, but the forum moderators keep passing me off to another moderator without ever really trying to help me with this problem. Have you any idea where or to whom I can get help with this problem?