

FurMark is still useful for checking GPU heat, fan noise, and worst case power behavior, but it is no longer enough to prove that a modern graphics card is truly stable. Today’s GPUs from Nvidia, AMD, and Intel change clocks, voltages, power draw, and boost behavior constantly, so proper stress testing now requires a mix of synthetic tests, memory checks, real games, ray tracing workloads, and long term heat testing.
This matters most if you overclock, undervolt, change power limits, or adjust fan curves. A GPU can pass FurMark for 30 minutes and still crash in a real game within five minutes. That does not mean FurMark is useless. It means modern GPU stability is more complicated than one benchmark can show.
The better approach is to build a testing routine that checks the card from different angles. You need to know how it behaves at stock settings, how the core and memory respond separately, how it handles sudden load changes, and whether it stays stable in the games you actually play.
Start by testing your GPU at stock settings
Before changing any slider, you should record how your GPU behaves at default settings. This gives you a baseline so you can tell whether your tuning actually improves performance or simply pushes the card into throttling.
Reset settings in tools such as MSI Afterburner, Nvidia App, AMD Adrenalin, or Intel Graphics Software. Also remove driver level overrides that could affect results. Then run a few repeatable tests and record clocks, temperatures, fan speeds, power draw, scores, and frame rates.
| What to record | Why it matters |
|---|---|
| Core clock | Shows real sustained boost behavior |
| Memory clock | Helps compare stock and tuned VRAM speed |
| GPU temperature | Shows whether cooling is healthy |
| Hotspot and VRAM temperature | Helps catch hidden thermal problems |
| Board power | Shows how much power the card actually uses |
| Fan speed | Helps judge noise and cooling balance |
| Benchmark score | Confirms whether tuning improves performance |
| 1 percent lows | Shows smoothness, not just average FPS |
Without this baseline, you may think an overclock is successful when the card is actually slower because of heat, power limits, or memory errors.
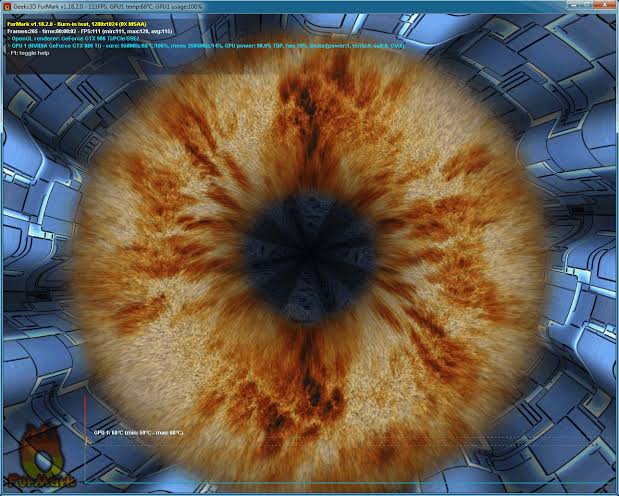
Use FurMark for thermals, not final stability
FurMark is a heavy thermal and power test. It can quickly reveal bad airflow, weak cooling, dusty heatsinks, failing fans, poor thermal paste contact, or a power supply problem.
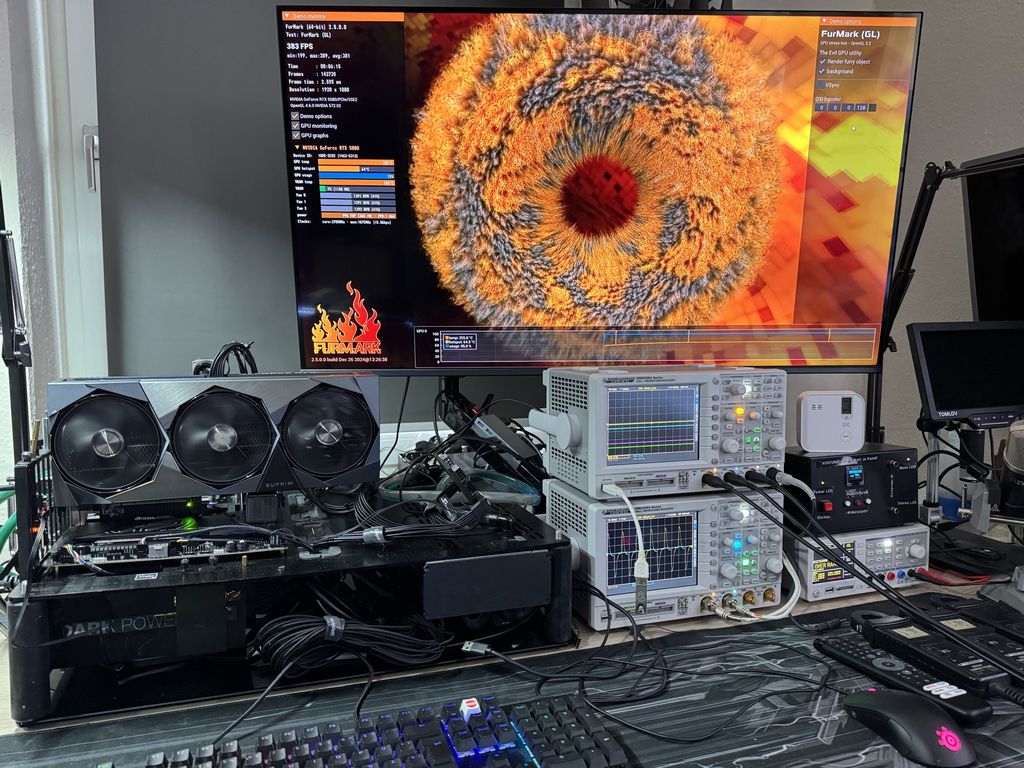
But it does not reflect how modern games behave. Many GPUs detect FurMark like a power virus and downclock aggressively to protect themselves. That means the card may run differently in FurMark than it does in Cyberpunk 2077, Alan Wake 2, Black Myth: Wukong, or other demanding games.
A short FurMark run of 10 to 20 minutes is enough for thermal sanity testing. It should not be the only test you trust.
Add OCCT and modern 3DMark tests to catch real instability
OCCT is useful because it can test load changes, adaptive GPU behavior, and VRAM stability. Modern GPUs often fail during fast clock changes or sudden power spikes, not only under a flat 100 percent load.
3DMark is useful for repeatable performance testing. For newer GPUs, modern tests matter more than old DirectX 11 benchmarks.
| Tool | Best use |
|---|---|
| FurMark | Thermal and power torture testing |
| OCCT | Load transitions and VRAM stability |
| 3DMark Steel Nomad | Modern raster performance |
| 3DMark Speed Way | DirectX 12 Ultimate and ray tracing |
| 3DMark Port Royal | Ray tracing stability |
| Time Spy Extreme | DX12 raster comparison |
| Unigine Superposition | Secondary stress test with a different engine |
| Unigine Heaven | Mostly useful for older GPUs |
Old tests like Unigine Heaven can still be fun for legacy comparisons, but they are not enough for modern GPUs. They do not properly stress newer ray tracing units, mesh shaders, upscalers, frame generation features, or high memory pressure workloads.
Test core and memory separately
One common mistake is changing core clock, memory clock, voltage, power limit, and fan curve at the same time. When the system crashes, you will not know which change caused the problem.
Test the core first while keeping memory at stock. Use modern synthetic tests and a few demanding games. Watch for driver timeouts, app crashes, freezes, black screens, and sudden reboots.
Then test memory separately. VRAM instability can be deceptive because modern memory error handling may hide obvious artifacts. Instead of showing flashing textures or dots, a bad memory overclock may quietly lower performance.
If your score stops improving or starts dropping as memory frequency rises, you have probably gone too far, even if the screen looks normal.
Real games are the final test
Synthetic benchmarks are controlled and repeatable, but real games are messy. They include shader compilation, asset streaming, changing CPU and GPU loads, ray tracing, upscaling, frame generation, and sudden power spikes.
A proper game test should include variety:
| Game type | Why it matters |
|---|---|
| Heavy raster game | Tests traditional GPU load |
| Ray traced or path traced game | Tests RT hardware and power behavior |
| Unreal Engine 5 game | Tests modern engine behavior and asset streaming |
| Your daily game | Proves the profile works where it matters |
A GPU profile that passes every benchmark but crashes in the one game you play every night is not stable. It only means the failure is specific.
Test cold starts and heat soaked conditions
Modern GPUs boost differently depending on temperature. A cold GPU may boost too aggressively and crash early. A hot GPU may lose stability after hours of gaming because the room is warmer or the case is fully heat soaked.
That is why you should test both conditions. Run a game shortly after a cold boot, then test again after the system has been under load for a long time. A profile tuned during winter may not stay stable during summer.
Leaving some safety margin is better than chasing the highest possible benchmark number.
A practical GPU stress testing workflow
A stable GPU tune should pass multiple layers of testing, not one quick benchmark run.
| Step | What to do |
|---|---|
| 1 | Record stock baseline |
| 2 | Test core clock or undervolt alone |
| 3 | Test VRAM clock alone |
| 4 | Combine core and memory settings |
| 5 | Run FurMark for thermal checking |
| 6 | Use OCCT for load shifts and VRAM |
| 7 | Loop modern 3DMark tests |
| 8 | Test real games with raster and ray tracing |
| 9 | Check cold and heat soaked stability |
| 10 | Use the PC normally for long sessions |
Watch for warning signs such as driver crashes, black screens, full reboots, flickering, missing textures, stutter, benchmark score drops, or crashes that only happen after long play sessions.
Stable daily use matters more than high benchmark numbers
Modern GPUs have strong safety protections, so normal software level tuning will not instantly destroy your card. Still, running at the edge every day can increase heat, noise, and long term wear on the cooler, VRM, thermal pads, solder joints, and silicon.
For a daily system, a conservative undervolt or mild overclock is usually better than an aggressive profile that crashes once a week. Stability should mean smooth games, clean frame times, reasonable temperatures, and no unexpected failures.
FurMark still has a role, but it is only one part of the process. A modern GPU needs to pass thermal testing, memory testing, synthetic benchmarks, ray tracing workloads, and real games before you can call it stable. Anything less is only a partial test.


Discussion (0)
Be the first to comment.