


Some of our readers have asked us if Windows 11 supports biometrics. Yes, it does, but in order for biometric authentication to work, you also need laptops or desktop computers with hardware that’s compatible with things like fingerprint authentication or face recognition. Both types of biometric authentication allow for fast and secure logins, and I personally like using them over traditional sign-in methods. If you have a Windows 11 laptop with a fingerprint scanner, here’s how to set up and use fingerprint authentication:
 In Windows 11's Settings, go to Accounts > Sign-in options
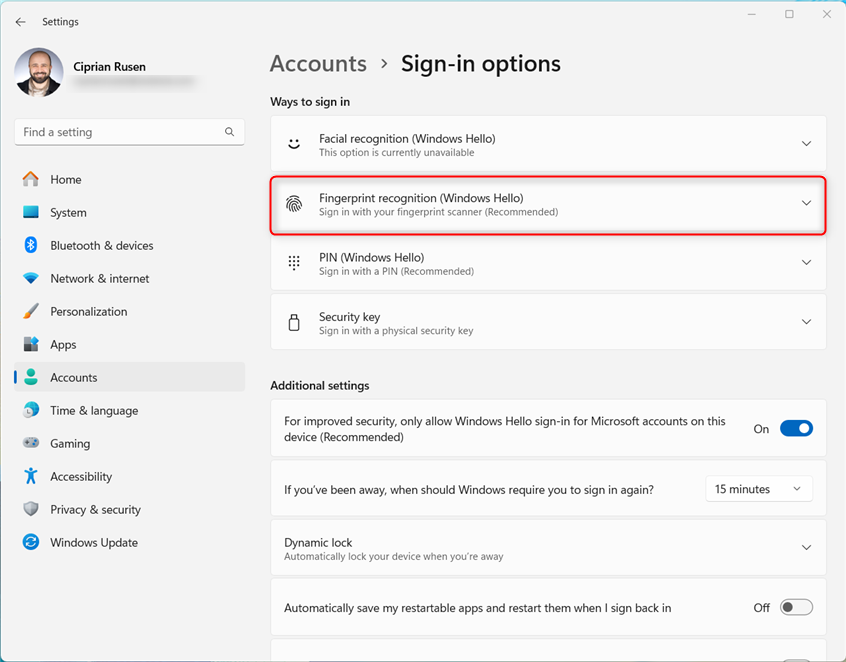
You see several options for signing in to Windows 11. Click or tap Fingerprint recognition (Windows Hello). If your laptop has a compatible fingerprint scanner like the HUAWEI MateBook D 16 2024 laptop I'm using, Windows 11 shows the “Sign in with your fingerprint scanner (Recommended)” message in this section.
In Windows 11's Settings, go to Accounts > Sign-in options
You see several options for signing in to Windows 11. Click or tap Fingerprint recognition (Windows Hello). If your laptop has a compatible fingerprint scanner like the HUAWEI MateBook D 16 2024 laptop I'm using, Windows 11 shows the “Sign in with your fingerprint scanner (Recommended)” message in this section.
 Click or tap Fingerprint recognition (Windows Hello)
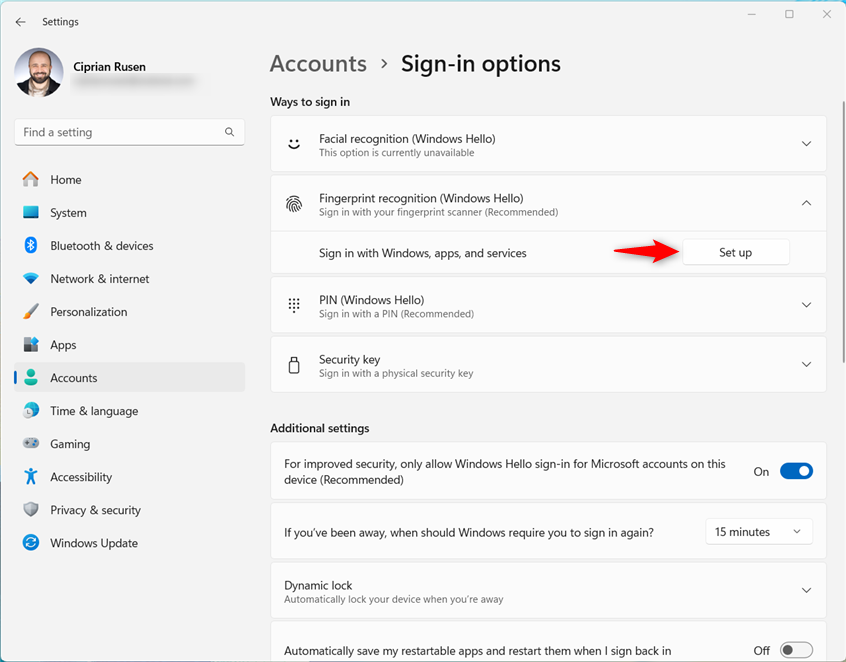
The Fingerprint recognition (Windows Hello) section extends, and you now see the Set up button. Click or tap on it to set up fingerprint authentication in Windows 11.
Click or tap Fingerprint recognition (Windows Hello)
The Fingerprint recognition (Windows Hello) section extends, and you now see the Set up button. Click or tap on it to set up fingerprint authentication in Windows 11.
 Click or tap Set up
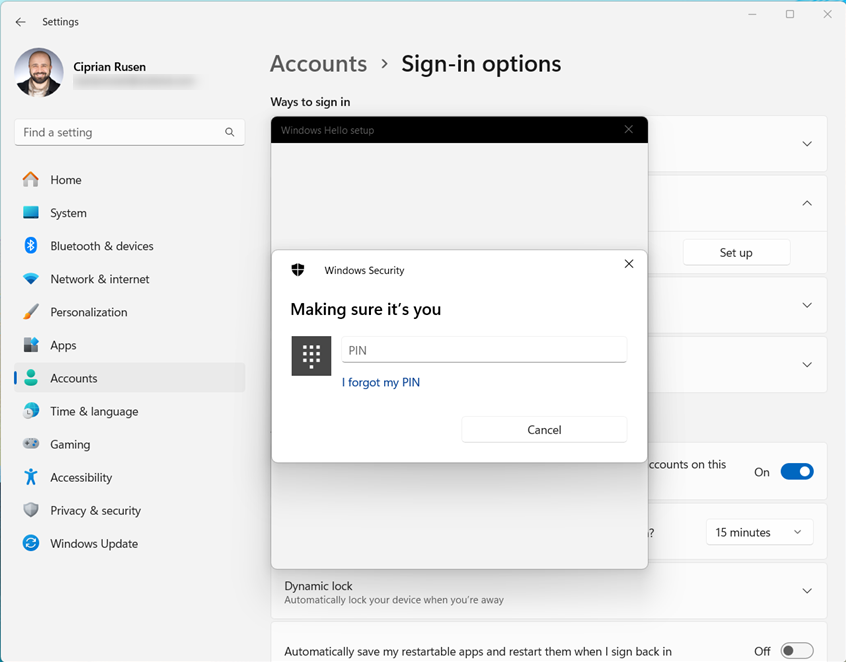
First, Windows 11 displays a welcome message and then asks you to enter your PIN or account password to make sure it is you. Type it and wait. Luckily, this feature works with both Microsoft accounts and local accounts.
Click or tap Set up
First, Windows 11 displays a welcome message and then asks you to enter your PIN or account password to make sure it is you. Type it and wait. Luckily, this feature works with both Microsoft accounts and local accounts.
 Enter your PIN, if asked
Next, you’re asked to touch the fingerprint sensor repeatedly. Do as instructed.
Enter your PIN, if asked
Next, you’re asked to touch the fingerprint sensor repeatedly. Do as instructed.
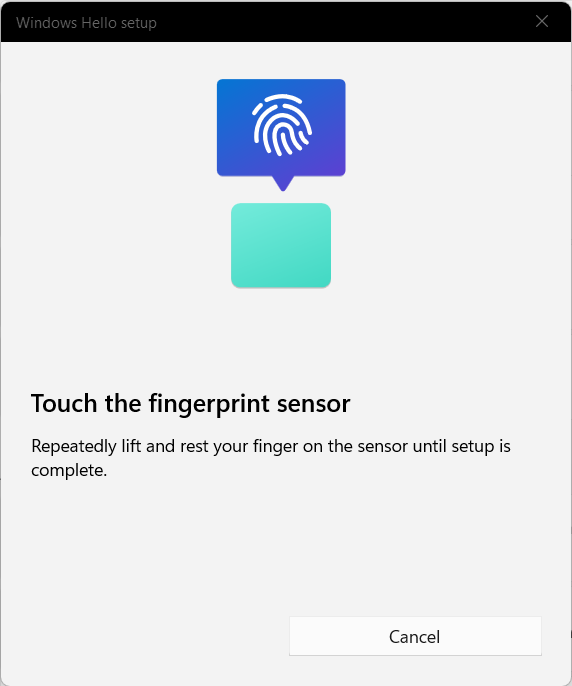
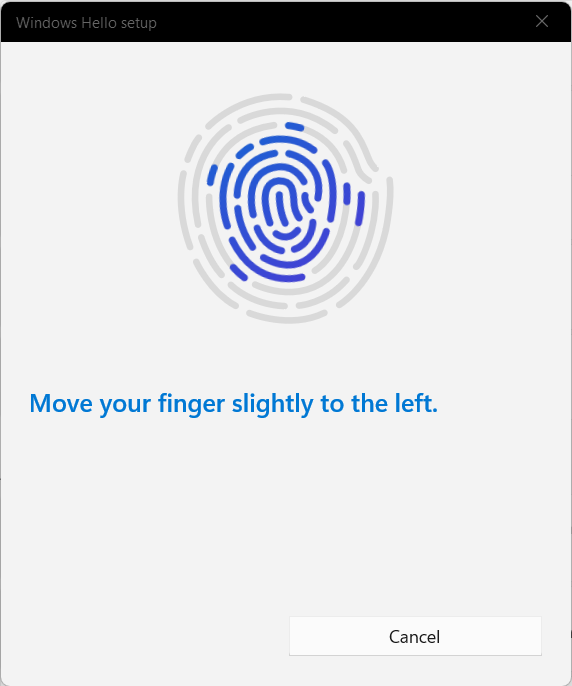
 Touch the fingerprint sensor
As you press your finger on the fingerprint reader and lift it, you see a map of a fingerprint and instructions on what to do next and how to move your finger. Follow those instructions closely.
Touch the fingerprint sensor
As you press your finger on the fingerprint reader and lift it, you see a map of a fingerprint and instructions on what to do next and how to move your finger. Follow those instructions closely.
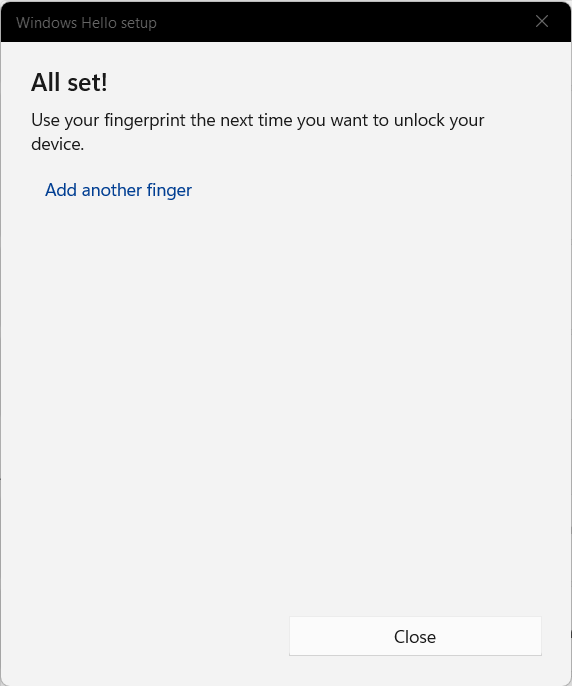
 Follow the instructions
When Windows 11 has read all the information it needs about your fingerprint, it lets you know it’s All set! At this step, you can choose to “Add another finger” or click or tap Close and stop here.
Follow the instructions
When Windows 11 has read all the information it needs about your fingerprint, it lets you know it’s All set! At this step, you can choose to “Add another finger” or click or tap Close and stop here.
 Fingerprint authentication is set
IMPORTANT: If you didn’t set up a PIN for authenticating to Windows 11 and you’re using a password instead, at the screen above, you’ll be asked to create a PIN, and you won’t see the Close option. If you don’t want to do that, simply click or tap the X button in the top-right corner to close the window.
If you use your laptop in all kinds of environments and with both hands, it is a good idea to choose “Add another finger” and go through the same process for reading the next fingerprint. I like to register the same finger on both hands so that I can easily open the laptop with my right or left hand, depending on which is easier in a given context.
Fingerprint authentication is set
IMPORTANT: If you didn’t set up a PIN for authenticating to Windows 11 and you’re using a password instead, at the screen above, you’ll be asked to create a PIN, and you won’t see the Close option. If you don’t want to do that, simply click or tap the X button in the top-right corner to close the window.
If you use your laptop in all kinds of environments and with both hands, it is a good idea to choose “Add another finger” and go through the same process for reading the next fingerprint. I like to register the same finger on both hands so that I can easily open the laptop with my right or left hand, depending on which is easier in a given context.
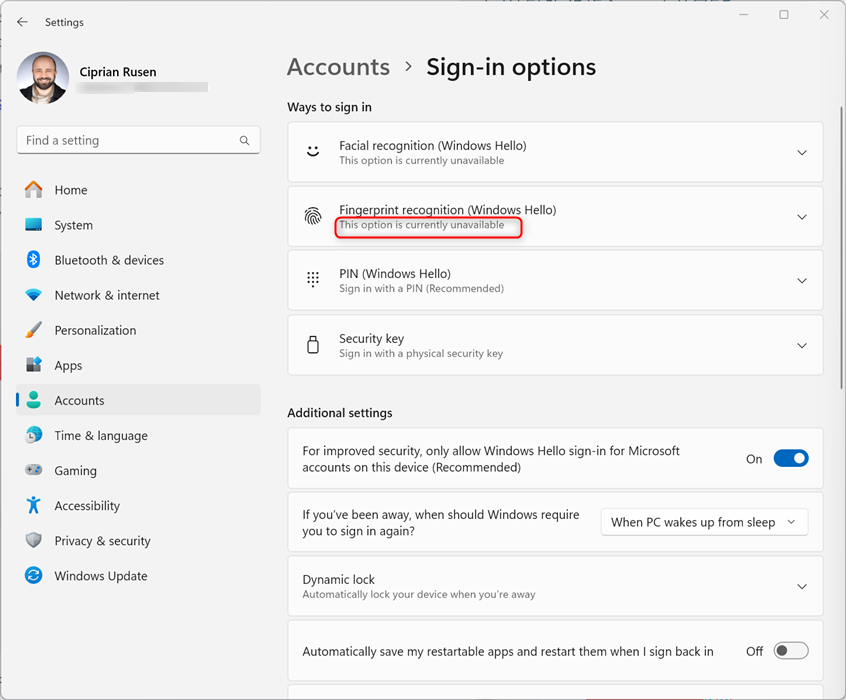
 Fingerprint recognition is currently unavailable
If you know that you have one, open the Device Manager and see if it shows up under Biometric devices. If it doesn’t, or if it does but has a yellow exclamation mark, you should look for the appropriate drivers on the support website of your laptop’s manufacturer. Search for the exact model of laptop you’re using, download and install the latest drivers for the fingerprint scanner, and try again.
Fingerprint recognition is currently unavailable
If you know that you have one, open the Device Manager and see if it shows up under Biometric devices. If it doesn’t, or if it does but has a yellow exclamation mark, you should look for the appropriate drivers on the support website of your laptop’s manufacturer. Search for the exact model of laptop you’re using, download and install the latest drivers for the fingerprint scanner, and try again.
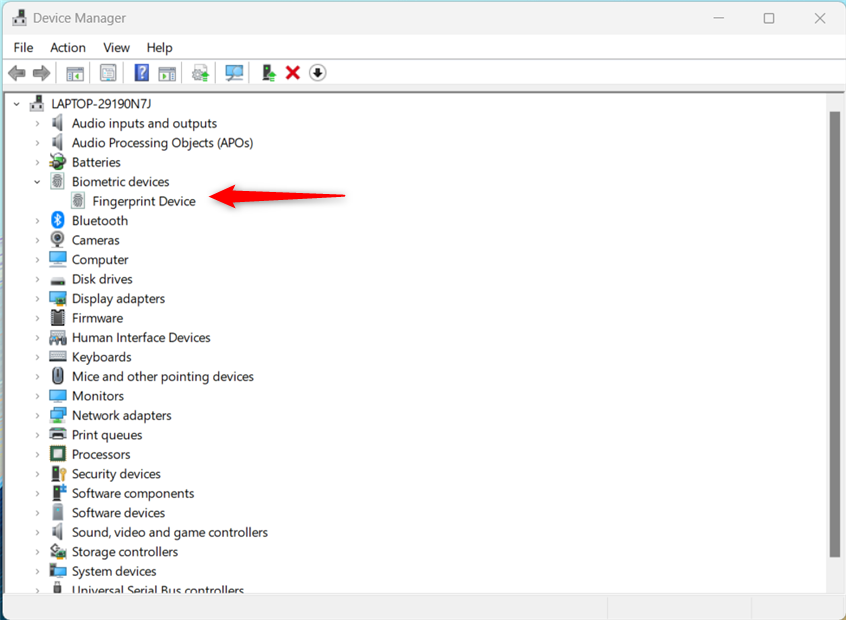
 Does the Fingerprint Device show up under Biometric devices?
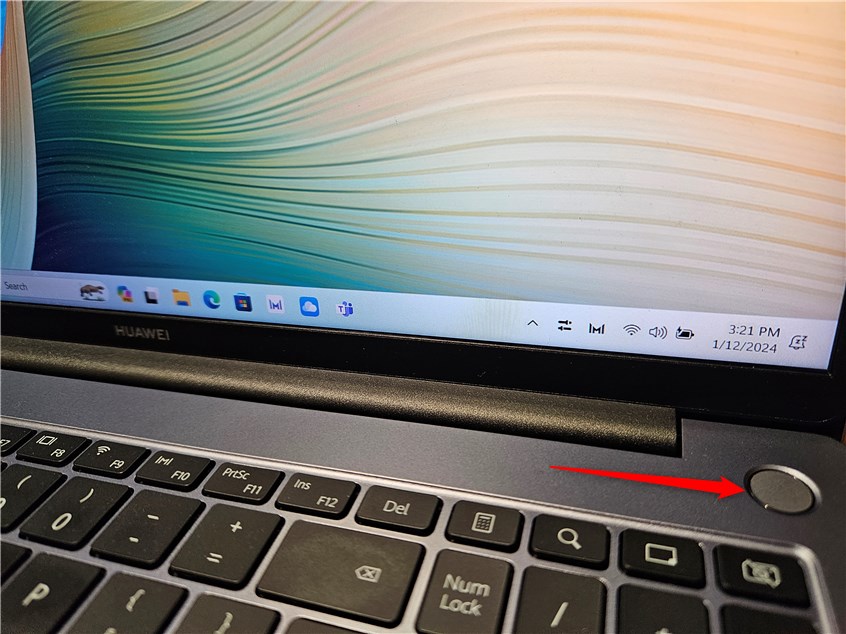
 My laptop's Power button is a fingerprint reader
If, for some reason, Windows 11 doesn’t automatically authenticate using your fingerprint, on the Sign-in screen, click or tap Sign-in options, choose Fingerprint, and then press the fingerprint scanner with the finger you recorded for authentication.
My laptop's Power button is a fingerprint reader
If, for some reason, Windows 11 doesn’t automatically authenticate using your fingerprint, on the Sign-in screen, click or tap Sign-in options, choose Fingerprint, and then press the fingerprint scanner with the finger you recorded for authentication.
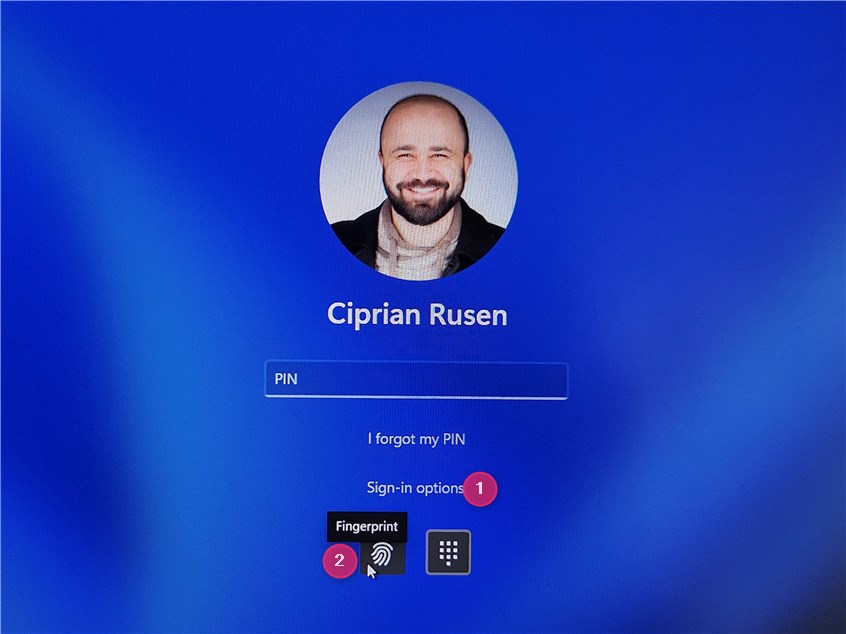 Click or tap Sign-in options and choose Fingerprint
If you’re using the wrong finger for authentication, or if your finger is dirty, Windows 11 says that your fingerprint couldn’t be recognized and asks you to try a different finger. Do as instructed, and you should be able to log in in no time.
Click or tap Sign-in options and choose Fingerprint
If you’re using the wrong finger for authentication, or if your finger is dirty, Windows 11 says that your fingerprint couldn’t be recognized and asks you to try a different finger. Do as instructed, and you should be able to log in in no time.
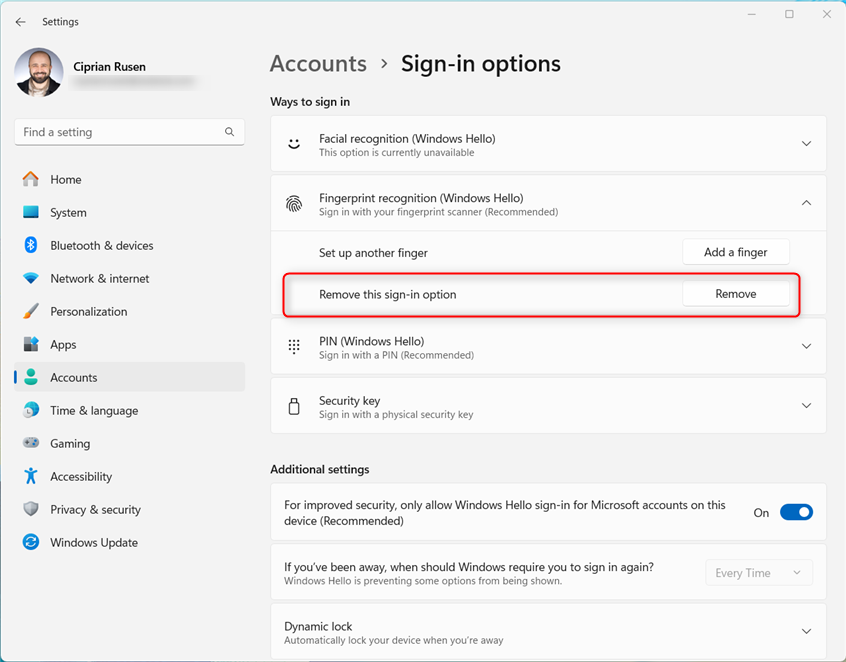 Turn off Fingerprint recognition (Windows Hello)
Fingerprint authentication is removed immediately without any confirmation being requested, and you can no longer use your finger(s) to authenticate to Windows 11. Furthermore, your fingerprint information is deleted, and to use this feature again, you need to redo all the configuration steps shared at the beginning of this tutorial.
TIP: If you want your Windows 11 laptop to remain secure while you’re away from it, it’s best to shut down Windows 11 instead of simply closing your laptop’s lid. Suppose you don’t like shutting it down; at least lock Windows 11 before you step away from the laptop.
Turn off Fingerprint recognition (Windows Hello)
Fingerprint authentication is removed immediately without any confirmation being requested, and you can no longer use your finger(s) to authenticate to Windows 11. Furthermore, your fingerprint information is deleted, and to use this feature again, you need to redo all the configuration steps shared at the beginning of this tutorial.
TIP: If you want your Windows 11 laptop to remain secure while you’re away from it, it’s best to shut down Windows 11 instead of simply closing your laptop’s lid. Suppose you don’t like shutting it down; at least lock Windows 11 before you step away from the laptop.
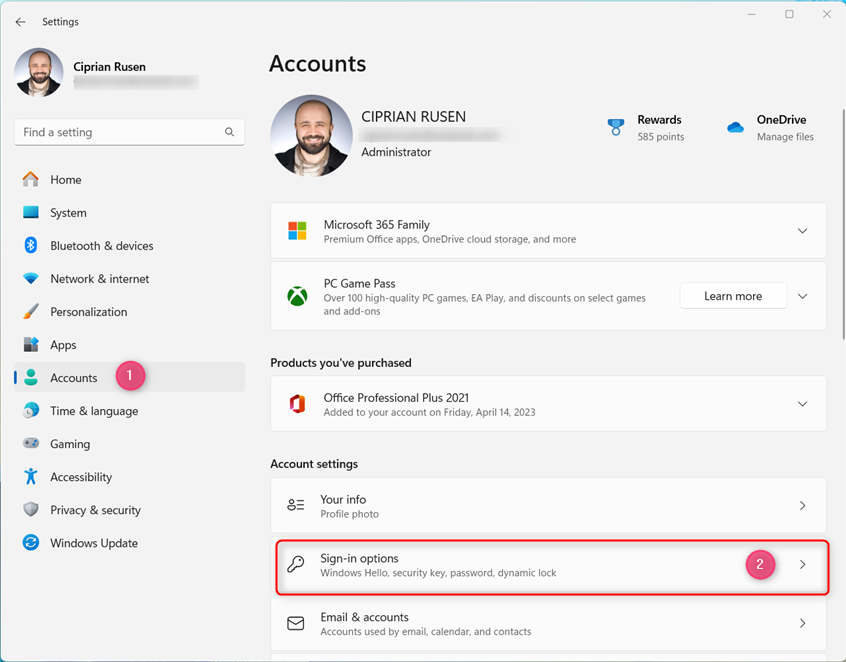
How to set up Fingerprint recognition (Windows Hello)
To enable fingerprint authentication in Windows 11, you need to set up the Fingerprint recognition service through Windows Hello. To do that, on your laptop with a fingerprint reader, open the Windows 11 Settings by pressing Windows + I on your keyboard or by clicking/tapping Start and then Settings. In the Settings app, select Accounts in the left sidebar. On the right, look for the Account settings section and click or tap Sign-in options.I can’t set up fingerprint recognition in Windows 11
If your laptop doesn’t have a compatible fingerprint scanner, Windows 11 displays “This option is currently unavailable” in the Sign-in options section of the Settings app. Unfortunately, you can’t continue setting up fingerprint recognition because you either don’t have a fingerprint scanner on your laptop or have one, but it is not properly installed.How to use fingerprint authentication in Windows 11
After setting up Fingerprint recognition (Windows Hello), simply scan your finger with the fingerprint reader the next time you start your laptop. Often, the Power button acts as a fingerprint scanner, and that’s great because you get to do multiple things with one button press: start your laptop and boot Windows 11, as well as authenticate with your fingerprint.How to turn off the fingerprint logon in Windows 11
Even though Microsoft’s Windows Hello fingerprint authentication has been bypassed several times, it doesn’t mean it’s an insecure technology. Fingerprint authentication is fast, accurate, and secure for most people and most situations. Cracking it is not as easy as the news headlines would have you believe. However, if you dislike using it or feel more secure without it, you can turn it off. To do that, open Settings (Windows + I) and go to Accounts > Sign-in options > Fingerprint recognition (Windows Hello). When this section is expanded, click or tap Remove.

Discussion (0)
Be the first to comment.