25.11.2022
Both Windows 11 and Windows 10 offer specialized apps and tools that you can use to delete partitions. If you need to remove a partition or a volume from a drive, you don’t have to install third-party apps like EaseUS Partition Master. Instead, you can use the apps or commands built into the operating system to manage disks and partitions. Here’s how to delete any partition using Windows graphical apps such as Disk Management or command-line tools like DiskPart (in Command Prompt, PowerShell, or Terminal):
IMPORTANT: The methods shown in this guide work exactly the same way in both Windows 11 and Windows 10.
Can I just delete partitions? Is it safe? What happens when you delete a partition?
To answer any of these questions, you must first understand what a partition (or disk volume) is. Fortunately, that’s quite easy: partitions are nothing more than a method to split a drive into multiple, smaller sections. In a way, partitions are disks within disks or drives within drives if you want.
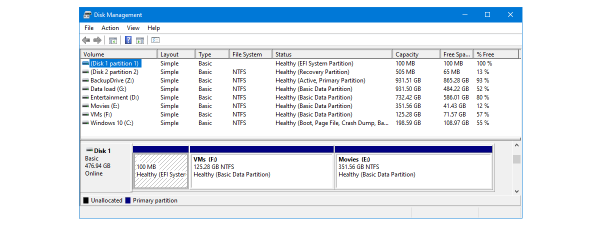
Several drives and partitions on a Windows computer
When you get a new hard disk or solid-state drive, the first thing you do is partition it. In other words, you create one or more partitions on it. If you don’t partition a drive, you can’t use it to store data on it. You can create a partition while installing Windows, or from Windows using built-in tools like Disk Management. Once created, Windows will show them as independent drives in File Explorer and any other file manager. Partitions keep their size no matter if they’re empty or not and regardless of how many files and folders are on them.
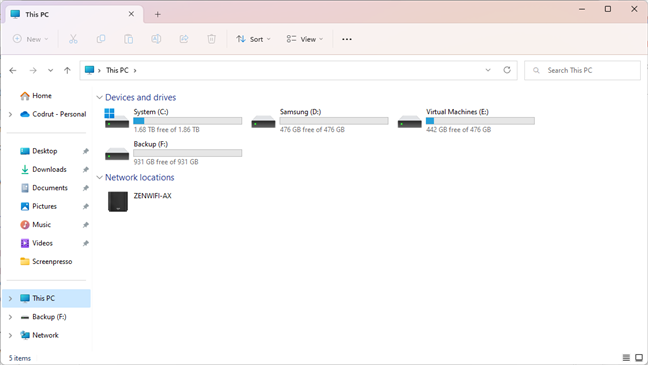
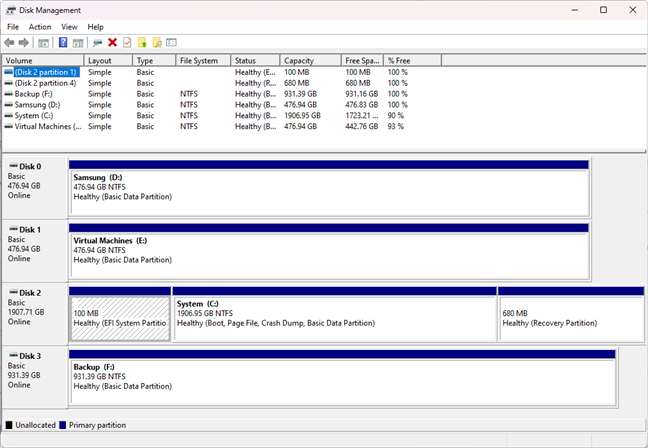
Partitions are shown in File Explorer
Now that you know what a partition is, you also have an idea of what happens if you delete a partition, right? Removing a partition from a drive will release the space occupied by it. If that partition was a regular one and you were only storing some personal files on it, you can just delete it. However, make sure you’ve moved everything you needed from it on another drive first. All the data on it will be erased and lost when you delete the partition.
There are also some special partitions that you can’t just delete. For example, the system partition where Windows 11 or Windows 10 is installed, OEM partitions where your computer’s manufacturer stored essential data (such as operating system images or drivers), and recovery partitions that are created by Windows upon installation and used to keep files vital for restoring the operating system. Even so, if you’re sure about what you’re doing, you can force delete any partition using the “delete partition override” command in the DiskPart. Read the second method in this guide to see how.
How to delete a partition in Windows using Disk Management
First, start Disk Management. A quick way to do it in either Windows 11 or Windows 10 is from the WinX menu. Use the keyboard shortcut Win + X or right-click (press and hold) the Start button on the taskbar to open it. Then, in the WinX menu, select Disk Management.
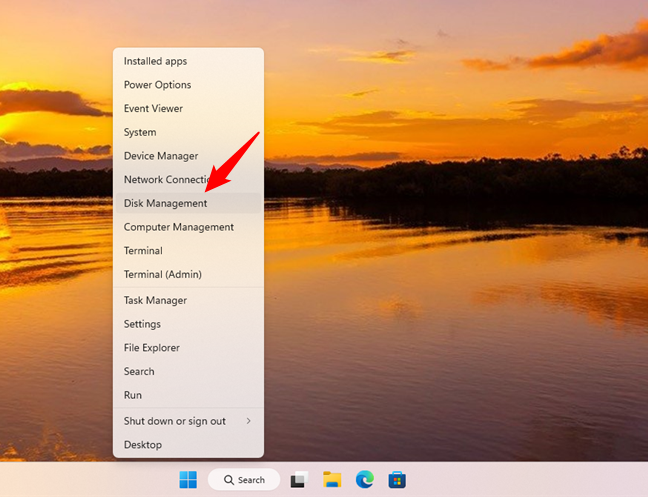
How to open Disk Management from Windows' WinX menu
In the Disk Management window, locate the partition you want to remove and right-click on it (or press and hold it if you’re using a touchscreen). You can do this in the list of volumes on the top side of the Disk Management window.
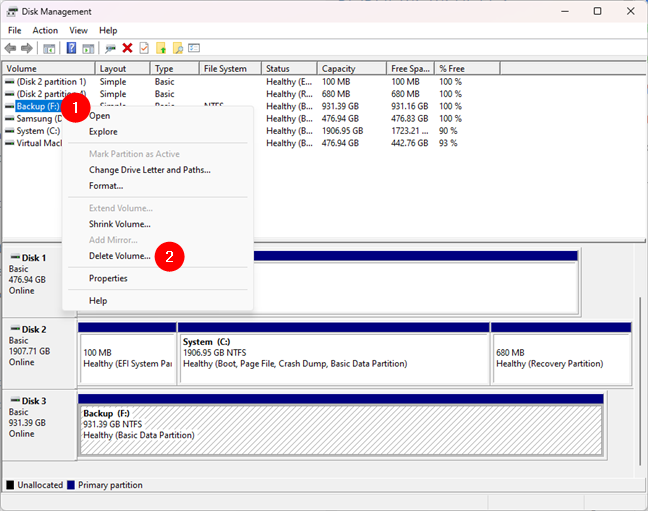
Choose Delete Volume for a partition in Disk Management
You can also do the same thing in the list of disks and partitions shown at the bottom of the Disk Management window. In the right-click menu, choose Delete Volume.
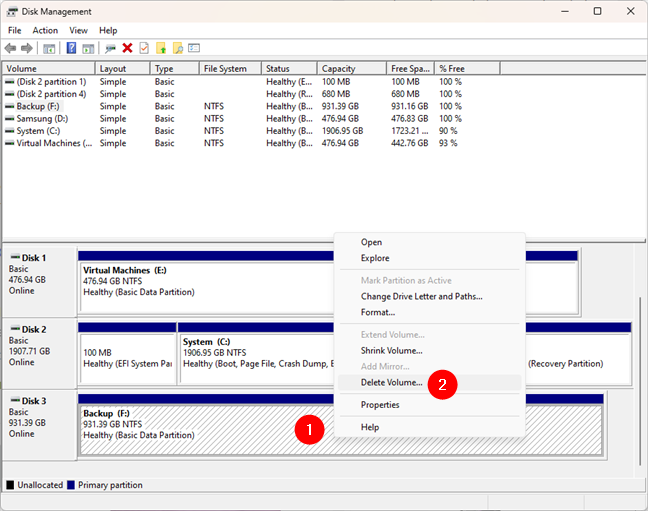
Choose Delete Volume at the bottom section of Disk Management
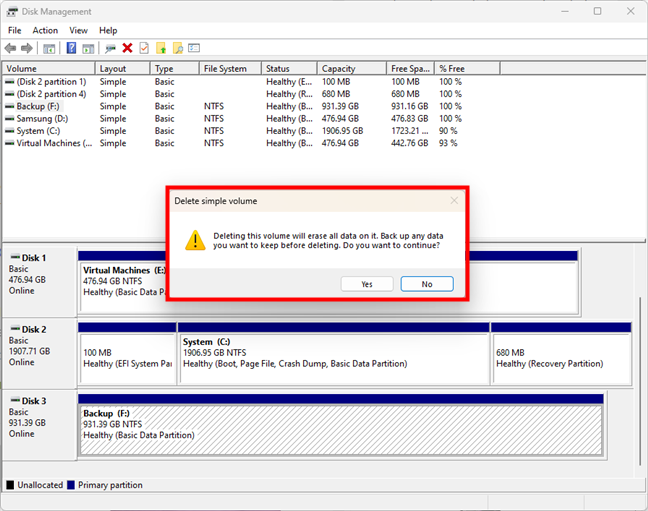
The “Delete simple volume” prompt is shown, warning you that deleting the partition erases all the data on it. Before pressing Yes to continue, make sure you’ve backed up all the important data on that partition. Otherwise, you’re going to lose it.
Deleting a partition with Disk Management
A few moments later, Disk Management deletes the selected partition. You can now see it marked as unallocated, just like in the screenshot below.
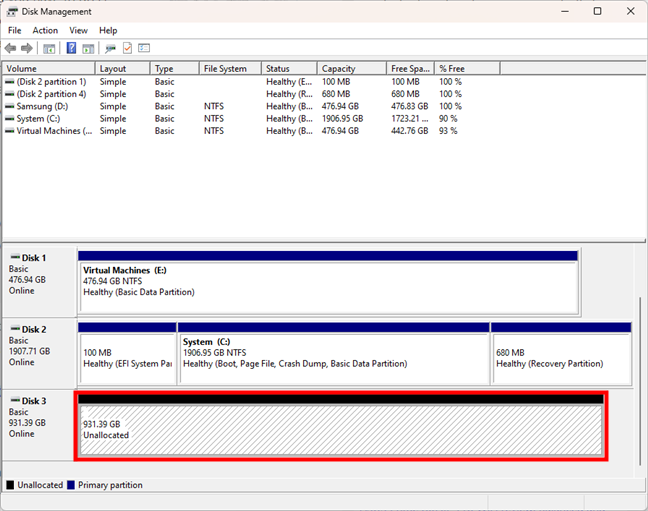
A drive with no partitions: The space is Unallocated
You’re done, and you can now close the Disk Management application.
How to delete a partition with DiskPart in the command line
If you are a fan of the command line, you can use Command Prompt or PowerShell. Start the app you prefer or launch it in Windows Terminal. Then, follow the next steps and use the following commands to remove the partition you no longer need or want:
The first command is the one that starts the disk partitioning tool:
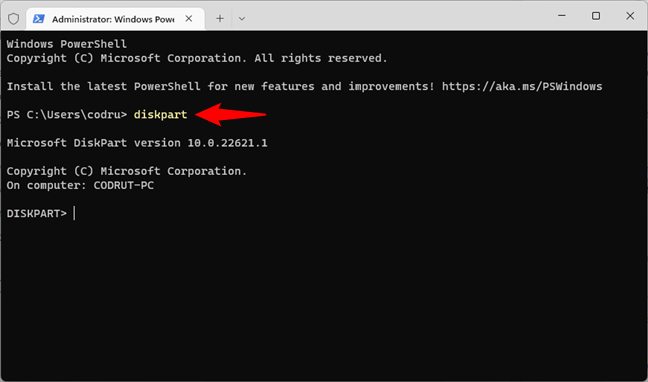
Launch DiskPart in a command line app
The second command you need to run is:
This command lists all the volumes (partitions) on your Windows computer or device. Identify the volume number of the partition that you want to remove. Look for it in the Volume ### column.

Using DiskPart to list all volumes on all drives
Once you’ve located the volume/partition to delete, you must select it. To do that in DiskPart, run this command:
Replace # with the real volume number of the partition you want to delete. In the example below, I wanted to remove the partition with the letter F. Its volume number is 5, so my command looked like this:
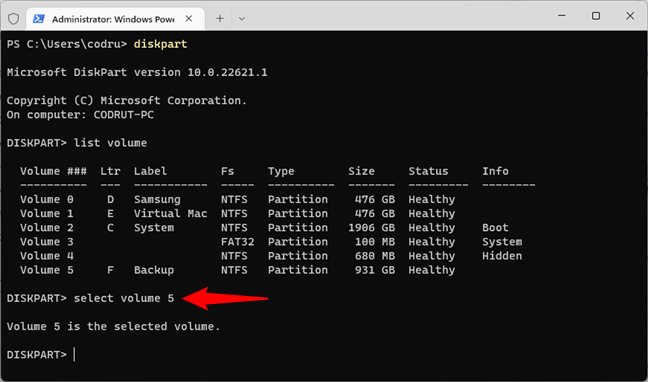
Select the partition to delete in DiskPart
Now it’s finally time to run the actual DiskPart delete partition command. The command that deletes the partition with the number you selected previously is:
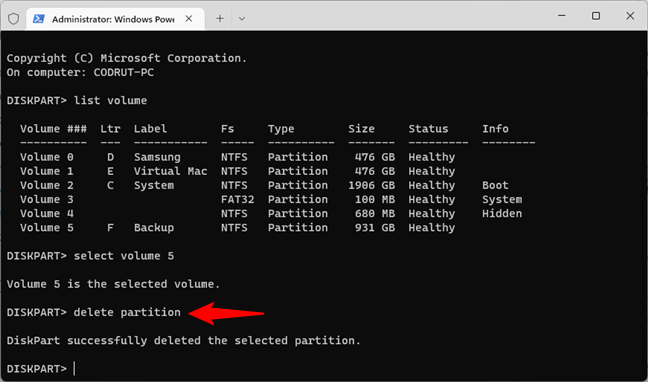
Delete the partition with DiskPart
The selected partition should be deleted immediately.
IMPORTANT: There are some special partitions that Windows doesn’t normally allow you to delete. For instance, as a general rule, you can’t delete protected partitions like a Windows Recovery partition or an OEM partition created by your computer’s manufacturer. However, you can bypass Windows’ protection using a force argument for the delete partition command in DiskPart. If you want DiskPart to delete a partition by force, after you select it, run this command:
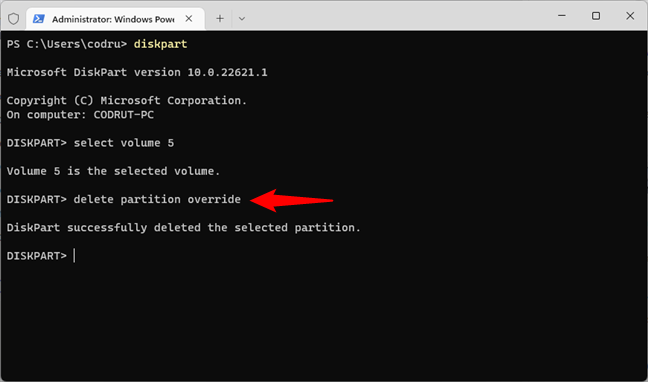
Delete a partition by force with DiskPart
If you want to continue working in the command-line app you’ve opened, close the DiskPart tool by entering this command:
Otherwise, you can simply close Command Prompt, PowerShell, or Windows Terminal.
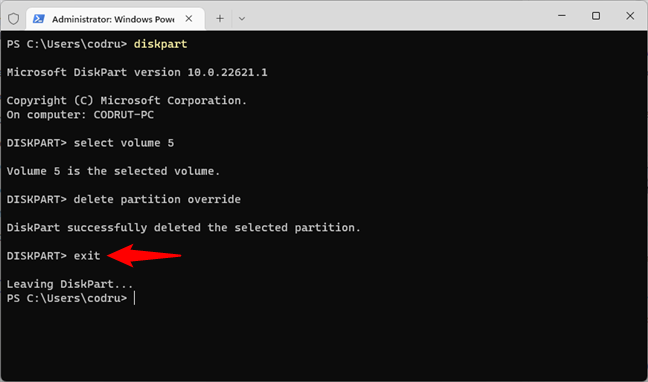
Exit DiskPart or close the command-line app
TIP: If you want to know more about the DiskPart command-line tool and how to use it in Windows to manage partitions and disks, read this tutorial: How to use diskpart, chkdsk, defrag, and other disk-related commands.
How to delete a partition with PowerShell
PowerShell offers an alternative way of deleting a partition from the command line. However, this method doesn’t work in Command Prompt. Here’s how it goes:
Launch PowerShell as an administrator or open it in Windows Terminal if you prefer. Then, run this command:
PowerShell will then show a table with all the partitions found on your Windows computer.
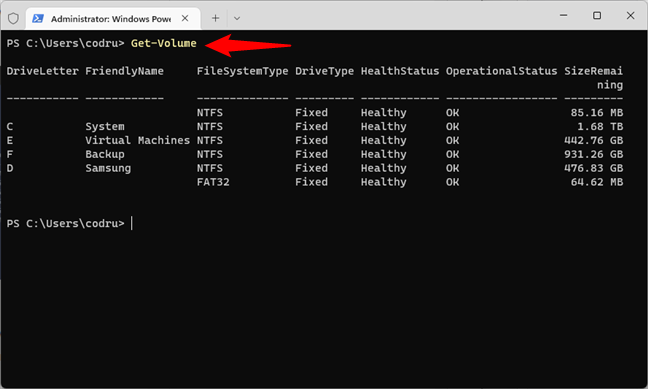
Get the list of partitions with PowerShell
To delete a partition, run the command:
Replace the # character in the command with the actual drive letter of the partition you want to remove. For example, I wanted to delete the Backup partition on my computer, and its letter was F, so the command I ran was:
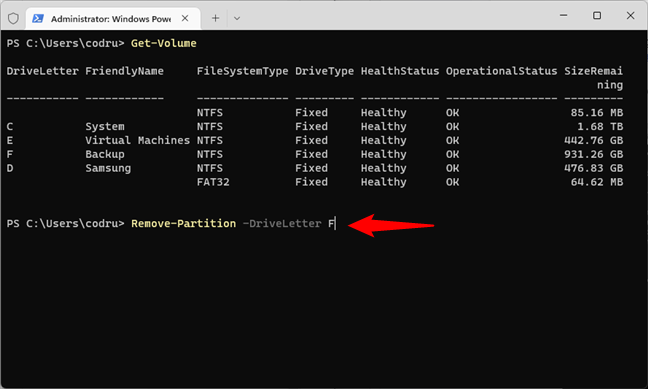
How to remove a partition with PowerShell
PowerShell then asks you to confirm that you want to delete the specified partition. Type Y and press Enter to perform the action.
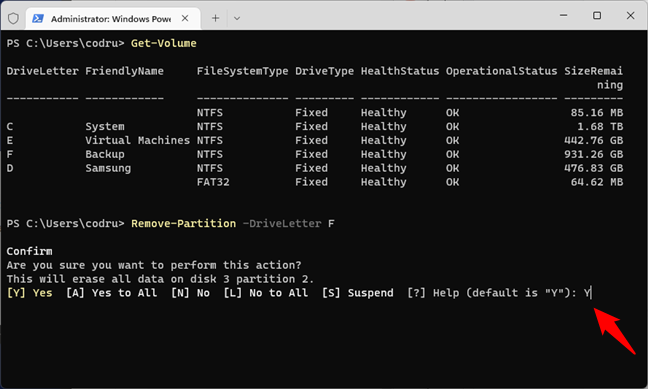
Confirm that you want to delete the partition
A second later, the partition is gone from your drive.
What’s next for the deleted partition?
After you delete a partition in Windows, its space is marked as unallocated, meaning that while it’s still there, it isn’t used. You can employ this unallocated space to extend the size of another partition; you can delete another partition and then combine it with the previously deleted one to create a new larger partition, etc. The choice is yours, depending on your needs. Before closing this tutorial, let me know if all worked well for you, and if you have questions, comment below.