06.02.2020
The Search in Windows 10 has evolved with every new version of the operating system. It is now more powerful and more complete than it has ever been. Whether you want to find documents, apps, photos, files, folders, emails, or even do web searches, the Search from Windows 10 can find almost anything. Although you can start using it as soon as you need it, it's best if you spend some time configuring Search to work just the way you like it. Here's how:
NOTE: If you've arrived here while searching the internet for information on how to use the Search in Windows 10, you should first read: How to search in Windows 10. Ten tips to become a Pro. We wrote this article using Windows 10 with November 2019 Update. If you're running an older version of the operating system, some features and settings that we're going to show might not be available on your PC.
How to open the Windows 10 Search settings
Before you can configure how Windows 10 Search works, you must know how to get to its settings. One fast way to get there is to click or tap on the search box on your taskbar, press the Options button from the top-right corner of the flyout (it looks like three dots), and then select Search settings in the menu.
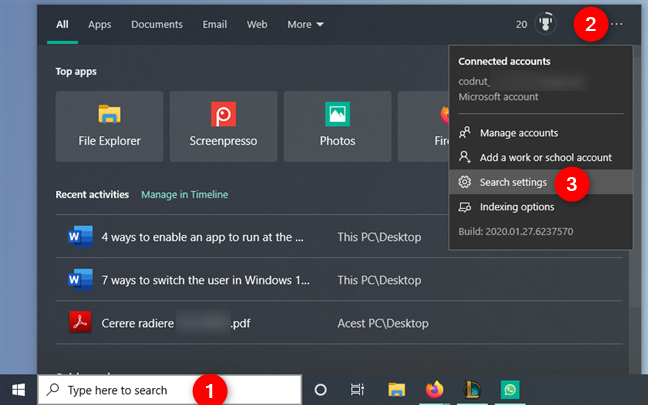
Another way to get to the Search settings is to open the Settings app (keyboard shortcut Windows + I) and then click or tap on Search.
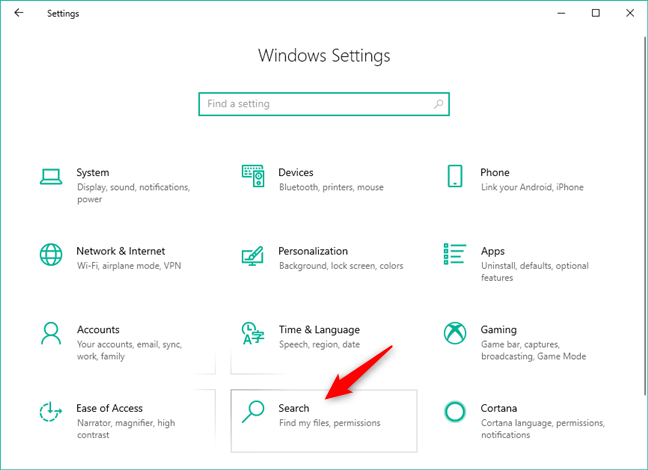
Either way, you should get to this Search page from the Settings app:
Now let's see how to personalize the way Windows 10 Search works:
1. How to filter adult content from Windows 10 Search
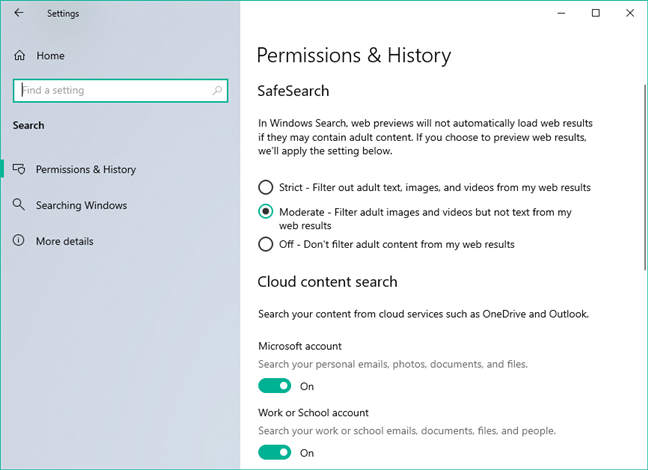
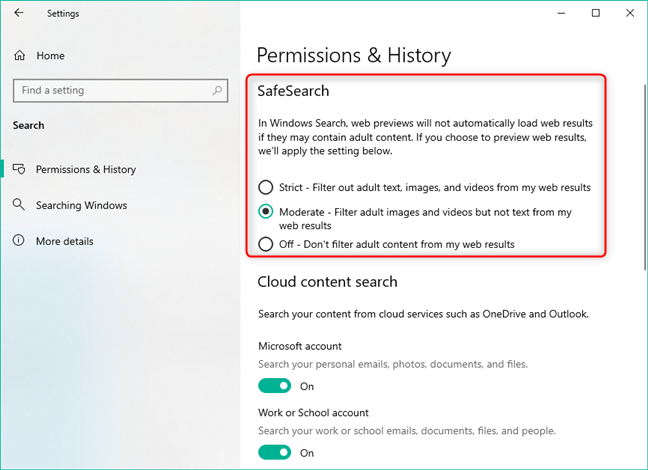
The first setting that you can change about how Windows 10 Search works on your computer or device is called SafeSearch. It lets you choose whether and how you want to filter web search results. By default, Windows 10 tells you that "In Windows Search, web previews will not automatically load web results if they may contain adult content."
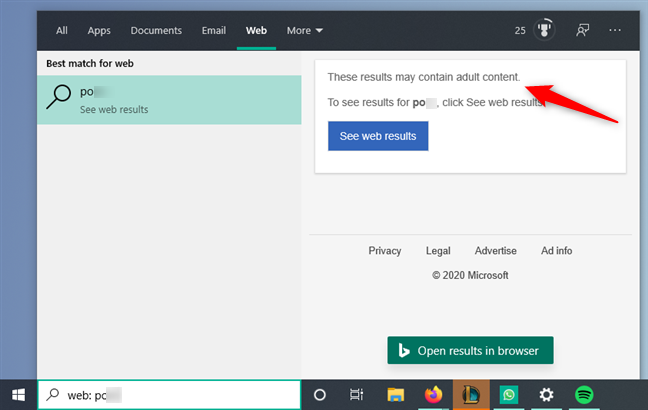
However, if you choose to preview web results in Search, you can choose to use one of three adult content filters:
- Strict - doesn't show any text, images, and videos from the web results that may have adult content.
- Moderate - filters images and videos that may contain adult content, but doesn't block any text from the web results.
- Off - doesn't use any filter for adult content in web results.
2. How to include content from OneDrive and Outlook in Windows 10 Search
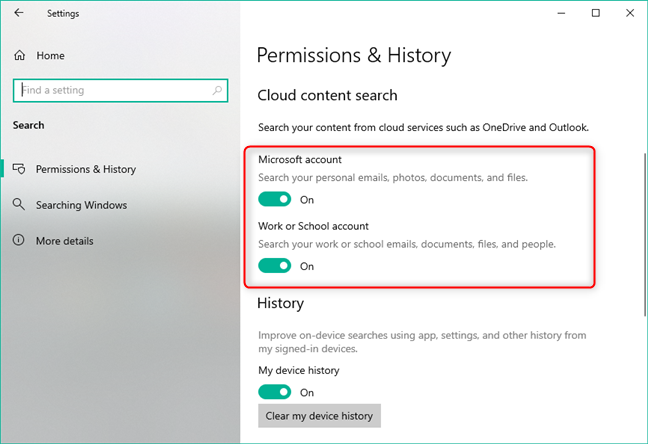
By default, if you sign in to Windows 10 using a Microsoft account or if you connect to your Microsoft account in apps such as OneDrive or Outlook, the Search can look for content in your cloud services. That means that the search results you get can contain things such as personal email, photos, videos, documents, files, and people.
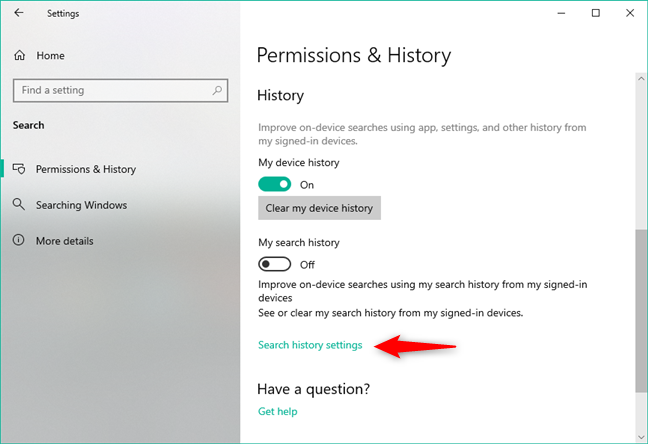
However, you can stop the Windows 10 Search from looking inside your cloud accounts if you don't want it poking around. On the Permissions & History page from the Settings app, there's a section called Cloud content search. In it, you get two switches - one for Microsoft account and one for Work or School account - which you can turn on or off, to enable or disable the search in your "personal emails, photos, documents, and files."
3. How to make Windows 10 Search use your history from other devices on which you've signed in
On the same Permissions & History page from the Settings app, you can choose whether you want the Windows 10 Search to be able to use your History. Your History is divided into two different entities: your device history and your search history. The switches for each of them are called accordingly:
- "My device history" can "improve on-device searches using app, settings, and other history from [your] signed-in devices."
- "My search history" can "improve on-device searches using [your] search history from [your] signed-in devices."
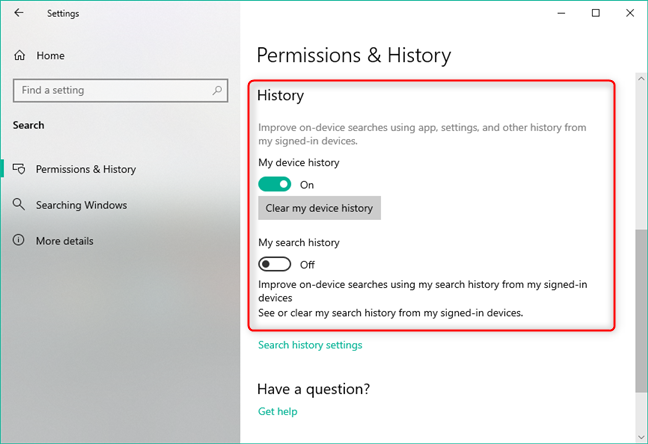
Underneath the two history switches, you also get a link called "Search history settings." Clicking or tapping on this link opens your default web browser and takes you to your Microsoft account Privacy web page, where you can manage your search history.
4. How to choose what content is indexed by Windows 10 Search
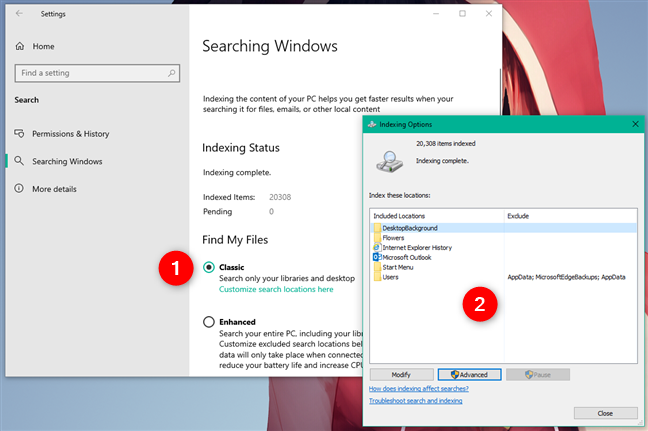
If you select Searching Windows on the left side of the Search settings, you get access to the indexing options. In other words, this is where you tell Windows 10 Search what types of content can and is indexed by your computer or device.
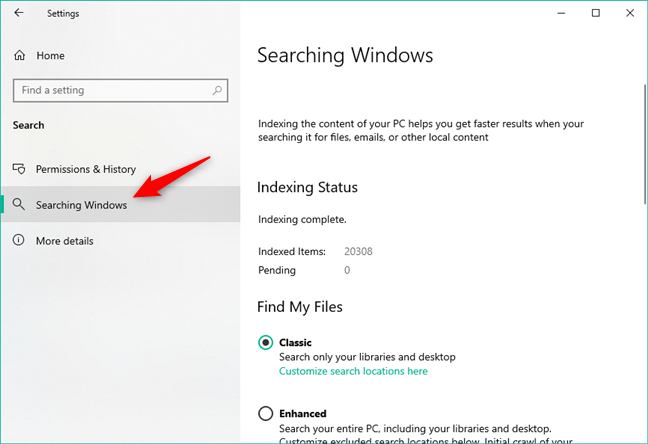
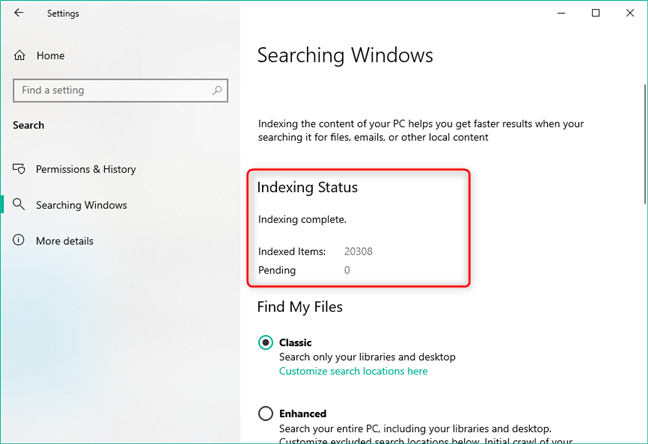
The first thing you see here is a message from Windows, which tells you that "indexing the content of your PC helps you get faster results when [you're] searching it for files, emails, or other local content." Then, you get to see the Indexing Status: whether your PC is indexing content right now, how many items on your PC have been added to the index, and how many are pending.
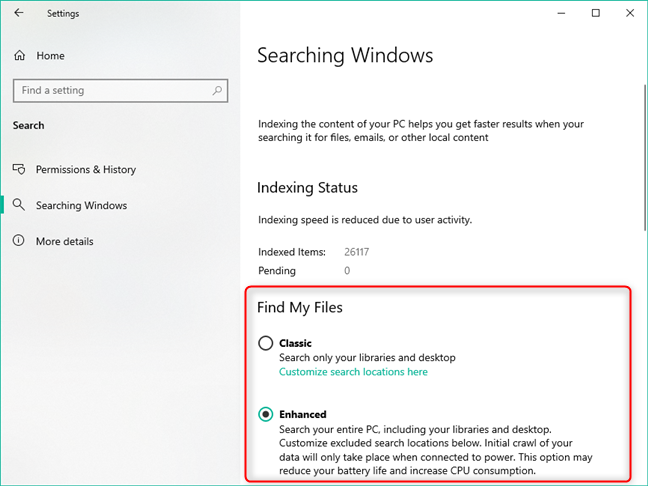
The Find My Files settings let you choose what locations from your PC are included in searches.
The Classic option means that Windows 10 Search can only look for files in your libraries and desktop, while the Enhanced option lets Search look into "your entire PC, including libraries and desktop."
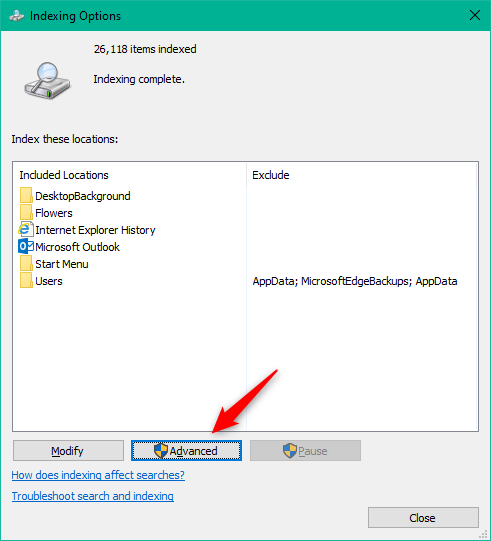
If you want to use the Classic option, but also want to include other folders in the search locations, click or tap on the "Customize search locations here" link. That opens a window called Indexing Options, where you can add or remove indexed locations as you please.
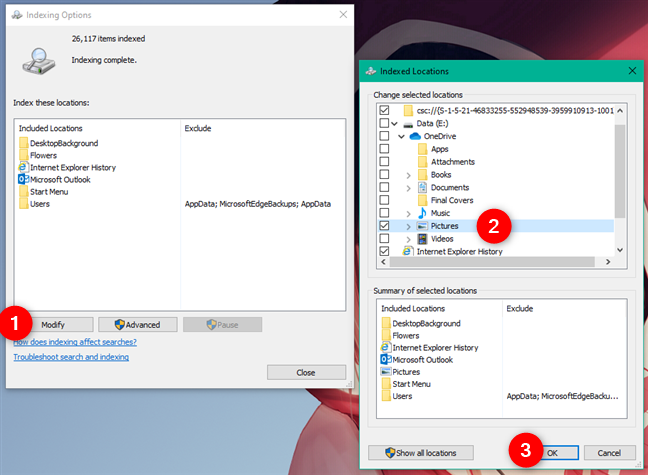
To add your own folders to Windows 10's index, click or tap on Modify. Then, you can see a list of locations available for indexing. Browse through them, check the locations you want to index, and uncheck the locations that you want to exclude from the index.
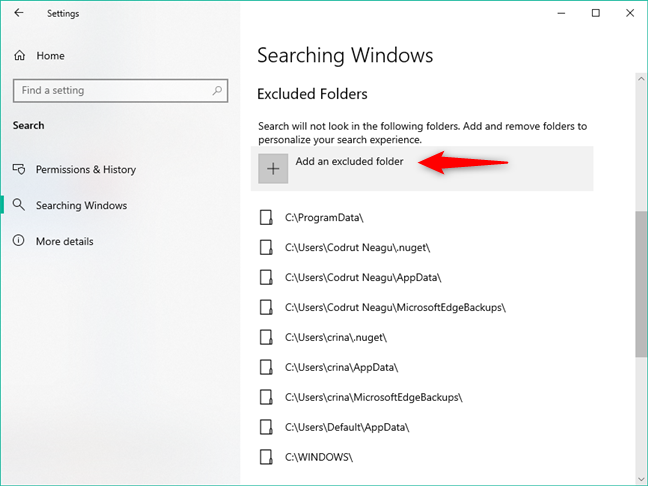
Going back to the Settings app, it too shows you a list of Excluded Folders, and, at its beginning, you can click or tap on Add an excluded folder to stop Windows 10 from indexing it.
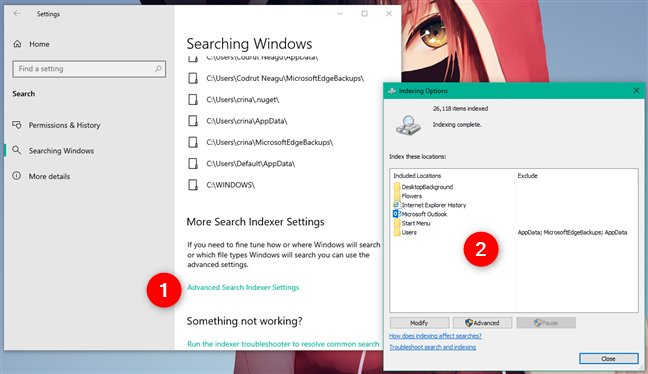
The final section from the Searching Windows page is called More Search Indexer Settings and, just as Windows 10 tells you, "if you need to fine tune how or where Windows will search or which file types Windows will search you can use the advanced settings." Clicking or tapping on the Advanced Search Indexer Settings opens the same Indexing Options window that we talked about earlier, where you can add or remove locations from the search index.
5. How to configure the Search Index Settings and choose what File Types are indexed
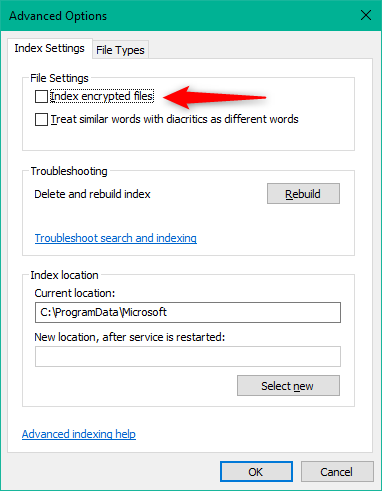
In the Indexing Options window, you don't just get to add or remove locations to the Search Index, you also get access to the Advanced search settings. Note that you should treat these settings carefully because they can alter the way search works in significant ways, and making bad decisions can break or slow searches, as well as fail to return some items that you might need. If you're sure you need to alter the Advanced search settings, click or tap on Advanced (you need to be an administrator to be able to do that).
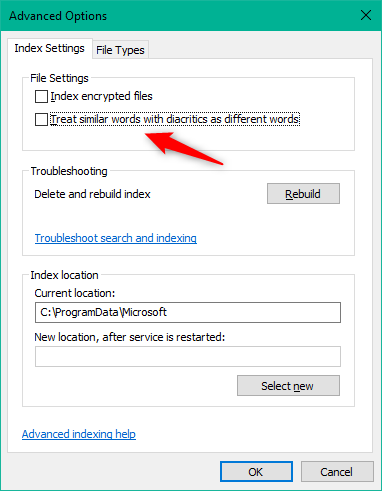
The Advanced Options window has two tabs: Index Settings and File Types. Let's see what settings are available in each:
On the Index Settings tab, the first setting is "Index encrypted files." By default, this setting should be off, and you should enable it only if you are going to index locations that are found on drives that are using full volume encryption with BitLocker or similar solutions.
The second setting available - "Treat similar words with diacritics as different words" - does exactly what it says. Although you might find it useful if you're using two or more languages and you're saving files with names that include diacritics, you should be aware that, if you enable this setting, the entire Windows 10 index needs to be rebuilt, and that can take a long time.
Next, in the Troubleshooting area, you can Rebuild the search index if you believe that something's wrong with it. Although issues like a corrupted index can be repaired by rebuilding it, take heed of the same warning as before: it could take a very long time!

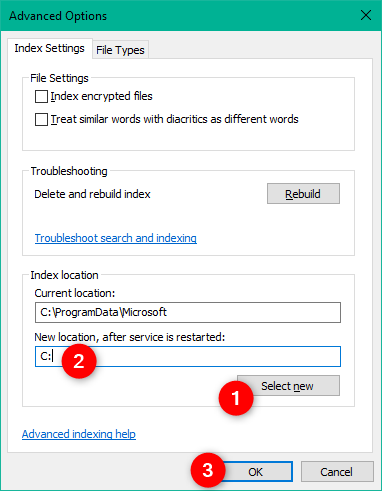
The final option from the Index Settings is Index location. By default, Windows 10 saves the Search Index in C:ProgramDataMicrosoft. However, you can select a different location if you want. Click or tap on Select new, choose the location, save your settings by pressing on OK, and then restart Windows 10 so that it can start using the new index location.
On the File Types tab, you can manage what types of files are indexed by Windows 10. If you don't want files of a certain type to be indexed, simply uncheck it from the list. Also, for each file type, you can choose whether you want Windows 10 to index file properties only, or also the file contents.

Finally, if you find that a certain file type is not found in the index list, you can add it manually. Type the extension used by the file type and click or tap on Add.
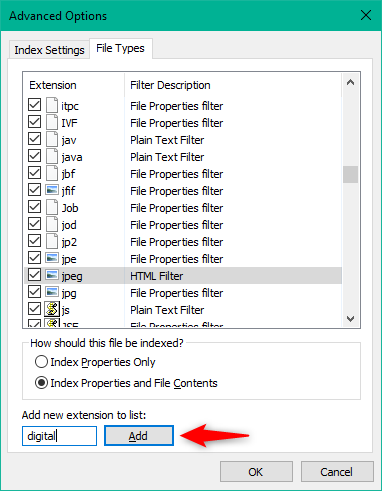
Press OK, and all the changes you've made are saved.
What would you change about the way Windows 10 Search works?
These are all the settings you can change for how Windows 10 Search works. Is there anything you would want to add to them, or do you believe that they're more than enough? Also, if you need help with Search in Windows 10, or if you have something to add to this guide, don't hesitate to leave a comment.