14.05.2025
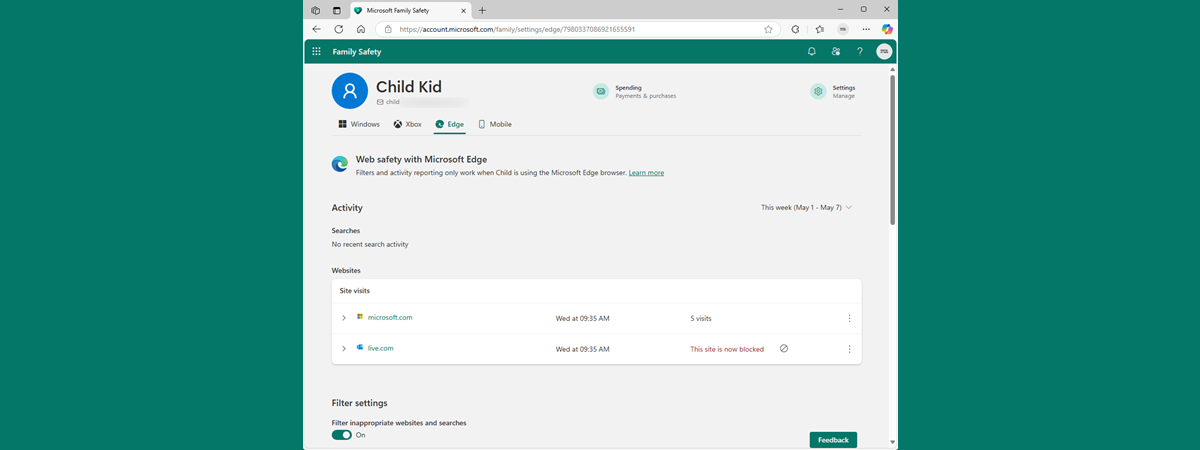
Helping your child navigate the internet safely is an important aspect of modern parenting. With so much content just a few clicks away, you need to have the right tools to filter what children can see. Microsoft Edge, the default browser included with Windows, offers built-in options to block certain websites and filter search results. These features are designed to reduce the risk of your child accessing inappropriate content, minimize online distractions, and encourage safe browsing habits from an early age. Here’s how they work:
NOTE: To use the content filtering features in Microsoft Edge, your child must be part of your Microsoft Family group of users. If you haven’t set that up yet, follow our step-by-step instructions on how to add a child account to Windows 10 or how to add a child account to your Windows 11 PC, depending on which Windows version you’re using. Once you include your child in your family group, you can start enforcing website and content restrictions. To ensure that they work, your child should be using only the account you’ve created for him or her, and shouldn’t have access to the password of the user account used by the parent.
How to set up filters and block sites in Microsoft Edge for your child
First, it’s important to understand that all tools for blocking harmful websites, filtering inappropriate search results, and creating a safer browsing environment for your child are managed online. These features are part of Microsoft Family Safety, a web-based dashboard where you can view activity and apply settings for each child individually, based on their age and needs. Once configured, the rules you set will automatically apply to all Microsoft Edge browsers where your child’s account is signed in, whether they’re using a Windows laptop, an Xbox, or even an Android phone or tablet. It doesn’t work on iPhones, though. Having said that, here’s what you need to do:
Step 1: Open your child’s profile in Microsoft Family Safety
On your computer or any other device you may have at hand, including your Android smartphone, open a web browser and visit family.microsoft.com. Then, sign in using your Microsoft account. You should be using the Microsoft account that is set as the parent, and the family organizer.
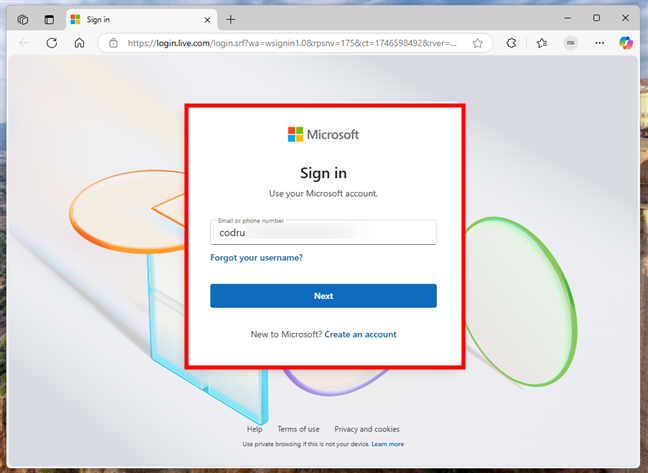
Sign in to Microsoft Family Safety with your Microsoft account
Once you’re signed in, you see an overview of your family group. Click or tap your child’s name to open their profile.
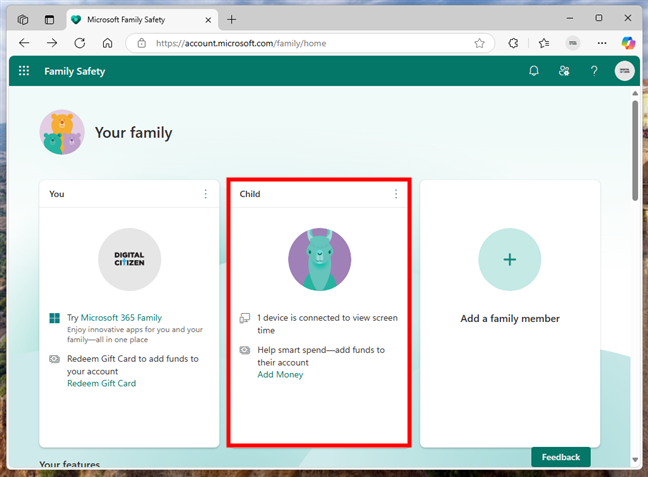
Access your child’s profile in Microsoft Family Safety
This is where you find all controls for managing their screen time, browsing permissions, and online activity.
Step 2: Access your child’s account settings
In the upper-right corner of your child’s profile page, click the Settings button. Beneath it, it says Manage.
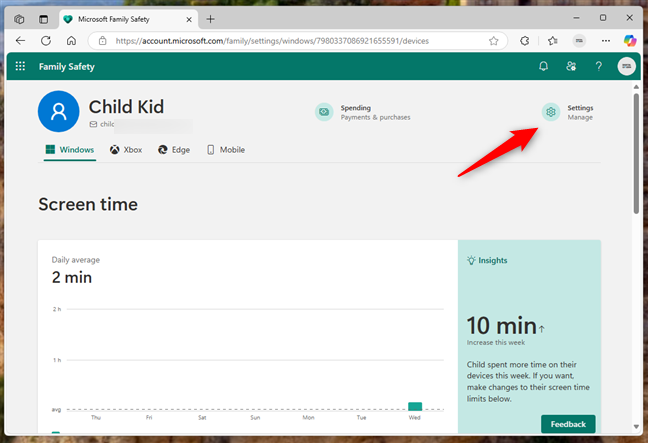
Click the Settings button in the top-right corner
Then, you can…
Step 3: Set an appropriate Age Rating and enable Web safety
In the Child’s account settings pop-up window, locate the Age Rating section. This value is usually set automatically by Microsoft based on the birthdate you entered when creating your child’s account, and it should match their actual age. Still, it’s a good idea to double-check that it’s accurate. You can also manually adjust it if you prefer to apply stricter or more relaxed content restrictions. To change it, simply click the dropdown menu and select the appropriate age for your child.
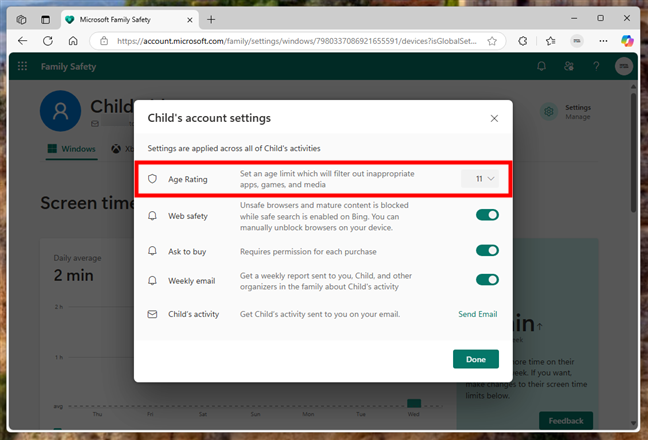
Set an appropriate age rating
In the same settings window, toggle on Web safety. This feature blocks access to unsafe browsers and restricts mature content while enforcing safe search in Bing. It works alongside the filtering tools in Microsoft Edge and adds an extra layer of browsing protection for your child.
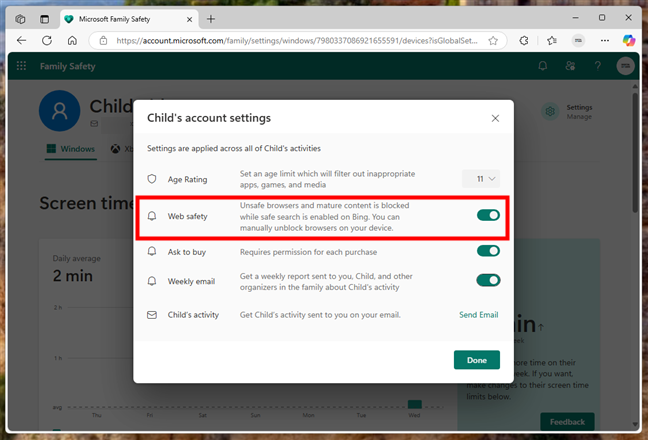
Turn on Web safety to filter content
After adjusting the settings, click or tap Done to apply the changes to your child’s devices.
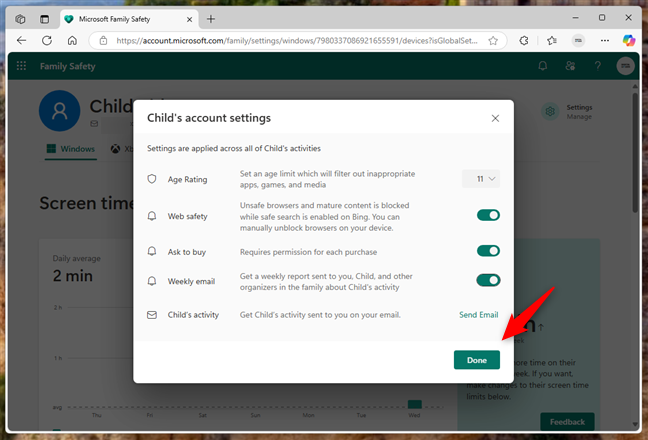
Press Done to save the changes
These protections will take effect on any Windows computer, Xbox gaming console, or Android devices that your child uses while signed in with their Microsoft account. But wait, there’s more:
Step 4: Make sure that the website and search filtering are turned on in Microsoft Edge
Back in your child’s profile, go to the Edge section. It contains all the tools needed to manage the websites your child can access.
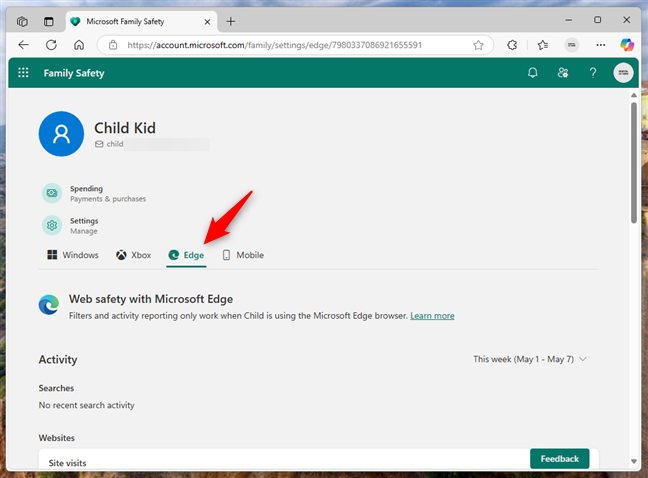
Go to your child’s Edge settings
Inside the content filters, look for the setting labeled Filter inappropriate websites and searches. If you enabled Web safety during the previous step, this switch should be on. If it’s not, turn it on now. When the switch is enabled, Microsoft Edge blocks a wide range of websites known to contain adult content, violence, or other harmful material, and it also improves search safety by removing explicit results in Bing.
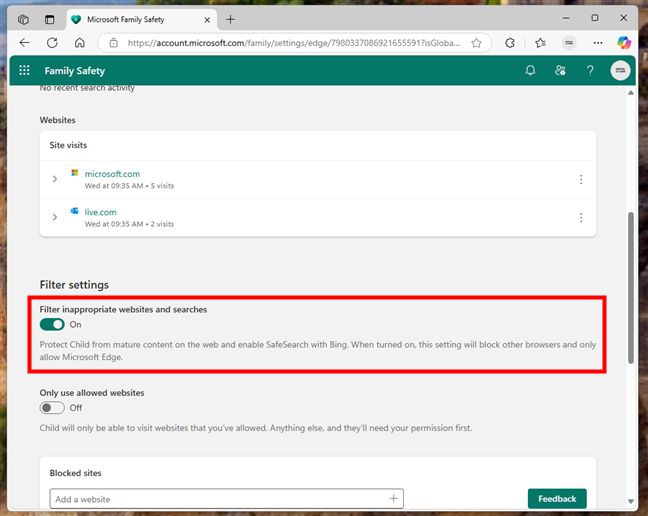
Turn on Filter inappropriate websites and searches
Microsoft keeps this blocklist updated regularly, so you won’t need to manage every detail yourself. For example, if your child searches for a violent or adult topic using Bing, filtered results will automatically hide anything inappropriate.
Step 5: Create a safe browsing list (optional)
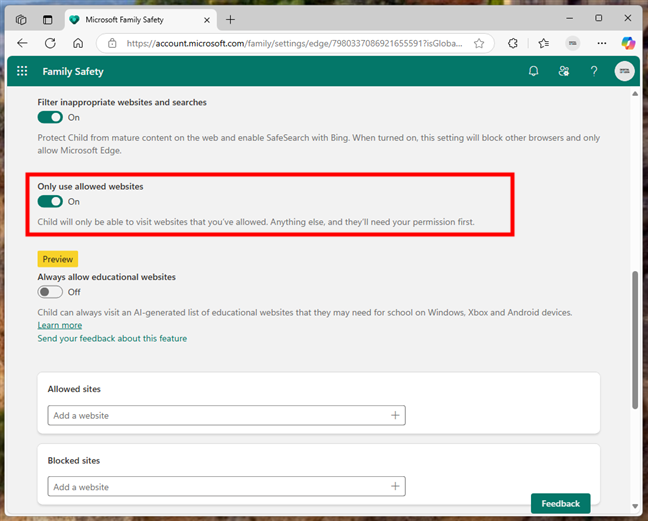
If you want even more control over what your child can access, there’s another setting called Only use allowed websites. Turn it on, and your child won’t be able to visit any websites unless you’ve specifically added them to the approved list.
Turn on Only use allowed websites to limit browsing
At the time of writing, enabling the Only use allowed websites toggle revealed a preview option: Always allow educational websites. According to Microsoft, this is a feature designed to simplify safe browsing for children. The tool uses an AI-generated list of educational websites about things like schoolwork, learning apps, or research and automatically approves access to them. However, you still have full control and can manually block or allow specific websites that don’t match your preferences. The feature is still in preview, and at the moment, it only works in the latest version of Microsoft Edge for Windows.
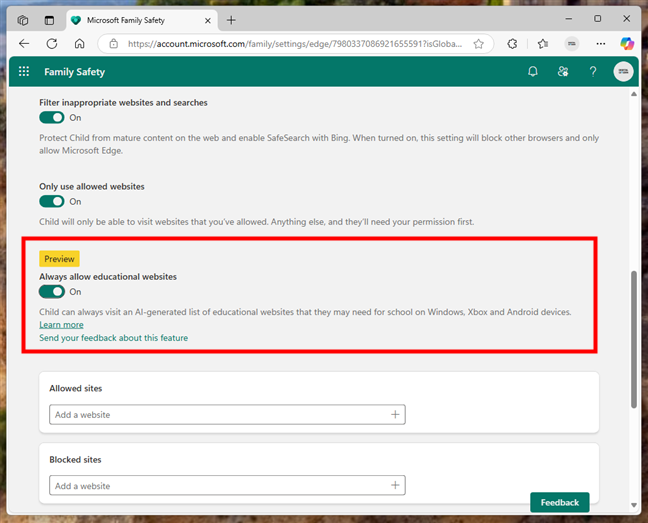
Always allow educational websites automatically grants access to AI-curated learning sites
Getting back to the part where you manage allowed and blocked websites, this feature is especially helpful for younger children. It turns Microsoft Edge into an even more secure browsing environment, giving your child access only to the websites you’ve personally reviewed and approved. To set this up, scroll down the page until you find the Allowed sites and Blocked sites sections. In these lists, you can type the exact web addresses you want to permit or block, then press the + (plus) button to save them.
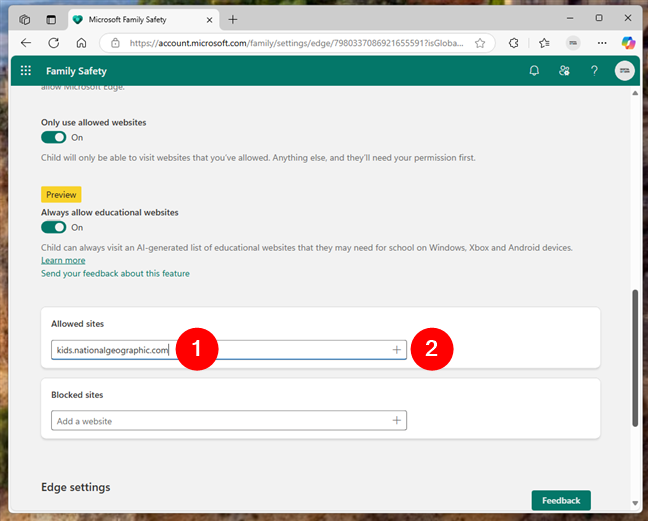
How to add websites to the Allowed sites or Blocked sites lists
For example, I decided to allow kids.nationalgeographic.com, as it offers safe, engaging science content for children. On the other hand, I chose to block tiktok.com, which is often filtered automatically, but I wanted to make sure that my child never visits this social network.
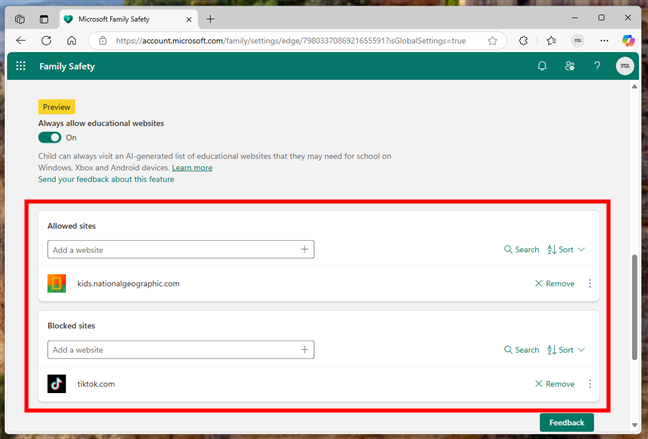
The Allowed sites and Blocked sites lists let you search and sort the websites in them
After you add websites to Allowed sites and/or Blocked sites, you see additional options that let you search through the entries, sort them, or remove them. These controls help you update the list over time as your child’s needs change.
Important: These websites and content filters work only in Microsoft Edge!
It’s important to understand that the web filtering settings you’ve configured up until now only apply when your child is using Microsoft Edge. If they open another browser, such as Google Chrome, Mozilla Firefox, or Opera, those restrictions won’t be enforced. To make sure your safety rules are consistently applied, you must either uninstall these alternative browsers or block access to them using the app and game limits available in Microsoft Family Safety. This step is essential if you want to keep your child browsing only within the safe boundaries you’ve created.
Did you set sites and content filters in Edge for your child?
Using Microsoft Edge with Microsoft Family Safety gives you real control over your child’s web experience. You can block access to unsafe sites and create a list of websites that you know are safe and useful. This can be extremely helpful when introducing a child to the internet for the first time. And because the settings are all managed through a central dashboard, it’s easy to update them as your child grows or your home rules change. Did you try setting up website filters or content restrictions using Microsoft’s family features? Was the process easy, or did you run into anything unclear or missing? I’d love to hear your experience in the comments below.