20.12.2012
File History can work both with local drives plugged into your computer and drives connected to other computers on the network or to the network itself. How does this work and what is the best way to set things up? Learn this and more from this article.
Connect an External Drive to a Computer & Recommend it to the Homegroup
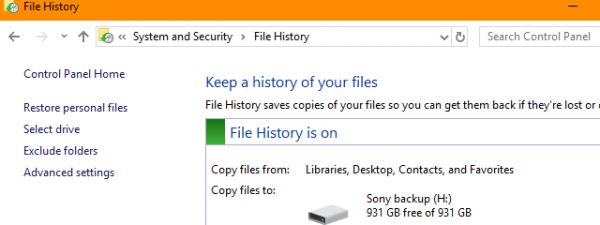
One way to use the same drive to backup your files across the network is to attach an external hard disk to your computer. Set it up and turn on File History, as shown in this guide: Introducing Windows 8: How to Backup Data with File History.
Once you have it working on the computer where the drive was plugged in, go to Advanced Settings and check the box that says "Recommend this drive". Then, click or tap Save changes.
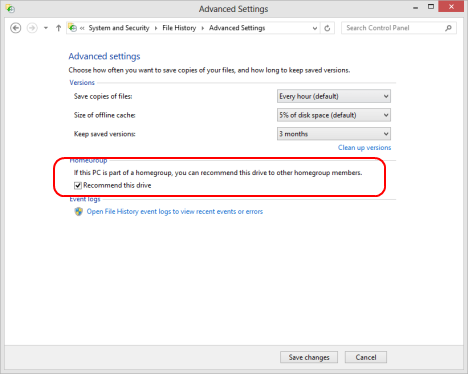
Now this drive is shown on all computers with Windows 8, that are part of the homegroup, as the recommended device to backup files using File History.
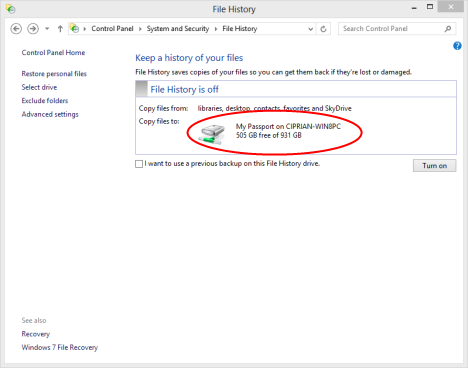
When you start File History on other Windows 8 computers, you can see the name of the drive and the computer to which is attached.
When you press the Turn on button, File History starts to backup your data automatically and displays the network path where your files are stored.
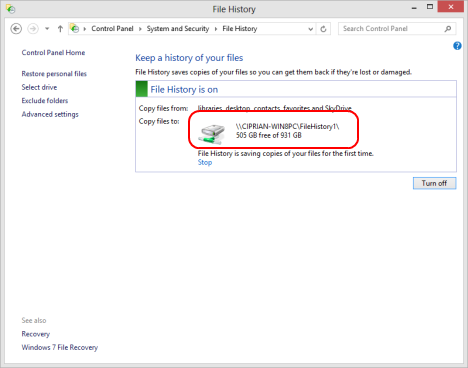
From here on, everything works as if the drive were connected directly to this computer and not another computer that is part of the Homegroup.
Here are some pros and cons for this setup:
- The backup speed is the maximum it can be on the computer where the drive is plugged in;
- The transfer speed for the other computers depends on the capacity of your network and if the drive is used or not to write data on it or access existing data;
- Other computers can backup their data only when the computer where the drive is plugged in, is turned on.
Connect it to the Routers & Use it from all Computers in the Network
If you have a modern router, like the ASUS RT-N56U or the Belkin N600 DB which we reviewed recently, then you should be able to plug in the external hard disk drive to the router via its USB port, have it mounted and brodcasted by the router as a network device.
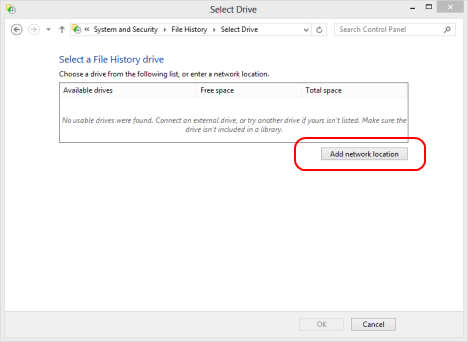
When the router has been set up to mount the drive, open File History on the Windows 8 computers where you want to set it up. Click or tap Select Drive on the left side column. Then, click or tap "Add Network Location".
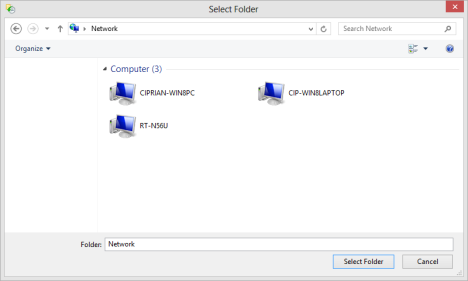
In the Select Folder window, double click or tap on the router.
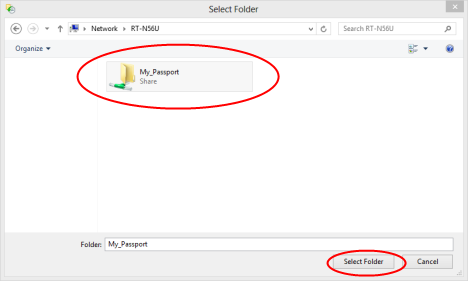
Then, select the name of the hard disk drive and press Select Folder.
File History will now use this device to perform its automated backups. Repeat this procedure for all the computers where you want File History turned on and working.
Here are some pros and cons for this setup:
- The transfer speed for all computers depends on the capacity of your network and if the drive is used or not to write data on it or access existing data;
-
File History is not dependent on another computer being turned on. The drive is accessible as long as the router is plugged in and working, for all the computers and devices connected to the network.
Personally, I prefer this approach for networks which have more than 2 computers or devices with Windows 8 that need to backup their data. It gives a bit more flexibility than the first approach I shared in this article.
Conclusion
As you can see, setting File History to backup data on network drives is relatively easy. You don't have to be a geek to make it work. Before you set things up, think about the pros and cons of each approach, decide which is best and get to work.
If you are looking for other tips on using this Windows 8 feature, don't hesitate to read the articles recommended below.