

The Local Group Policy Editor is a Windows tool most often used by IT administrators to quickly change settings for computers in a network. However, the Local Group Policy Editor also lets you control many settings related to your computer and the local user accounts. This article explores its functions, layout, and use cases. Read on to find out what the Local Group Policy Editor is and how you can work with local group policies in Windows:
NOTE: Although you can also use this tool to change settings on other computers in the network, this article focuses on editing settings for the local machine and its users.
 The Local Group Policy Editor
Technically speaking, the editor is just one of the snap-ins that can be hosted in the Microsoft Management Console (MMC), but for the sake of simplicity, we won’t go into more detail here. The Local Group Policy Editor is a powerful tool in managing local settings. You may be asking yourself, “but what can I actually do with the Local Group Policy Editor?” You can, for example:
The Local Group Policy Editor
Technically speaking, the editor is just one of the snap-ins that can be hosted in the Microsoft Management Console (MMC), but for the sake of simplicity, we won’t go into more detail here. The Local Group Policy Editor is a powerful tool in managing local settings. You may be asking yourself, “but what can I actually do with the Local Group Policy Editor?” You can, for example:
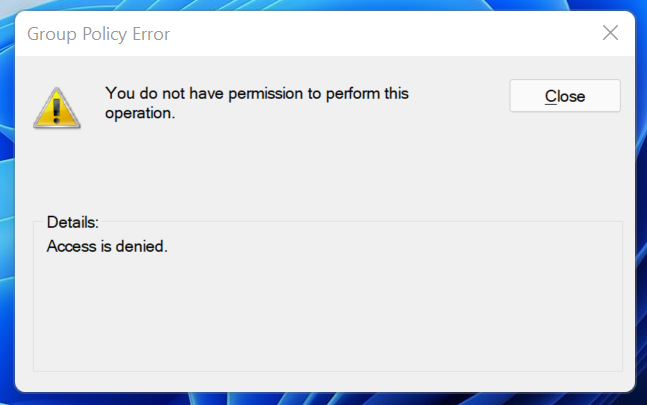
 Only users with administrative rights can use the Local Group Policy Editor
Also, since the Local Group Policy Editor is an advanced tool, you should know that it's not available by default in the Home or Starter editions of Windows. Without additional tweaking, you can access and use it only in Professional (or above) versions of Windows:
Only users with administrative rights can use the Local Group Policy Editor
Also, since the Local Group Policy Editor is an advanced tool, you should know that it's not available by default in the Home or Starter editions of Windows. Without additional tweaking, you can access and use it only in Professional (or above) versions of Windows:
 Open the Local Group Policy Editor from the Start Menu
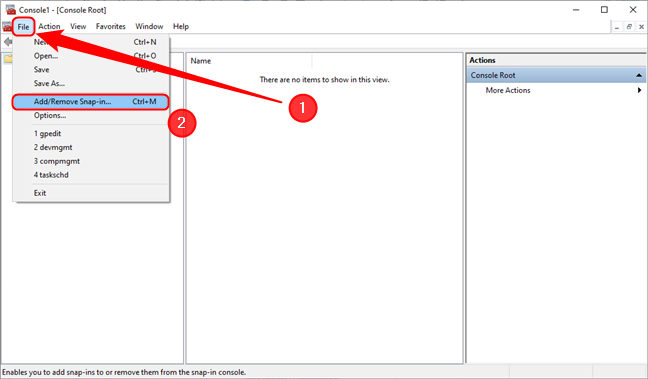
 Add a snap-in in the Microsoft Management Console
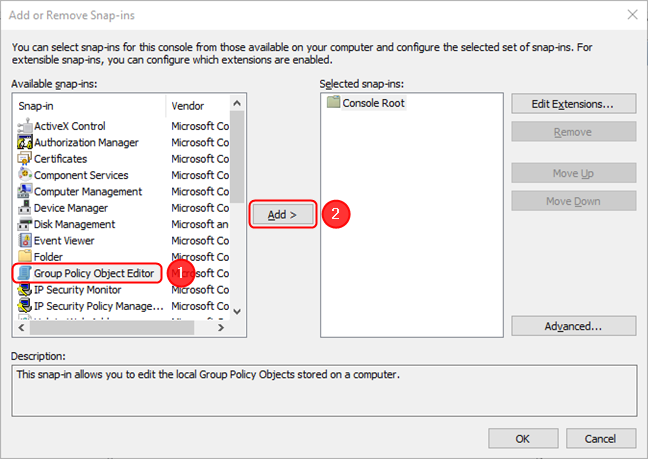
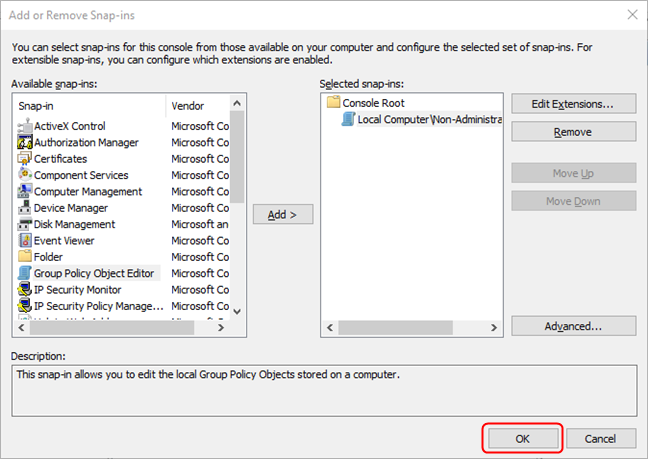
In the Add or Remove Snap-ins window, click or tap on Group Policy Object Editor, then press Add. Alternatively, you can double-click the Group Policy Object Editor.
Add a snap-in in the Microsoft Management Console
In the Add or Remove Snap-ins window, click or tap on Group Policy Object Editor, then press Add. Alternatively, you can double-click the Group Policy Object Editor.
 Select the Group Policy Object Editor, then press Add
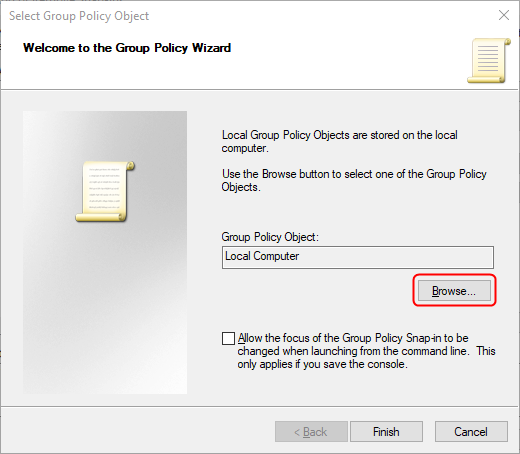
This opens the Select Group Policy Object wizard. Click or tap on Browse.
Select the Group Policy Object Editor, then press Add
This opens the Select Group Policy Object wizard. Click or tap on Browse.
 Hit Browse in the wizard
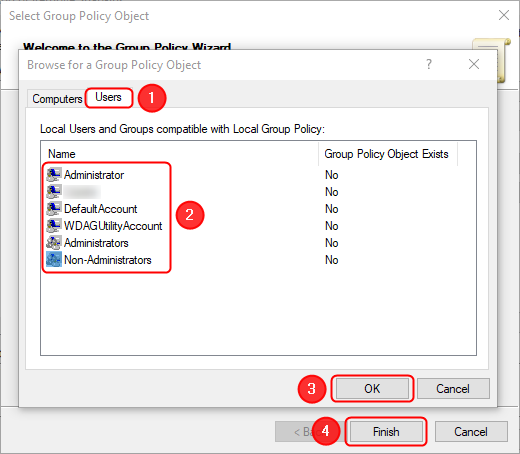
In the next window, go to the Users tab, then select the user or the group of users for which you want to make changes. In this case, we selected the Non-Administrators group. Click or tap on OK afterward, then on Finish.
Hit Browse in the wizard
In the next window, go to the Users tab, then select the user or the group of users for which you want to make changes. In this case, we selected the Non-Administrators group. Click or tap on OK afterward, then on Finish.
 Selecting the user or the group for which you want to change settings
The final step is to press OK. This opens the settings tree applicable to the selected user/group.
Selecting the user or the group for which you want to change settings
The final step is to press OK. This opens the settings tree applicable to the selected user/group.
 Press OK and the Editor will appear
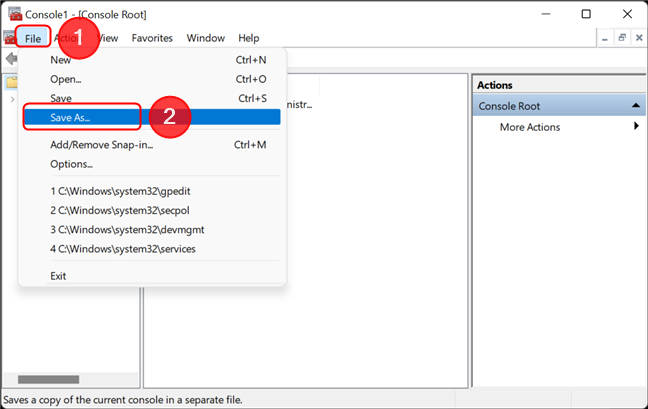
In order to bypass this lengthy process the next time you want to modify the settings to that particular user or group, you can save the console settings and create a shortcut for it. Open the File menu, then click or tap on Save as.
Press OK and the Editor will appear
In order to bypass this lengthy process the next time you want to modify the settings to that particular user or group, you can save the console settings and create a shortcut for it. Open the File menu, then click or tap on Save as.
 Save the console configuration for the Local Group Policy Editor
Next, navigate to the location where you want a shortcut to the console to be created, rename the shortcut, and click or tap on Save.
Save the console configuration for the Local Group Policy Editor
Next, navigate to the location where you want a shortcut to the console to be created, rename the shortcut, and click or tap on Save.

 Rename the shortcut and place it in a folder of your choosing
The next time you want to modify the settings for the same user or group, simply double-click or double-tap the newly-created icon.
Rename the shortcut and place it in a folder of your choosing
The next time you want to modify the settings for the same user or group, simply double-click or double-tap the newly-created icon.
 Hovering over the toolbar buttons displays a tooltip
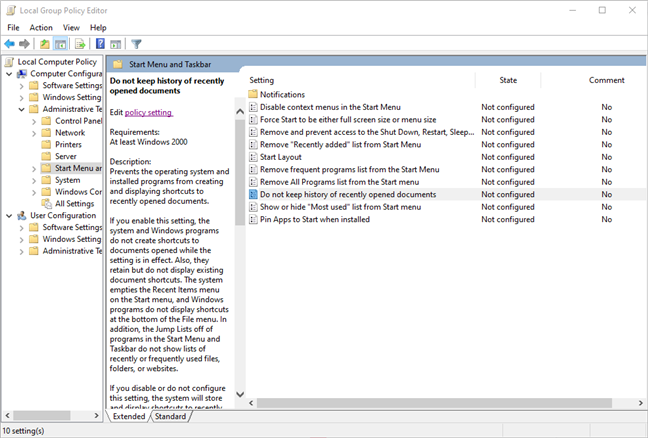
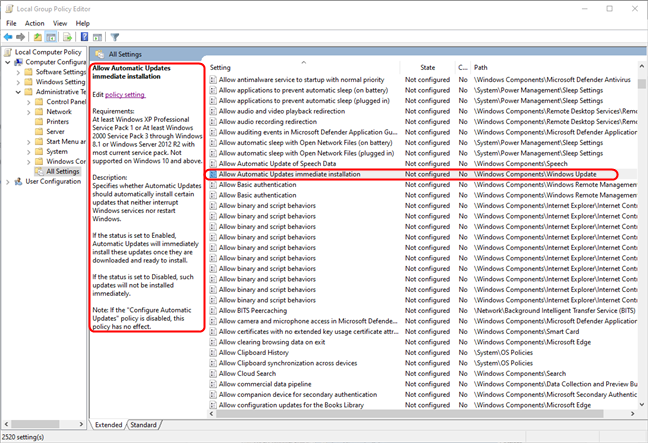
The main elements of the interface are below the toolbar. In the default view, the Local Group Policy Editor has a navigation pane called Console Tree on the left, where you can select the policy category or node. In the center, the main section lists all the policies in the selected category, as well as a very useful description of any policy you select. The policy list contains the name of the policy, the state (which can be Not Configured, Enabled, or Disabled), and the comments added by you or other administrators. When selecting All Settings in the Console Tree, an additional column is displayed, showing the path of that particular setting in the tree.
Hovering over the toolbar buttons displays a tooltip
The main elements of the interface are below the toolbar. In the default view, the Local Group Policy Editor has a navigation pane called Console Tree on the left, where you can select the policy category or node. In the center, the main section lists all the policies in the selected category, as well as a very useful description of any policy you select. The policy list contains the name of the policy, the state (which can be Not Configured, Enabled, or Disabled), and the comments added by you or other administrators. When selecting All Settings in the Console Tree, an additional column is displayed, showing the path of that particular setting in the tree.
 Selecting a policy in the main section displays a description of the setting
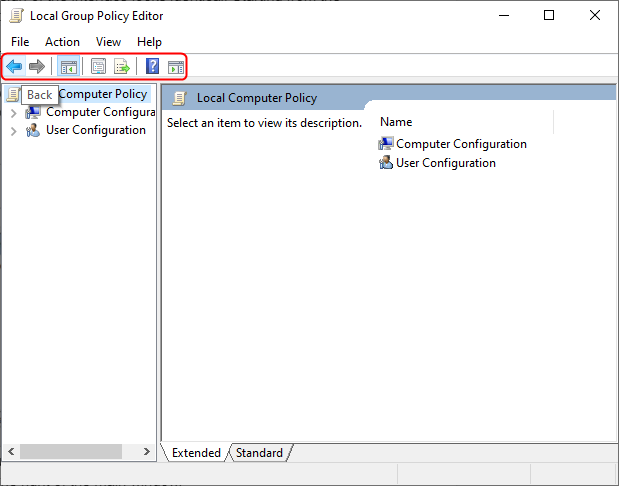
Finally, by pressing the corresponding buttons in the toolbar, you can show or hide the Console Tree on the left and an Action pane on the right of the main window.
Selecting a policy in the main section displays a description of the setting
Finally, by pressing the corresponding buttons in the toolbar, you can show or hide the Console Tree on the left and an Action pane on the right of the main window.
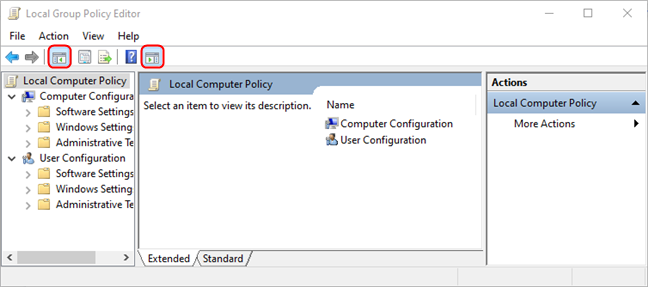
 Use the buttons in the toolbar to show or hide the left and right panes
Depending on where you navigate to using the left pane, the list in the main section can get pretty extensive. Speaking of which, let’s now move on to…
Use the buttons in the toolbar to show or hide the left and right panes
Depending on where you navigate to using the left pane, the list in the main section can get pretty extensive. Speaking of which, let’s now move on to…
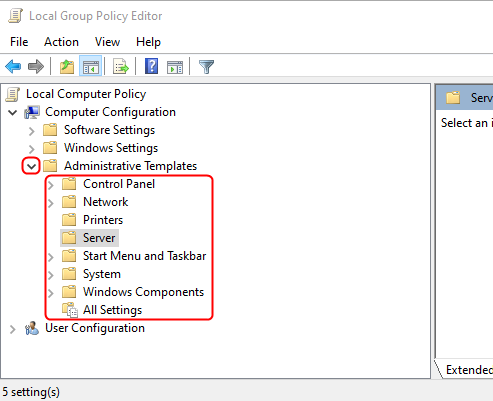
 Navigating the Console Tree
If you select a folder in the Console Tree (by clicking or tapping on it), its contents will be displayed in the main section of the Local Group Policy Editor.
Finally, if you are looking for a setting in the Administrative Templates, but you don’t know exactly where to search for it, you can filter the nodes by selecting the Administrative Templates node, then going to the Action menu in the upper part of the window and selecting “Filter Options…”
Navigating the Console Tree
If you select a folder in the Console Tree (by clicking or tapping on it), its contents will be displayed in the main section of the Local Group Policy Editor.
Finally, if you are looking for a setting in the Administrative Templates, but you don’t know exactly where to search for it, you can filter the nodes by selecting the Administrative Templates node, then going to the Action menu in the upper part of the window and selecting “Filter Options…”
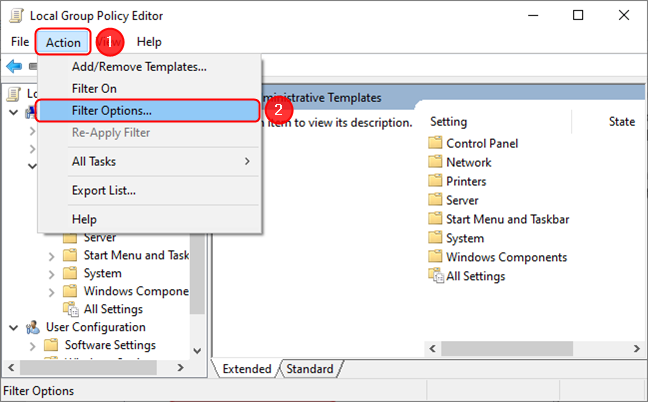
 Accessing the filter settings for the Local Group Policy Editor
To filter using a keyword, click on Enable Keyword Filters, then input the keyword(s), define where to look for them, and finally click on OK. The filter will be applied immediately and will hopefully narrow your search.
Accessing the filter settings for the Local Group Policy Editor
To filter using a keyword, click on Enable Keyword Filters, then input the keyword(s), define where to look for them, and finally click on OK. The filter will be applied immediately and will hopefully narrow your search.
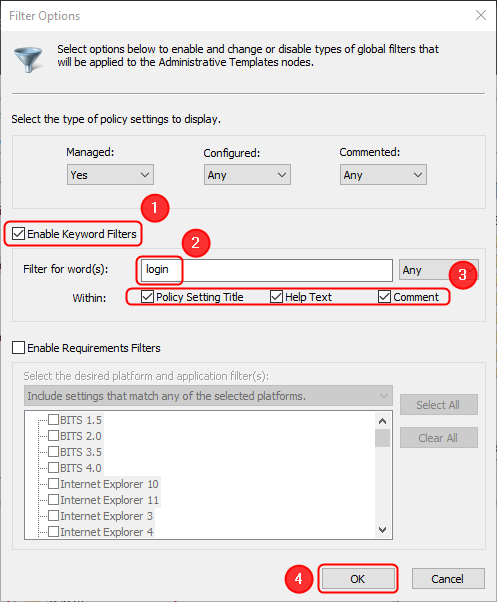
 Filtering the settings list using keywords
To toggle the filter, click or tap on the Filter button on the toolbar (the one that looks like a funnel).
Filtering the settings list using keywords
To toggle the filter, click or tap on the Filter button on the toolbar (the one that looks like a funnel).
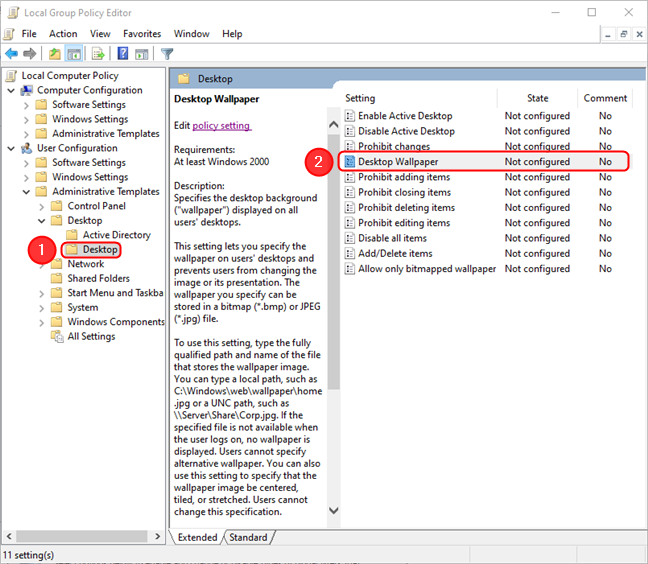
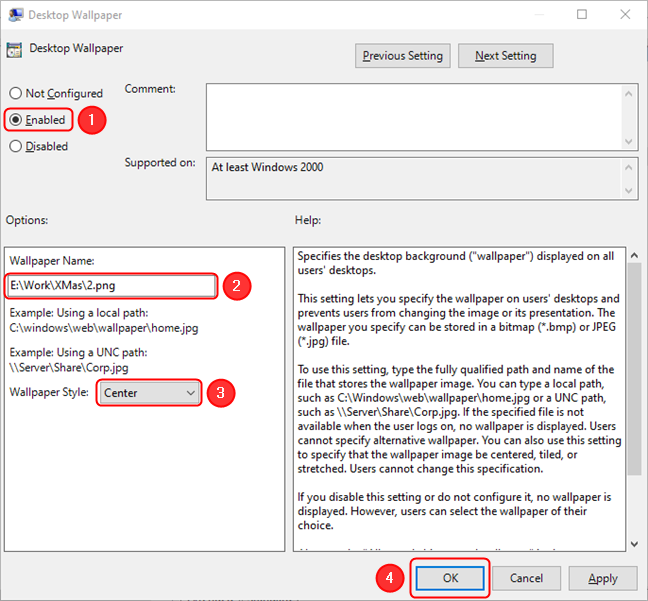
 Double-click the setting you want to configure
In the next window, you can set it to Enabled, Disabled, or Not Configured. Depending on which setting you are editing, these three states will allow or restrict various actions. In this case, we want to set it to Enabled to enforce the same wallpaper for all users. Next, in the Options section, type the path and name of the wallpaper image. Then, select the wallpaper style (Center, Fill, Fit, etc.) and click or tap on OK. The next time you or another user logs in, the selected wallpaper will be displayed. Moreover, the users won’t be able to change the wallpaper unless they have access to the Local Group Policy Editor.
Double-click the setting you want to configure
In the next window, you can set it to Enabled, Disabled, or Not Configured. Depending on which setting you are editing, these three states will allow or restrict various actions. In this case, we want to set it to Enabled to enforce the same wallpaper for all users. Next, in the Options section, type the path and name of the wallpaper image. Then, select the wallpaper style (Center, Fill, Fit, etc.) and click or tap on OK. The next time you or another user logs in, the selected wallpaper will be displayed. Moreover, the users won’t be able to change the wallpaper unless they have access to the Local Group Policy Editor.
 Enable or disable it, then configure its options
You can also leave a note in the Comment section. It will be saved once you hit OK.
Depending on the setting you wish to change, the options might be different or missing altogether. For example, suppose you want to lock the taskbar for all users (User Configuration/Administrative Templates/Start Menu and Taskbar). In this case, you just need to enable the setting, so no other options are available.
Enable or disable it, then configure its options
You can also leave a note in the Comment section. It will be saved once you hit OK.
Depending on the setting you wish to change, the options might be different or missing altogether. For example, suppose you want to lock the taskbar for all users (User Configuration/Administrative Templates/Start Menu and Taskbar). In this case, you just need to enable the setting, so no other options are available.
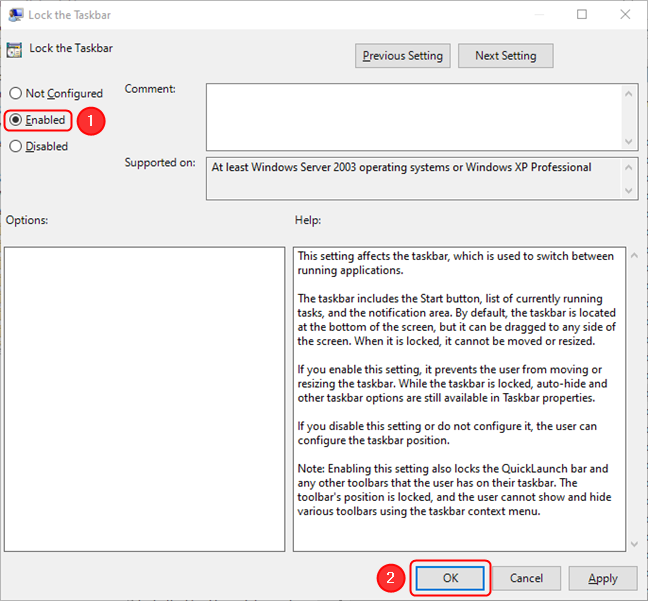 Some settings don't have more options
Once you enable or disable a policy, its status will show up in the list. Remember that most of the settings are applied the next time users log into their account.
Some settings don't have more options
Once you enable or disable a policy, its status will show up in the list. Remember that most of the settings are applied the next time users log into their account.
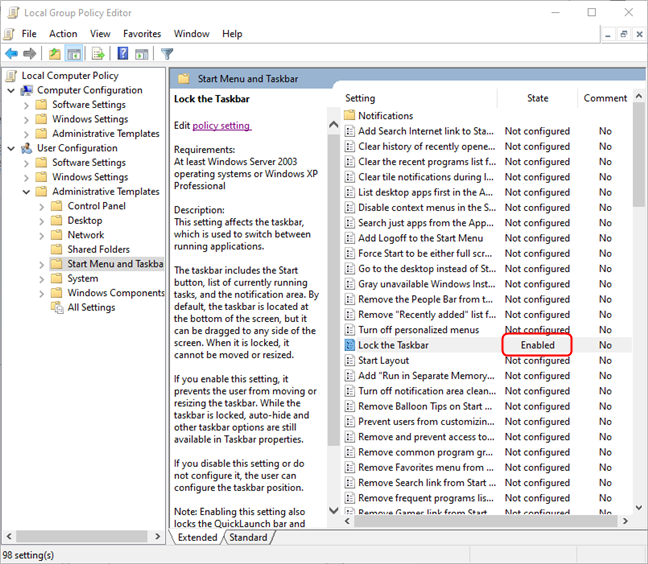 You can clearly see in the list the modified settings
TIP: To familiarize yourself with the settings, click on them in the Local Group Policy Editor to display their description. Alternatively, double-click on them to see the possible options for that setting. Nothing changes as long as you don’t click OK, so feel free to browse.
You can clearly see in the list the modified settings
TIP: To familiarize yourself with the settings, click on them in the Local Group Policy Editor to display their description. Alternatively, double-click on them to see the possible options for that setting. Nothing changes as long as you don’t click OK, so feel free to browse.
What is the Local Group Policy Editor?
First of all, what is the Local Group Policy Editor? To answer that, let’s first define the Group Policies. By definition, a Group Policy is a Windows feature that offers a centralized way of mass managing and configuring the operating system, the programs, and user settings for all the computers connected to the same domain. Group Policies are most useful if you are a network administrator and you need to enforce rules or settings on the computers or users within the network you manage. A Local Group Policy is a variant of Group Policy that applies to individual computers, as opposed to all the computers that are registered on a domain. A good example is your home computer with Windows 11, Windows 10, Windows 8.1, or Windows 7. To put it into simple terms, you should think about Local Group Policy as a set of rules that govern how Windows works on your computer or device. The built-in tool that allows you to modify these rules is, you guessed it, the Local Group Policy Editor.- Allow users to access only some of the applications found on your computer.
- Block users from using removable devices (ex. USB memory sticks) on the computer.
- Block users' access to the Control Panel and to the Settings app.
- Hide specific elements from the Windows user interface or the Control Panel.
- Specify the wallpaper used on the Desktop and block users from changing it.
- Block users from enabling/disabling LAN connections or block them from changing the properties of the computer's LAN (Local Area Network) connections.
- Deny users to read and/or write data from CDs, DVD, removable drives, etc.
Can I use the Local Group Policy Editor?
Only users with administrative rights can run the Local Group Policy Editor. If a regular user tries to run it, the system will display an error.- Windows 11 Pro and Windows 11 Enterprise
- Windows 10 Pro and Windows 10 Enterprise
- Windows 7 Professional, Windows 7 Ultimate, and Windows 7 Enterprise
- Windows 8.1 Professional and Windows 8.1 Enterprise
How to open Local Group Policy Editor
Before using it, you should know how to access the Local Group Policy Editor. Start by asking yourself for whom you want to change the settings. Is it for all users? Or is it for a particular user or a group of users? Because the process is very different, we cover the two separately.Using the Local Group Policy Editor to change settings for all users on the local computer
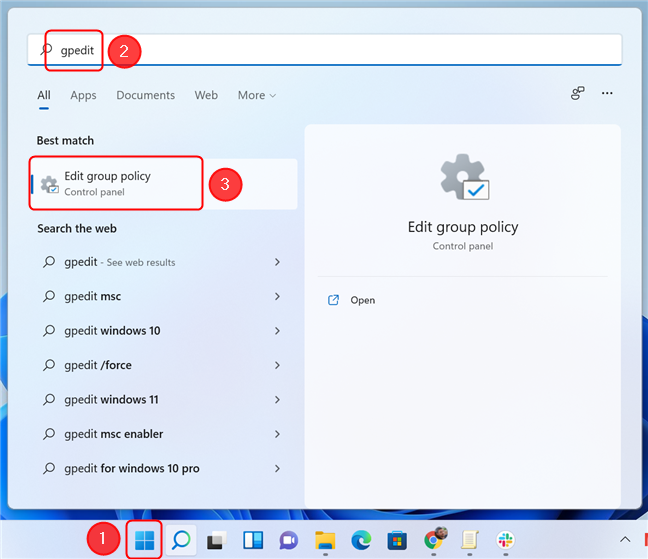
If you want to apply the settings for all users, there are many ways to launch the Local Group Policy Editor. Check out our article on how you can open the Local Group Policy Editor in Windows for more details. The quickest method (and the one we prefer) is simply pressing the Windows key on the keyboard (or clicking/tapping on the Start button on the desktop), then typing gpedit followed by Enter. This opens the Local Group Policy Editor immediately.Using the Local Group Policy Editor to change settings for particular users or groups on your computer
If you want to adjust settings only for a specific user account or user group, launching the Local Group Policy Editor is more complicated. First, start the Microsoft Management Console. The quickest way to do it is by pressing Windows + R to open the Run window, and then typing mmc followed by Enter. Next, in the MMC window, click or tap on File, then on Add/Remove Snap-in.How to use the Local Group Policy Editor
After you’ve started the Local Group Policy Editor using one of the methods described earlier, it is time to learn how to use it. Let’s first look at the layout of the editor.The Local Group Policy Editor layout
Whether you use it on Windows 11 or any other version of Windows, the design of the interface looks identical. Starting from the top, you have a series of menus, then a toolbar that lets you, among other things, navigate through the policies. Feel free to click on the menu items and the toolbar buttons to familiarize yourself with the interface, you are not going to break anything :).Navigating the Console Tree
In the default view of the Local Group Policy Editor, the Console Tree displays two large sections:- Computer Configuration - holds Local Group Policy settings that control policies applied computer-wide, regardless of the user or users logged in.
- User configuration - holds Local Group Policy settings that control user policies. These policies are applied to users, rather than the whole computer.
- Software Settings - contains policies that apply to installed programs and, by default, it should be empty.
- Windows Settings - holds Windows security settings. It's also the place where you can find or add scripts that should run when Windows starts or shuts down, or when logging in and out.
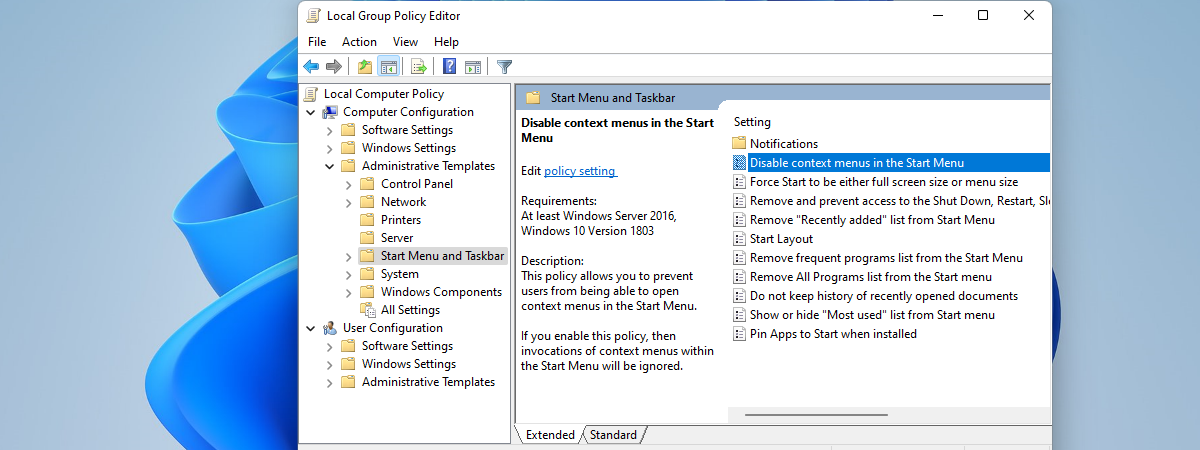
- Administrative Templates - this is the most interesting part if you’re here to tweak your system. This is the place where you can see, change and even enforce all kinds of settings and rules. To give you a few examples, you can manage how the Control Panel, Network, Start Menu, and Taskbar work and what users can change when using them.
Modifying Local Group Policies
In order to explain how to modify a policy, let’s pick an example. Let’s say you want to set and enforce the same desktop wallpaper for all users on your computer. First, navigate to the setting. Since the setting applies to users, the policy will be located under User Configuration/Administrative Templates/Desktop/Desktop. Next, double-click or double-tap on Desktop Wallpaper to edit it.
Discussion (0)
Be the first to comment.