14.10.2024
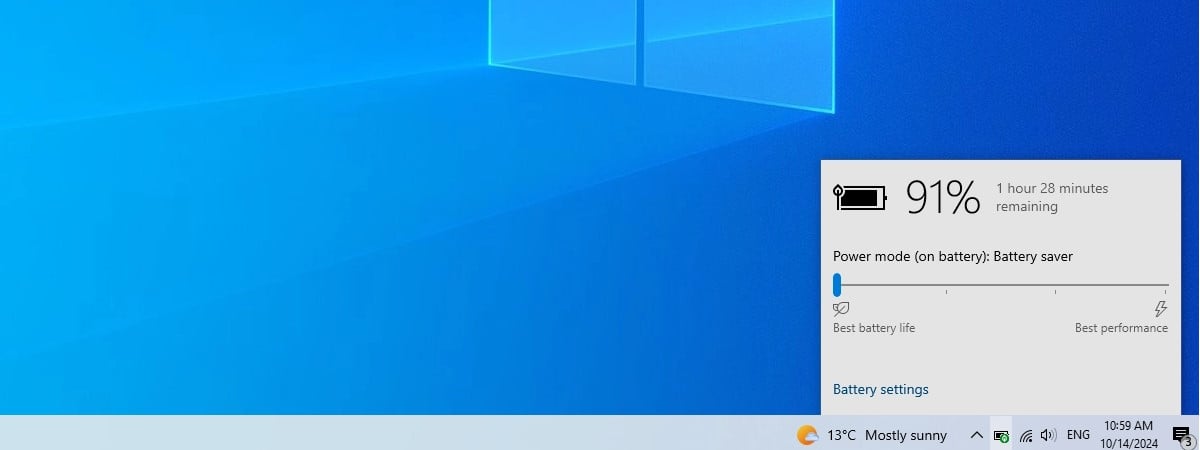
The battery saver in Windows 10 is a feature designed to help you get the most out of your laptop or tablet’s battery life. It’s especially useful when your device is running low on power, and you don’t have access to a charger or power outlet. By limiting certain background activities and adjusting settings, battery saver helps extend your laptop’s remaining battery life, giving you more time to finish what you’re doing. In this guide, I’ll tell you more about what the battery saver is, how it works, and the specific features it temporarily disables to save power. I’ll also show you how to enable, configure, and turn off battery saver. Without further ado, let’s get started:
What is battery saver in Windows 10?
Battery saver is a built-in Windows 10 feature designed to reduce power consumption by limiting background activity and adjusting system settings. Its purpose is to help your laptop, 2-in-1, or tablet conserve battery power when you can’t connect it to a power source.
Battery saver in Windows 10
When battery saver is enabled, some Windows 10 features are affected:
- Some apps and background services, such as OneDrive or Outlook, stop automatically syncing until the battery saver is disabled.
- The screen brightness is automatically dimmed, to conserve battery power. If you don’t like that, you can still manually adjust it.
- Notifications from some apps may be delayed, as Windows 10 may check less often for them.
Worth noting, the battery saver automatically turns on when your battery level drops below a certain percentage (by default, 20%). However, you can manually adjust its settings or activate it as needed. Read the next chapters in this guide to learn everything there is to know about it:
How to turn off the battery saver in Windows 10
The best way to turn off the battery saver is to plug your Windows 10 laptop or tablet into a power outlet. As soon as Windows 10 detects that your device is charging, it stops using the battery saver.
Charging your laptop stops battery saver
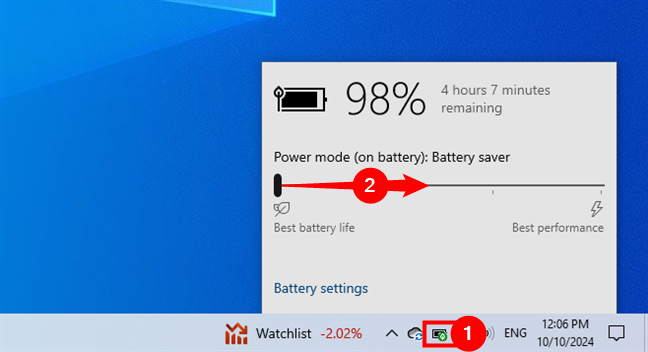
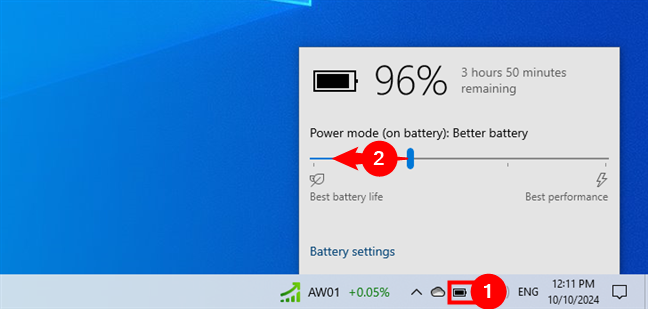
Another way to turn off the battery saver is to click or tap the battery icon in the bottom-right corner of your desktop. In the panel that pops up, you should find the slider on the left edge of the Power mode bar. Move the slider to the right, to any other position, and the battery saver is disabled.
How to turn off the battery saver in Windows 10
NOTE: To learn more about the power slider, as well as its levels and settings, read this guide on how to use the Windows 10 power slider to save battery or increase performance.
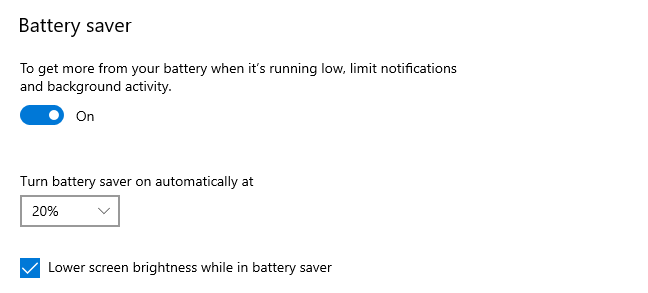
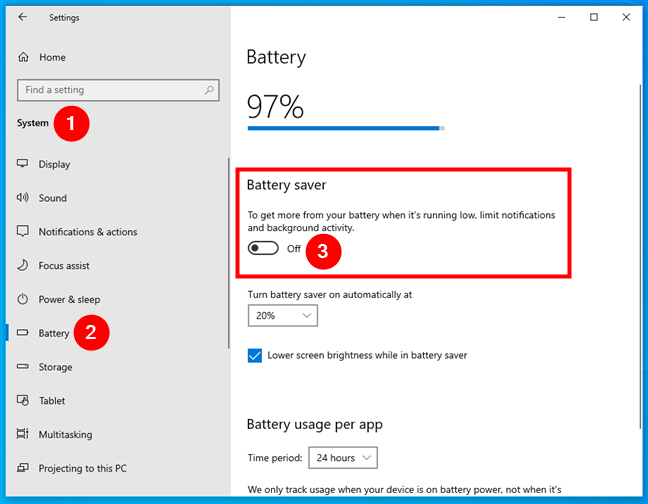
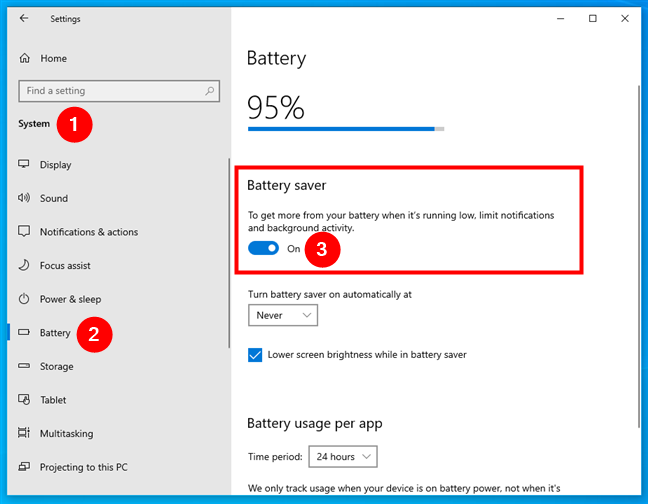
A third way to disable the battery saver in Windows 10 starts with opening Settings. Then, go to System and click or tap Battery in the left sidebar. On the right, in the Battery saver section, look for the Battery saver switch. Windows 10 explains what this switch does: “To get more from your battery when it’s running low, limit notifications and background activity.” Set it Off.
Turn off battery saver in Windows 10's Settings
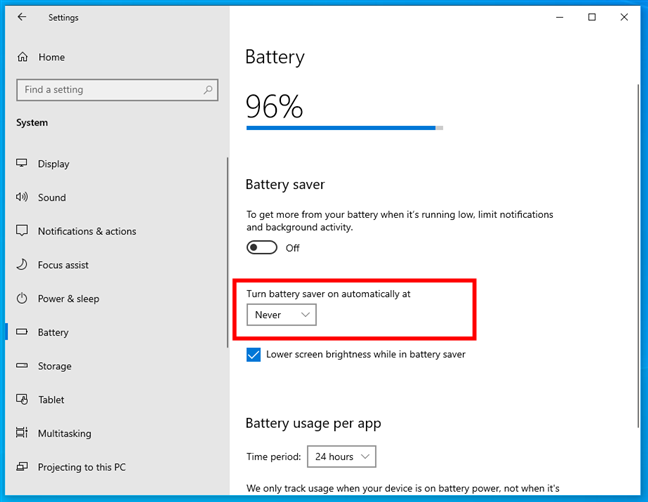
If you did this, and the battery saver is still turned on, then your battery may be at a critical level, under 20%, and you should charge your Windows 10 laptop or tablet. However, you can still disable the battery saver, by selecting the Never option in the “Turn battery saver on automatically at” drop-down menu.
Never turn on the battery saver automatically in Windows 10
And now that you know how to turn off the battery life extender in Windows 10, let’s also see…
How to turn on the battery saver in Windows 10
If you want to enable the battery saver on your Windows 10 laptop or tablet, click or tap the battery icon in the bottom-right corner of the desktop. Then, move the power slider to the left margin where it says Best battery life.
How to enable the battery saver in Windows 10
When the battery saver is turned on, you see that the Power mode (on battery) changes to Battery saver.
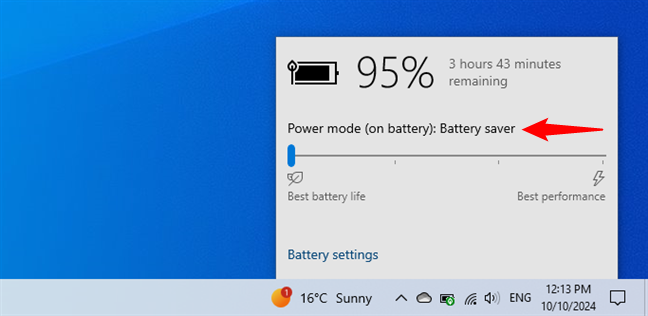
Battery saver is enabled in Windows 10
Another visual confirmation is that you see a small green leaf over the battery icon from your taskbar, like the one in the screenshot below.
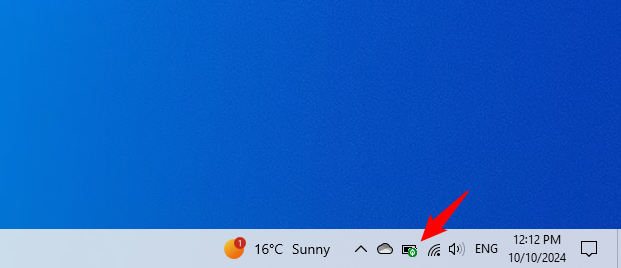
Battery saver is turned on in Windows 10
A second way to enable the battery saver in Windows 10 is available in the Settings app. Open it (press Win + I on the keyboard, or click/tap its icon in the Start Menu) and go to System. Then, click or tap Battery in the left sidebar. On the right, set the Battery saver switch On.
Turning on the battery saver in Windows 10
The battery saver is now enabled in Windows 10, doing its best to lower energy consumption and increase your laptop’s battery life.
How to configure the battery saver mode in Windows 10
If you want to personalize how the battery saver works, open Settings and go to System.

Accessing System settings in Windows 10
In the left sidebar, select Battery. On the right side of the window, there are two other settings besides the switch that turns the battery saver mode On or Off. The first one is called “Turn battery saver on automatically at.” By default, it’s set to activate when your laptop’s battery is at 20% of its charging capacity.
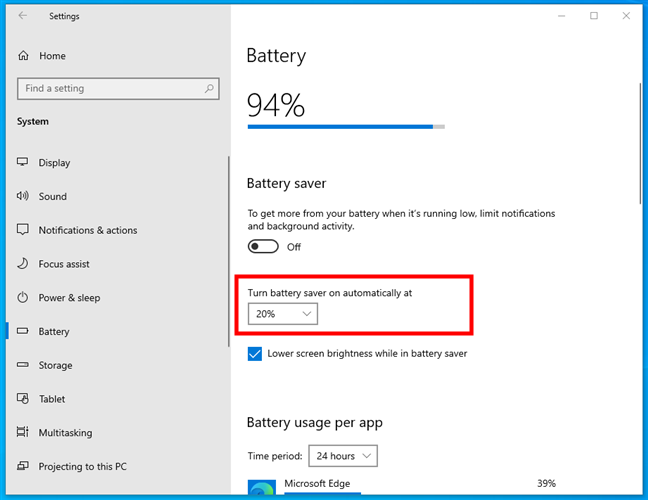
Turn battery saver on automatically at 20%
However, you can change it to a different level or even turn it on or off permanently, regardless of the battery level. To do that, click or tap the drop-down list and choose what you prefer from the available options: Never, 10%, 20%, 30%, 40%, 50%, or Always.
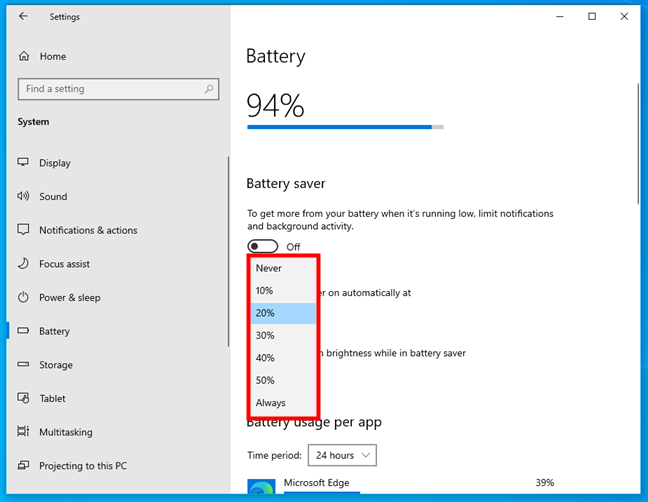
Configuring when to automatically turn on the battery saver
The other thing you can change about the way the battery saver works on your Windows 10 device is whether its screen brightness will lower when the battery saver is on. If you check the “Lower screen brightness while in battery saver” box, your display will dim automatically, and your device will consume less energy when the battery saver turns on.
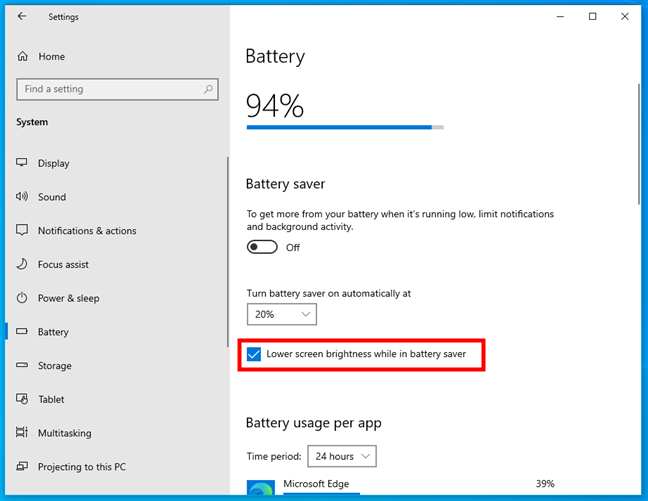
Lower screen brightness while in battery saver
Now, the battery saver from Windows 10 should be configured according to your needs.
Are you using the battery saver feature on your Windows 10 laptop or device?
The battery saver in Windows 10 is a great tool for increasing your laptop’s battery life when you're running low on power. You should now have a better understanding of how it works, what features it disables, and how to configure it. Are you using this feature to extend your device’s battery life? Is it because you’re traveling and working in a power-limited environment, like a camper? Are you simply looking to get the most out of your laptop’s battery? Let me know in the comments section below.