



If you spend a lot of time gaming, filling forms, or running tests in your browser, learning how to get an auto clicker on Chromebook can save you a lot of time. ChromeOS now includes a built-in automatic clicker, and you can still use Chromebook auto clicker extensions, Android apps, or Linux tools when you need more control.
Before you try third-party tools, start with the built-in Chromebook automatic clicks feature. It handles most basic auto-clicking tasks, works across system menus, and avoids the risk of installing shady extensions or apps that promise free auto clickers but add tracking or ads.
On ChromeOS, you can use two main types of auto-clickers. The first is the built-in Automatic Clicks option in Chromebook accessibility settings, which clicks automatically when your pointer stops moving. The second group includes third-party Chromebook tools that run as Chrome extensions, Android apps, or Linux apps.
The built-in ChromeOS auto clicker works best for accessibility, basic web browsing, and simple idle games. Third-party apps for Chromebook usually offer more presets, multiple click locations, and advanced macros, but you must manage them carefully and respect game or site rules.
Turn On The Built-In Automatic Clicker In ChromeOS
The easiest way to get an auto clicker on Chromebook is to enable the Automatic Clicks feature in ChromeOS. This ChromeOS auto clicker does not require any download and works across most apps and windows on your Chromebook:
- Click the time in the bottom right corner of your Chromebook to open the quick settings panel.
- Select Settings and scroll down to Accessibility.
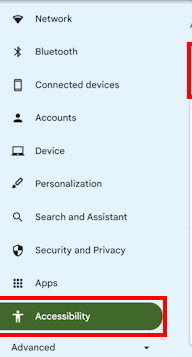
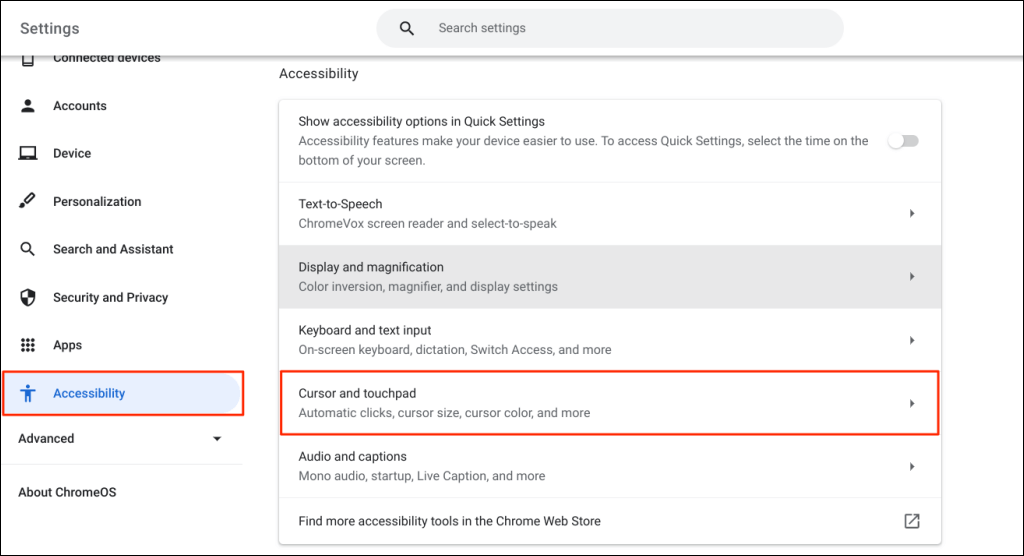
- Choose Cursor and Touchpad in the Accessibility section.
- Toggle Automatic Clicks to the on position.
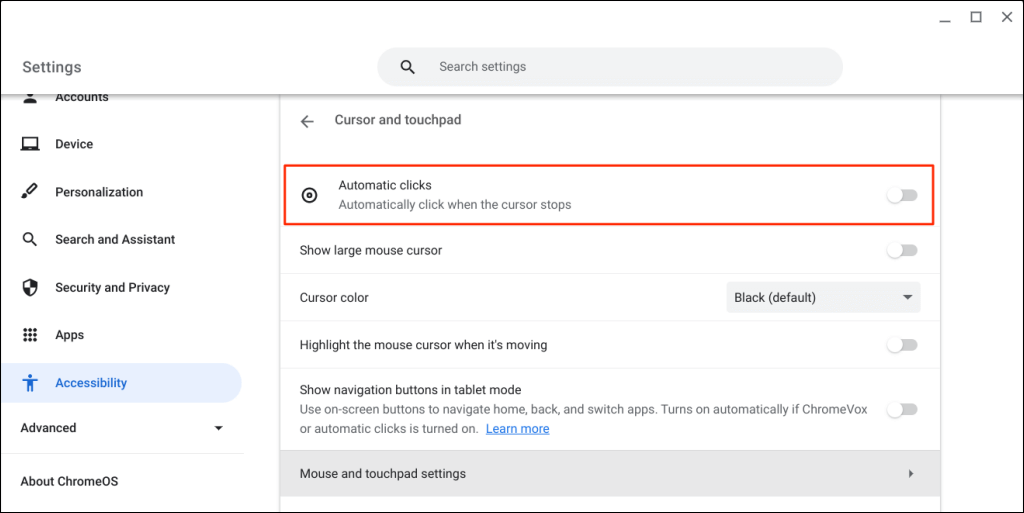
- Adjust the Delay Before Click to control how long the cursor must stay still before the Chromebook auto clicker activates.
- Change options like Stabilize Click Location, Movement Threshold, and Revert To Left Click After Action to match how you use the mouse or touchpad.
- Use the floating Click Action menu on-screen to switch between left-click, right-click, double-click, drag, and scroll.
If you mainly want an auto-clicker on Chromebook to reduce strain or support accessibility, the Automatic Clicks feature should cover most scenarios without installing anything extra.
Use A Chrome Extension Auto Clicker
When you need a more traditional auto clicker for Chromebook inside the browser, a Chrome extension can give you finer control. This method works well for simple browser games and repetitive web tasks but only affects actions inside Chrome.
Follow these general steps to add a ChromeOS auto-clicker extension:
- Open Chrome on your Chromebook and go to the Chrome Web Store.
- Search for terms like Auto Clicker, Autoclicker, or Mouse Auto Clicker.
- Check ratings, recent reviews, and last update dates to avoid outdated or spammy extensions.
- Click Add To Chrome, then choose Add Extension when Chrome asks for confirmation.
- Select the new auto clicker icon near the address bar to open its controls.
- Set options such as click interval, click type, and whether you want single, double, or continuous clicks.
- Start the Chromebook auto clicker while the target tab or game remains focused, and stop it using the extension controls or a hotkey.
Only install one Chrome auto clicker extension at a time to avoid conflicts. If something behaves strangely, disable or remove the extension in chrome://extensions and test again.
Install An Android Auto Clicker App On Chromebook
Most modern Chromebooks can run Android apps from the Google Play Store, which gives you access to many Android auto clicker apps. This method suits mobile games, tap-heavy apps, and touch-first workflows where a classic Chrome extension auto clicker cannot reach.
To use an Android auto clicker on Chromebook, do this:
- Open Settings and look for the Google Play Store section on your Chromebook.
- Enable the Play Store if it is not already on, and sign in with your Google account.
- Launch the Google Play Store app and search for terms like Auto Clicker, Auto Tapping, or Automatic Tap App.
- Pick an Android auto clicker with recent updates and strong reviews, then tap Install.
- Open the auto clicker app and grant any permissions it needs to display over other apps.
- Configure click points, intervals, and scripts based on what you want to automate in your Chromebook games or apps.
- Start the script in the Android app, then switch to your game or tool and let the auto-clicker run.
Because Android auto clicker apps on Chromebook can click anywhere on the screen, use them carefully. Review the rules for each game or service so you do not break any terms of use.
Set Up A Linux Auto Clicker On Chromebook Advanced
If you use a Chromebook with Linux support enabled, you can install a Linux auto-clicker for more advanced automation. This route helps developers, quality assurance testers, and technical users who want keyboard-driven macros or full desktop control beyond the browser.
Use these high-level steps to run a Linux auto clicker on Chromebook:
- Open Settings and enable the Linux Development Environment (Crostini) if your Chromebook supports it.
- Launch the Linux terminal from your app drawer after ChromeOS finishes the setup.
- Use the package manager to install a Linux auto-clicker tool, such as a click automation utility or macro recorder, available for your distribution.
- Configure the auto-clicker using command-line flags or a graphical interface, depending on the package you choose.
- Set up hotkeys, intervals, and target windows so you can trigger the Linux auto clicker without switching out of your ChromeOS workflow.
- Test in a safe environment first to confirm the tool clicks only where you expect and does not interfere with normal Chromebook navigation.
This advanced method offers the most flexibility but requires comfort with Linux commands and ChromeOS developer features. Most everyday users should stay with Automatic Clicks, Chrome extensions, or Android auto clicker apps on Chromebook instead.
Troubleshooting Common Problems
If your Chromebook auto-clicker stops working or behaves unpredictably, a few quick checks usually fix the issue. Start with the simplest settings first before you uninstall extensions or reset your device.
- Automatic Clicks Does Not Start: Confirm that Automatic Clicks stays toggled on in Settings > Accessibility > Cursor And Touchpad and that you have not turned it off from the floating menu.
- Clicks Happen Too Fast Or Too Slow: Lower or raise the Delay Before Click slider so automatic clicks happen at a comfortable pace for your Chromebook usage.
- Chrome Extension Auto Clicker Does Nothing: Make sure the extension icon shows as active, the correct tab is selected, and no other extension blocks input on that page.
- Android Auto Clicker Cannot Tap: Check overlay permissions in the Android app settings and verify that the auto clicker floats above your game or app window.
- Cursor Jumps Around: Reduce the Movement Threshold in Automatic Clicks, or turn off any second auto-clicker so only one tool controls clicks at a time.
- Games or Sites Act Strangely: Disable your Chromebook auto-clicker, then reload the page. Some services detect rapid automated clicks and may throttle or block actions.
Tips
- Use the built-in ChromeOS Automatic Clicks feature first before you install any third-party Chromebook auto clicker tool.
- Keep only one auto clicker active at a time to avoid conflicting clicks and unpredictable behavior.
- Test new Chrome auto clicker extensions or Android apps on harmless pages before you use them in games or important web apps.
- Respect game and website rules, since running an aggressive auto clicker on Chromebook can violate terms of service.
- Adjust delay times and movement thresholds gradually until automatic clicks feel natural for your usual work or gaming sessions.
- Turn off all auto clickers when you step away from your Chromebook to prevent unintended clicks or changes.
FAQ
Is There A Built-In Auto Clicker On Chromebook
Yes. Chromebook devices include the Automatic Clicks setting in ChromeOS accessibility options, which works as a basic auto clicker. When you enable it, ChromeOS clicks automatically after your pointer stops moving for a short delay.
Are Auto Clickers On Chromebook Safe To Use
The built-in ChromeOS auto-clicker is safe because Google maintains it as part of the system. Third-party Chromebook auto clicker tools from the Chrome Web Store or Google Play Store can be safe, but you should choose well-reviewed options, avoid unknown downloads, and respect the rules of any game or website you automate.
Can I Use An Auto Clicker On Chromebook For Games
You can use a Chromebook auto clicker in many web and Android games, especially idle or clicker titles, but you should always check each game’s policy. Some competitive games and online services ban auto clickers, so use them only where they are allowed.
Why Does My Auto Clicker Stop Working Randomly
An auto-clicker on a Chromebook can stop working if ChromeOS updates, the extension crashes, or the Android app loses overlay permission. Restart your Chromebook, update your apps and extensions, and confirm that only one auto clicker runs at a time.
Do I Need Linux To Get An Auto Clicker On Chromebook
No. You do not need Linux to learn how to get an auto clicker on Chromebook. Most users can use Automatic Clicks in ChromeOS, Chrome auto-clicker extensions, or Android auto-clicker apps without enabling the Linux development environment.
Summary
- You can turn on the built-in Automatic Clicks feature in ChromeOS to get a basic Chromebook auto clicker without installing extra software.
- Chrome auto-clicker extensions handle repetitive clicks in the browser but require careful selection and setup.
- Android auto clicker apps on Chromebook provide powerful tap automation for games and mobile apps from the Google Play Store.
- Linux-based auto clicker tools are available for advanced users who need scripting and full desktop control.
- Most auto-clicker issues clear up when you adjust Chrome OS settings, disable extra tools, or update extensions and apps.
Conclusion
When you understand how to get an auto clicker on Chromebook, you can choose the safest and most efficient option for your work or play. ChromeOS now includes a reliable automatic clicker, while Chrome extensions, Android apps, and Linux tools cover more demanding automation tasks.
Start with the built-in Automatic Clicks setting, then move to a Chromebook auto-clicker extension or an Android app only if you need extra control. Combine that with sensible delay settings and respect for game and site rules, and you can automate repetitive clicks without slowing down or risking your Chromebook.


Discussion (0)
Be the first to comment.