




If you want to enable Advanced Browsing Protection in NordVPN, you can activate the Threat Protection feature inside the NordVPN app. This security tool blocks malicious websites, prevents dangerous downloads, and protects you from online trackers while browsing.
NordVPN’s Advanced Browsing Protection works alongside the VPN connection to improve online safety. Once enabled, it automatically scans websites and files to detect threats before they reach your system. This guide explains how to enable Advanced Browsing Protection in NordVPN on Windows 11.
What Is Advanced Browsing Protection in NordVPN?
Advanced Browsing Protection in NordVPN is part of the Threat Protection feature. It helps secure your internet activity by detecting unsafe websites and blocking harmful content.
When enabled, the feature can:
- Block malicious or phishing websites
- Prevent malware downloads
- Stop intrusive ads and trackers
- Scan downloaded files for threats
This protection works even when the VPN is not actively connected in some configurations.
Why Enable Advanced Browsing Protection?
Activating Advanced Browsing Protection adds an extra layer of security to your internet browsing.
Benefits include:
- Protection from phishing and scam websites
- Reduced risk of downloading malware
- Blocking intrusive advertisements
- Improved online privacy
For users who frequently download files or visit unfamiliar websites, this feature can significantly reduce risk.
How to Enable Advanced Browsing Protection in NordVPN
Follow these steps to enable the feature on Windows 11.
First - Open the NordVPN Application
- Launch the NordVPN app on your computer.
- Log in to your NordVPN account if you are not already signed in.
Second - Open Settings
- Click the Settings icon (gear icon).
- Navigate to the Threat Protection section.
Third - Enable Threat Protection
- Turn on Threat Protection.
- Enable options such as:
- Malicious website blocking
- Tracker and ad blocker
- Malware download scanning
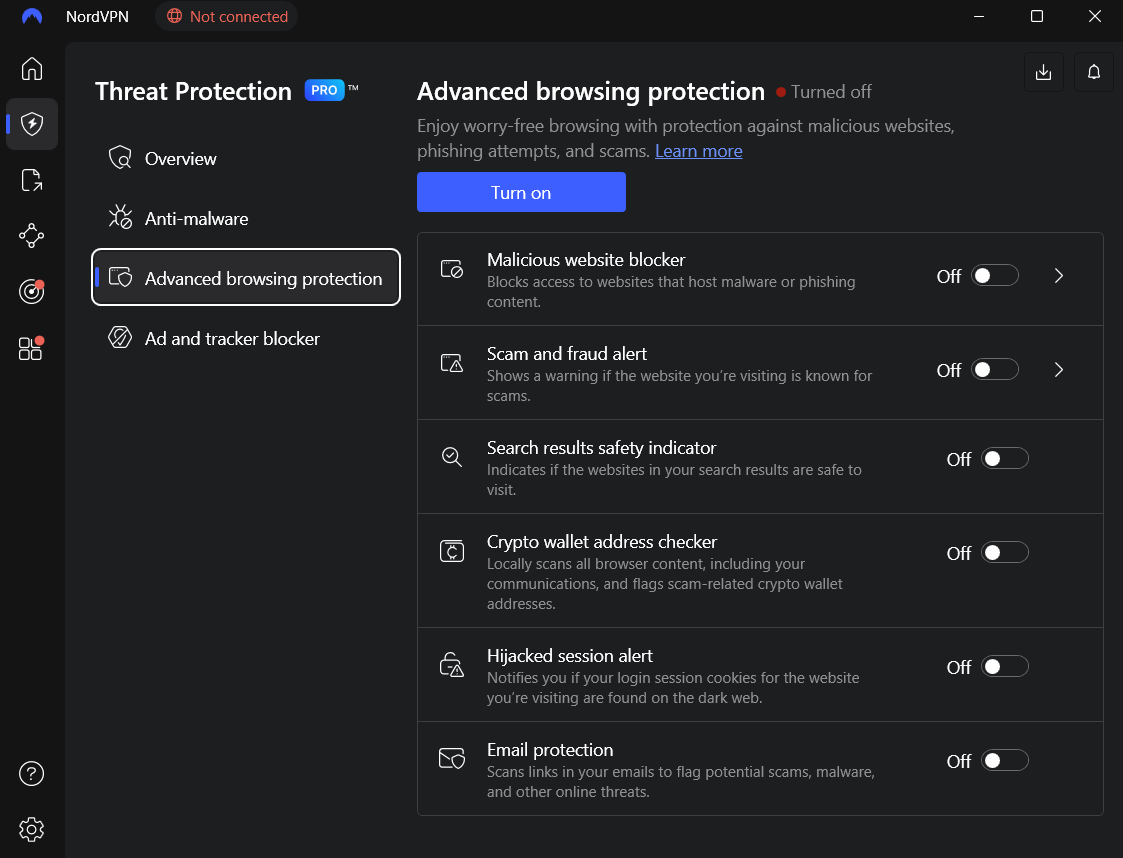
Once activated, Advanced Browsing Protection will start working automatically.
Check That the Feature Is Working
After enabling the feature, NordVPN will automatically monitor your browsing activity.
You can confirm it is active by:
- Checking the Threat Protection status in the NordVPN app
- Viewing blocked threats or trackers in the protection dashboard
NordVPN may also notify you when it blocks a dangerous website.
Tips for Better Online Protection
To improve security further while using NordVPN:
- Keep the NordVPN app updated
- Use strong passwords for online accounts
- Enable browser security features
- Avoid downloading files from unknown sources
Combining VPN protection with safe browsing habits improves overall security.
Final Thoughts
Learning how to enable Advanced Browsing Protection in NordVPN helps protect your system from malicious websites, trackers, and harmful downloads. The Threat Protection feature provides an extra security layer while browsing the internet.
Once enabled, it works automatically in the background, helping keep your Windows 11 system safer from online threats.
FAQs
What is Advanced Browsing Protection in NordVPN?
It is part of NordVPN’s Threat Protection feature that blocks malicious websites, trackers, and harmful downloads.
Does Advanced Browsing Protection work without a VPN connection?
Some protection features may work even when the VPN is not connected, depending on the settings.
How do I enable Threat Protection in NordVPN?
Open the NordVPN app, go to Settings, and enable Threat Protection.
Can Advanced Browsing Protection block ads?
Yes. It can block many ads and trackers that appear on websites.


Discussion (0)
Be the first to comment.