




Setting up a YI IoT camera only takes a few minutes, but small mistakes can block the pairing process. Most issues come from incorrect WiFi settings, outdated app versions, or missed prompts during setup.
This guide walks you through every step, including router requirements, QR pairing, placement tips, and common fixes for cameras that won’t connect.
But before you start, confirm that you’re using a YI IoT model and not a YI Home model. Each uses a different app and firmware. Also, YI IoT cameras connect only to 2.4 GHz networks. If your router combines both bands, create a separate 2.4 GHz SSID to avoid pairing failures.
Step 1: Download and install the YI IoT app
The YI IoT app handles camera pairing and video monitoring. Search for the YI IoT app on your device’s app store and download it. Avoid similarly named apps that work with older YI models.

Next, allow notifications, local network access, and camera permissions. These settings help the app read the QR code and connect to the device smoothly.
Step 2: Add the camera in the app
Connect the camera to power and wait for the LED to flash yellow. This means the device is ready for pairing. Next, open the app, tap Add Device, and choose the exact model from the list. The camera type determines the setup flow and supported features.
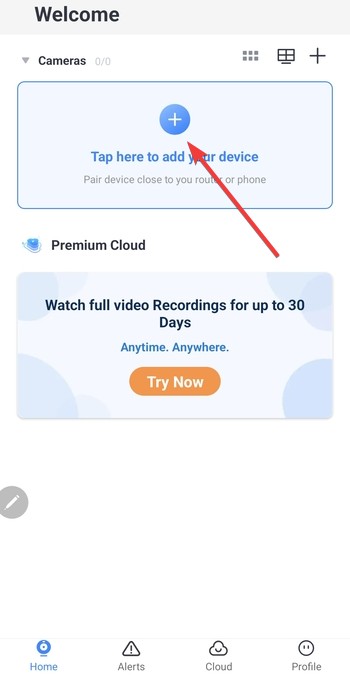
Now, connect to 2.4 GHz WiFi inside the app and enter your WiFi name and password. From here, scan the QR code using the camera.
Hold your phone 6–8 inches from the lens and angle the screen slightly downward. A short beep confirms the scan worked. The LED turns solid blue when pairing completes.
Step 3: Place and mount the camera
Keep the camera within 30 feet of your router during setup. Thick walls and metal appliances weaken the signal. Next, pick a spot with a wide view of your room.
Use the included mount and adjust the tilt to cover entry points or hallways.

Step 4: Configure essential settings
Start by setting up motion detection. Adjust sensitivity to reduce false alarms from pets or shadows. You should also enable push notifications if you want real-time activity alerts.
Next, insert a microSD card to store recordings locally or activate cloud backup. Format the SD card inside the app for best compatibility. Finally, switch between SD and HD depending on your WiFi speed.
Higher resolution provides clearer footage but uses more bandwidth.
Step 5: Share the camera with family
Use the Share button inside the camera settings and enter the email of the person you want to invite. You can also choose whether others can view playback, change settings, or receive notifications. Limiting access keeps your camera secure.
Troubleshooting connection issues
- Camera stuck on ‘waiting to connect’: Make sure your phone is also on 2.4 GHz WiFi. Move the camera closer to your router to strengthen the signal.
- Camera won’t scan QR code: Increase phone screen brightness and avoid direct sunlight. Wipe the lens if the camera fails to read the code.
- Device shows offline after setup: Restart your router and check whether the camera received a DHCP address. Mesh systems may require you to place the node closer to the camera.
- Reset the camera: Hold the reset button for 5–7 seconds until the LED flashes yellow. This lets you redo the entire pairing process from scratch.
Privacy and security tips
- Update camera firmware: Enable automatic firmware updates in the app. Updates improve stability and prevent security issues.
- Enable stronger passwords and 2FA: Use a strong account password and turn on two-factor authentication for extra protection.
- Secure local network: Update your router password and avoid using open guest networks for the camera.
Summary
- Install the YI IoT app on your phone.
- Power on the camera and start pairing.
- Connect to a 2.4 GHz WiFi network.
- Scan the QR code to complete setup.
- Place and mount the camera in a strong-signal area.
- Configure motion alerts, storage, and sharing.
Conclusion
Connecting a YI IoT camera takes only a few minutes when your phone and router use the right settings. Once you pair the device, you can customize alerts, share access with family, and secure your footage. If you run into problems, work through the troubleshooting steps or reset the camera to start fresh.

Discussion (0)
Be the first to comment.