




If your camera suddenly stops working, you may need to fix integrated webcam not working on Windows 11 using a few simple troubleshooting steps. This issue is usually caused by driver problems, privacy settings, or system glitches.
The good news is that most webcam issues can be fixed quickly without advanced technical knowledge. This guide walks you through practical solutions that work in most cases.
Why Is Your Integrated Webcam Not Working?
Before fixing the issue, it helps to understand what might be causing it.
Common reasons include:
- Camera access disabled in settings
- Outdated or corrupted drivers
- App permissions not enabled
- Webcam disabled in Device Manager
- Conflicts after Windows updates
Identifying the cause makes troubleshooting easier.
Check Camera Privacy Settings
Windows 11 may block camera access for privacy reasons.
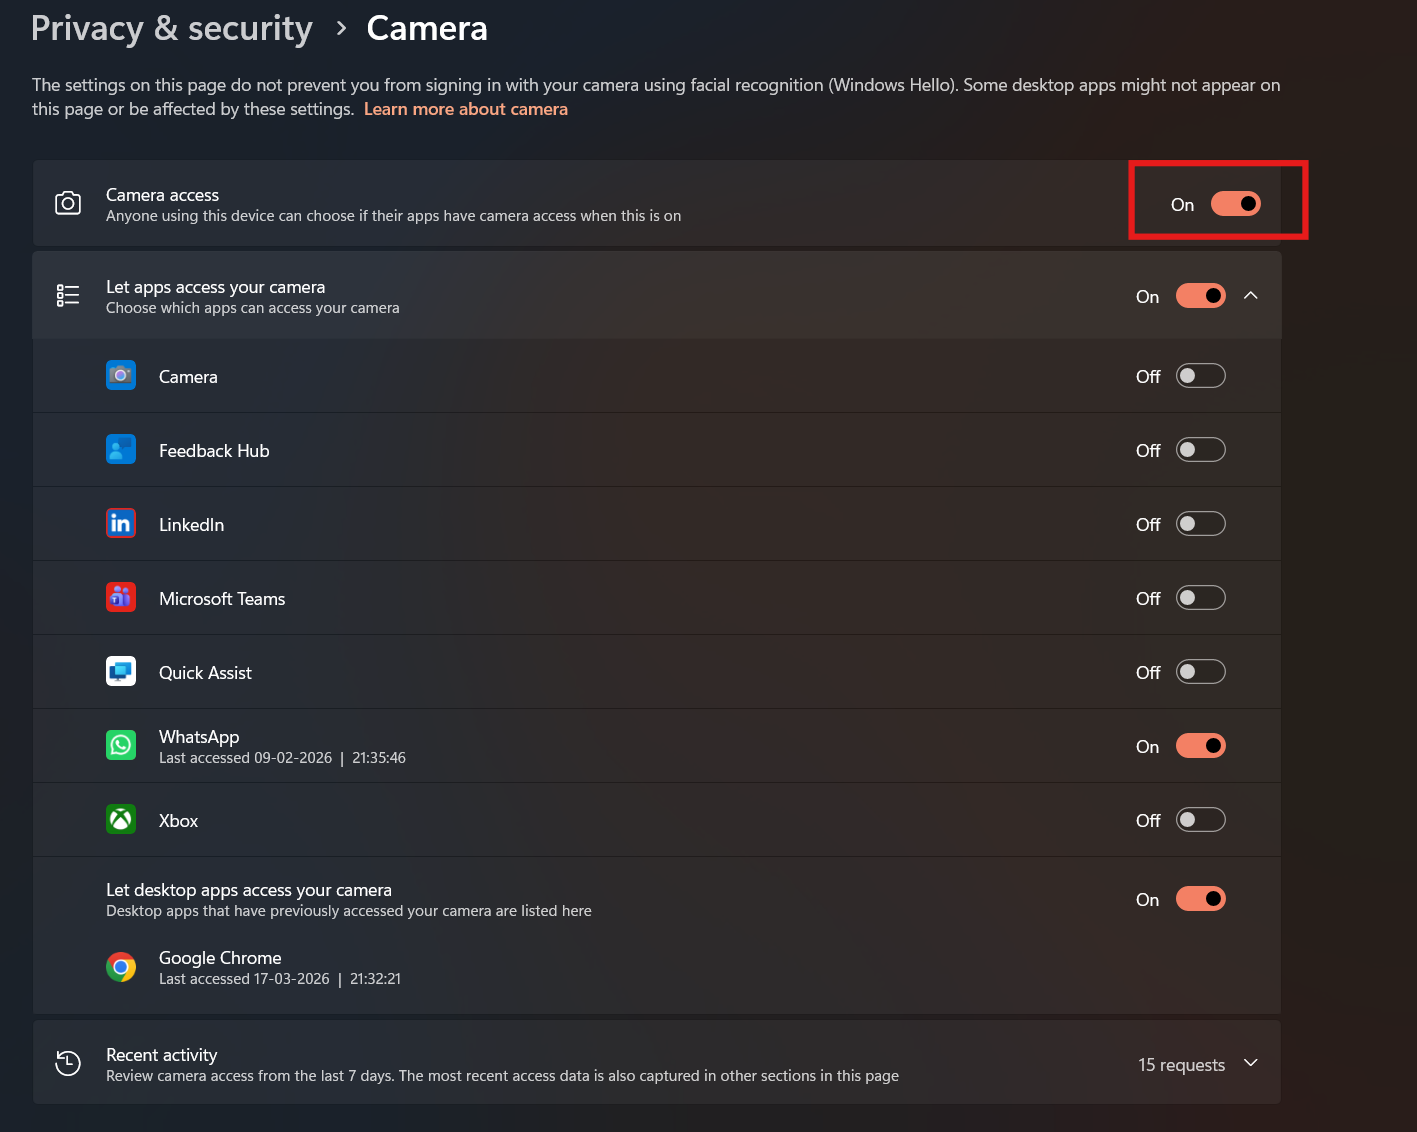
Steps to Enable Camera Access
- Press Windows + I to open Settings
- Go to Privacy & security
- Click Camera
- Turn on Camera access
- Enable Let apps access your camera
Also ensure the specific app you are using has permission enabled.
Restart Your Computer
Sometimes the issue is temporary.
- Close all applications
- Restart your PC
- Open the camera app again
This can fix minor system glitches.
Check Device Manager
Your webcam might be disabled or not working properly.
Steps to Check Webcam
- Right-click the Start button
- Open Device Manager
- Expand Cameras or Imaging devices
- Look for your webcam
If disabled:
- Right-click the device
- Click Enable device
Update Webcam Drivers
Outdated drivers are a common cause.
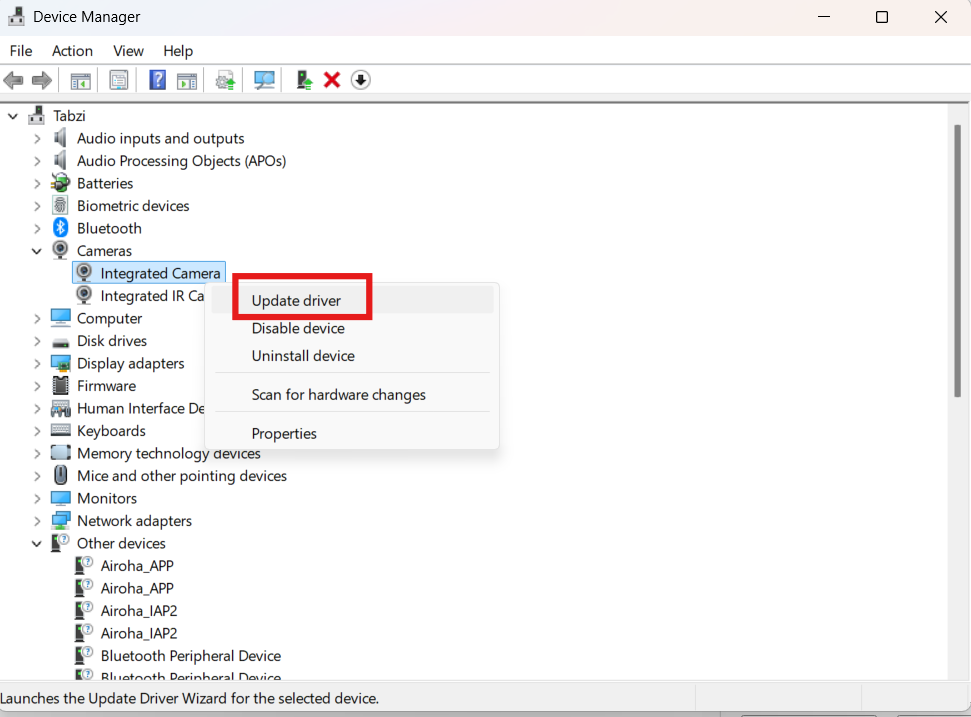
Steps to Update Drivers
- Open Device Manager
- Right-click your webcam
- Select Update driver
- Click Search automatically for drivers
Install any available updates and restart your PC.
Reinstall Webcam Drivers
If updating does not help, reinstall the driver.
Steps to Reinstall
- Open Device Manager
- Right-click your webcam
- Select Uninstall device
- Restart your computer
Windows will reinstall the driver automatically.
Run the Camera Troubleshooter
Windows has built-in tools to fix hardware issues.
Steps to Run Troubleshooter
- Open Settings
- Go to System > Troubleshoot
- Click Other troubleshooters
- Run the Camera troubleshooter (if available)
This can detect and fix common problems.
Check for Windows Updates
Sometimes system updates fix hardware issues.
- Open Settings
- Go to Windows Update
- Click Check for updates
Install updates and restart your PC.
Check Antivirus or Security Software
Some antivirus programs block camera access.
- Open your antivirus settings
- Check privacy or webcam protection
- Allow access to your camera
Disabling strict protection temporarily can help identify the issue.
Test the Webcam
After applying fixes:
- Open the Camera app
- Check if the webcam works
- Test it in apps like Teams or Zoom
This confirms whether the issue is resolved.
Final Thoughts
If your integrated webcam is not working on Windows 11, the issue is usually related to permissions, drivers, or system settings. By checking privacy settings, updating drivers, and reinstalling the device, you can resolve most problems quickly.
In most cases, one of these steps will restore your webcam functionality.
FAQs
Why is my webcam not working on Windows 11?
It is usually caused by disabled permissions, outdated drivers, or system conflicts.
How do I enable my webcam?
Enable camera access in Privacy settings and ensure the device is enabled in Device Manager.
Do I need to reinstall drivers?
Reinstalling drivers can fix issues if updating does not work.
Can antivirus block my webcam?
Yes. Some antivirus software may block camera access for security reasons.

Discussion (0)
Be the first to comment.