


Making a projector with a flashlight is a fun, simple DIY project that allows you to turn everyday items into a functional image projector. Whether you're showing off photos or creating a small movie night, this easy-to-build flashlight projector brings your creations to life on the wall.
Before you start: Materials you’ll need
- A high-lumen flashlight is ideal to ensure your projections are bright enough.
- A shoebox or similarly sized cardboard box will be your projector body.
- Magnifying glass that helps to focus the image that the flashlight projects.
- Tape/glue to hold everything in place.
- Printed images or transparent slides that will be projected onto the wall.
Step 1: Prepare the cardboard box
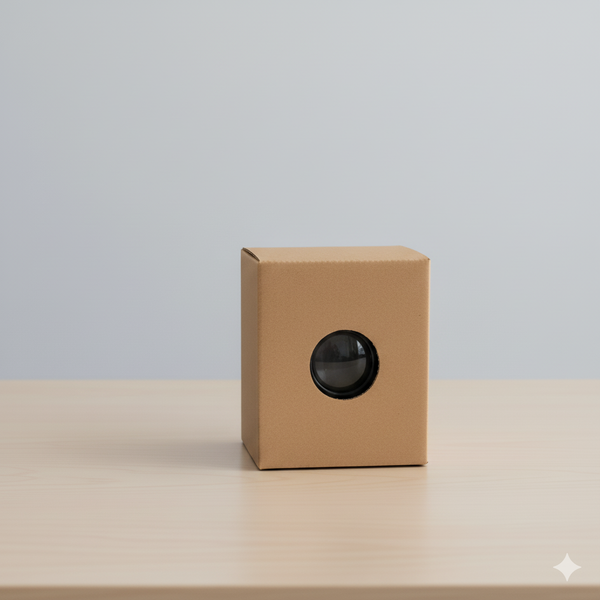
First, take your cardboard box and cut a hole in one side. The hole should be large enough to fit the magnifying glass snugly. This hole serves as the lens of your projector.
Step 2: Attach the magnifying glass
Next, position the magnifying glass over the hole you just cut and secure it in place with tape or glue. This is the lens that will focus the flashlight’s light and project it onto the wall.
Step 3: Position the Flashlight
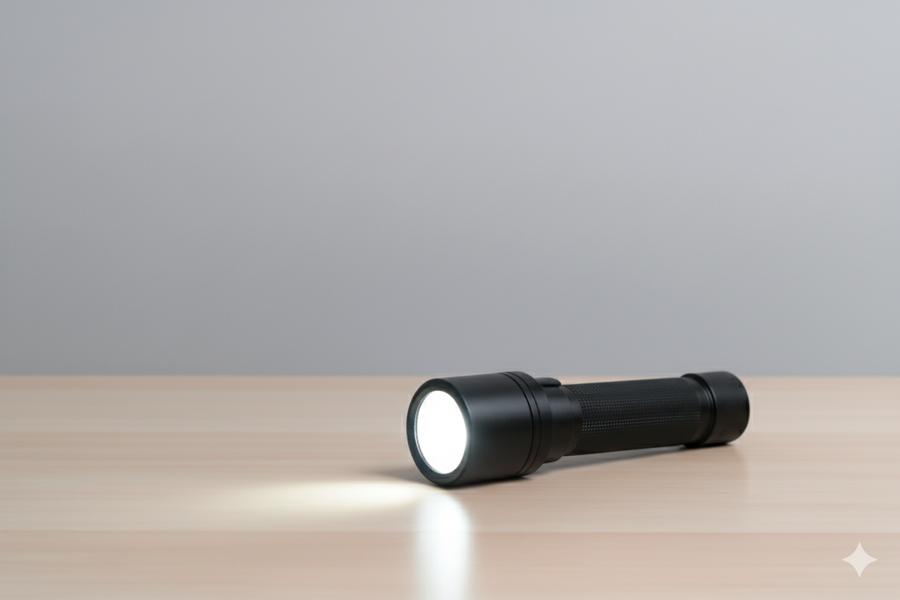
Now, place the flashlight at the opposite end of the box. The flashlight should be aligned directly with the magnifying glass. This alignment ensures that the flashlight's light passes through the magnifying glass to create a focused projection.
Step 4: Add Your Image or Slide
Place your printed image or transparent slide on the side of the box opposite the flashlight. This will be your source material that is projected onto the wall. If you’re using a printed image, make sure it's positioned correctly to get the best projection.
Step 5: Test and Adjust
Turn on the flashlight and check the projection. You may need to adjust the distance between the flashlight and the magnifying glass to get the clearest image. The closer the flashlight is to the lens, the sharper the projection.
Troubleshooting common cardboard project issues
- Blurry image: Adjust the distance between the flashlight and the magnifying glass. A small tweak can make a big difference.
- Image is too dim: Try using a brighter flashlight or a larger magnifying glass for better light focus and image clarity.
Tips for Customization
- Change the image format: Using a transparent film or slide for your images will improve projection quality, especially for more intricate designs.
- Build a more robust projector: For added durability, you can enhance your cardboard box with plastic or other materials. You could also build a lens holder to ensure your magnifying glass stays in place.
FAQs
Can I use any flashlight? Yes, any flashlight will work, but a high-lumen flashlight will ensure that your projections are brighter and clearer.
What’s the best surface to project onto? For the clearest image, use smooth, white walls or a white sheet. The smoother the surface, the sharper the image will be.
Summary
- Prepare the Cardboard Box: Cut a hole in one side of the box large enough for the magnifying glass to fit snugly.
- Attach the Magnifying Glass: Secure the magnifying glass over the hole with tape or glue.
- Position the Flashlight: Place the flashlight at the opposite end of the box, aligning it with the magnifying glass.
- Add Your Image or Slide: Place the printed image or transparent slide on the side opposite the flashlight.
- Test and Adjust: Turn on the flashlight and adjust the distance between the flashlight and magnifying glass for the clearest projection.
Conclusion
Making a projector with a flashlight is an easy and enjoyable DIY project that allows you to create a functional image or video projector at home. Now that you know the basics, experiment with different images, adjust the settings, and have fun creating your own light show.
Discussion (0)
Be the first to comment.