


The Snipping Tool comes built into Windows 10 and Windows 11, but updates or system issues can hide it or remove it. You can download it again from the Microsoft Store, reinstall it through Windows Settings, or restore it using system repair tools. This guide covers every method that brings the Snipping Tool back quickly.
1) Check if Snipping Tool is already installed
Windows sometimes hides Snipping Tool after updates or moves it to a different folder. Confirming that the app still exists saves time before reinstalling anything.
You can simply search for and open Snipping Tool in Start. Open the Start menu and type Snipping Tool. If the app appears, you can pin it to the taskbar for faster access.

You can also check the Windows Accessories folder. Go to Start > All apps, then look for Windows Accessories. On older Windows 10 builds, Snipping Tool appears inside this folder instead of the regular app list.
2) Download Snipping Tool from the Microsoft Store
Open the Microsoft Store and search for Snipping Tool. Select the app and choose Get to start the installation.

Tip: If the Store doesn’t load the app, reset the cache by typing wsreset in the Run dialog. Sign in again if the Store shows account errors.
3) Reinstall Snipping Tool from Windows Settings
You can repair or reset Snipping Tool from Settings when the app appears but won’t launch.
Repair or reset the Snipping Tool app
Go to Settings > Apps > Installed apps and search for Snipping Tool. Select Advanced options, then choose Repair or Reset to restore default files.

Uninstall and reinstall Snipping Tool
Open Settings > Apps > Installed apps, select Snipping Tool, and choose Uninstall. After removal, reinstall it from the Store or the Optional Features menu.

4) Restore Snipping Tool using Optional Features
Some Windows builds include Snipping Tool as an optional component that you can toggle on or off.
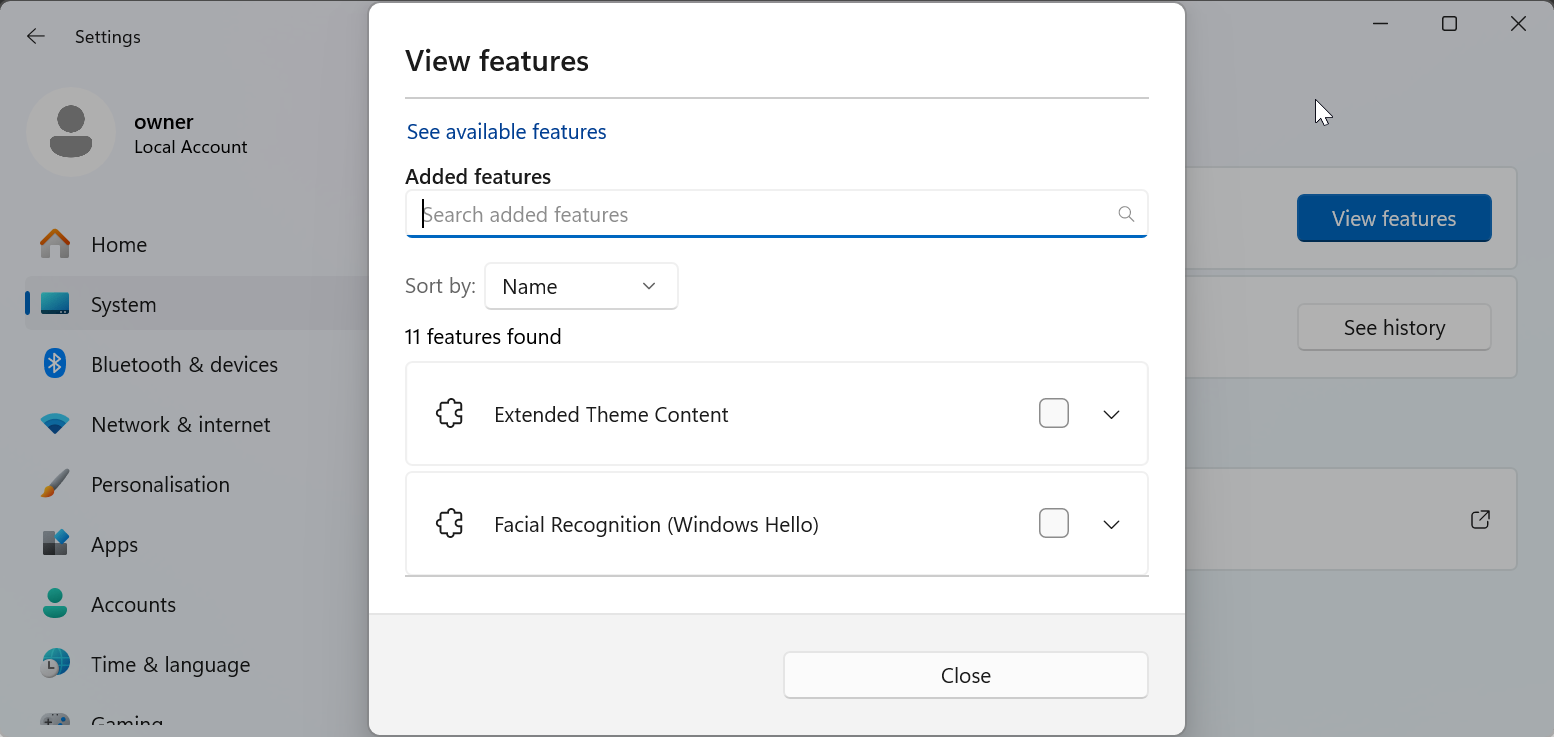
Go to Settings > System > Optional features > View features and search for Snipping Tool. Select Install to bring the tool back. Finally, restart your PC after enabling the feature so Windows can reload the system components that support Snipping Tool.
5) Restore Snipping Tool using System File Checker
System repair tools help restore core Windows components that support Snipping Tool. Open Command Prompt as administrator and run sfc /scannow to fix missing system files. Follow up with DISM /Online /Cleanup-Image /RestoreHealth to repair deeper issues.

Finally, restart the PC to activate the repaired components and restore Snipping Tool if file corruption caused the issue.
6) Download Snipping Tool offline (advanced scenario)
Offline users can restore Snipping Tool by extracting its package from Windows installation media.
Mount your Windows ISO and browse the install.esd file. Advanced tools let you extract the AppX package for Snipping Tool. After extraction, use PowerShell to re-register the AppX package. This restores the tool even without internet access.
Troubleshooting common Snipping Tool issues
- Check for pending cumulative updates: Open Settings > Windows Update and install any pending updates. The latest cumulative patch often restores system tools automatically.
- Roll back the problematic update: If the Snipping Tool disappeared after a specific update, use Update history to uninstall that update. This brings back the previous version of the tool.
- Clear the app’s stored data: Go to Settings > Apps > Snipping Tool > Advanced options and choose Terminate. Clear the app’s data to remove corrupted settings.
- Reset screen capture permissions: Open Settings > Privacy & security > Screen capture and confirm that apps have permission to capture the screen. Without this permission, Snipping Tool cannot work properly.
Tips for using Snipping Tool effectively
- Use Windows + Shift + S to start a quick capture from anywhere in Windows.
- Enable Auto copy to clipboard in settings if you paste screenshots frequently.
- Save time by pinning the app to your taskbar for easy access.
FAQs
What’s the difference between Snipping Tool and Snip & Sketch? Snip & Sketch started as a more modern capture app, while newer Windows 11 releases merge its features into Snipping Tool. Most users can now rely on Snipping Tool as the single built-in capture app.
Why does Snipping Tool disappear after updates? Some updates move or replace system apps, especially when Microsoft merges tools or changes feature packs. In most cases, reinstalling from the Store or Optional Features brings it back.
Can Snipping Tool be removed from Windows 10 and 11? Yes, it can be removed through Settings or third-party tools, but Windows usually keeps it as part of the core experience. If it disappears, you can reinstall it using the methods in this guide.
Summary
- Check Start and Accessories to confirm the app exists.
- Download Snipping Tool from the Microsoft Store.
- Repair or reset the app in Settings.
- Restore the tool through Optional Features or PowerShell.
- Use SFC, DISM, or offline methods for deeper repair.
Windows usually restores Snipping Tool quickly once you identify whether the issue comes from the Store, system files, or update conflicts. Most users fix the problem by reinstalling it from the Microsoft Store or resetting it in Settings. Only advanced cases require PowerShell or offline repair tools.

Discussion (0)
Be the first to comment.