One of the changes often performed in Windows is to customize the way File Explorer displays files. We show you how to make these changes once, and make sure they re-apply automatically for all the other folders that contain the same type of files. This magic is done using the default viewing templates, and using them is easier than you might think. Let's go together through the setup so that you can be more efficient in the way you deal with files in Windows:
NOTE: This guide covers Windows 10, Windows 7, and Windows 8.1. If you do not know the version of Windows that you have, read this tutorial: What version of Windows do I have installed?.
What are the folder view templates in File Explorer or Windows Explorer?
Folders are the basic elements of organization in your file system, and the way we view them has a significant impact on our productivity. If you want to learn more about folders, read What is a folder? Why do I need folders?.
The app that displays the folders and their content is named File Explorer in Windows 10 and Windows 8.1, and Windows Explorer in Windows 7. From here on, we refer only to File Explorer, but you can apply the procedure to Windows Explorer as well. To adapt to different types of content, File Explorer uses five different viewing templates:
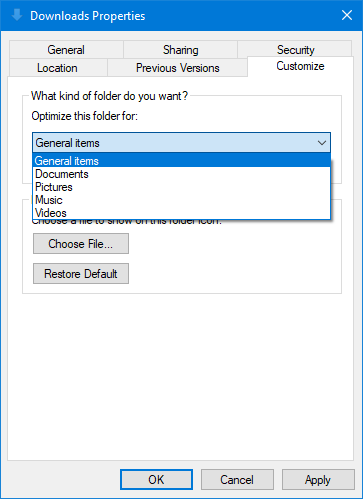
General Items - this view template shows the following data columns: Name, Date modified, Type and Size. The default view is Details and it is used for most folders because they contain mixed files. Also, when you create a new folder in Windows, this is the default view that tends to be applied, until you populate it with files and content.
Documents - it shows, by default, the following data columns: Name, Date modified, Type, and Size. Like the General Items, this viewing template uses the Details view.
Pictures - this viewing template shows photos and image files using the Large icons view. When you select the Details view, it shows the following data columns: Name, Date, Tags, Size, and Rating. There, you see these data columns only when you are in the Pictures view.
Music - it includes the following data columns: Name, Contributing artists, Album, # (stands for track number), and Title. The default view is Details.
Videos - the default view is Large icons. When you select the Details view, it shows the following data columns: Name, Date, Tags, Size, and Rating.
Viewing templates for File Explorer
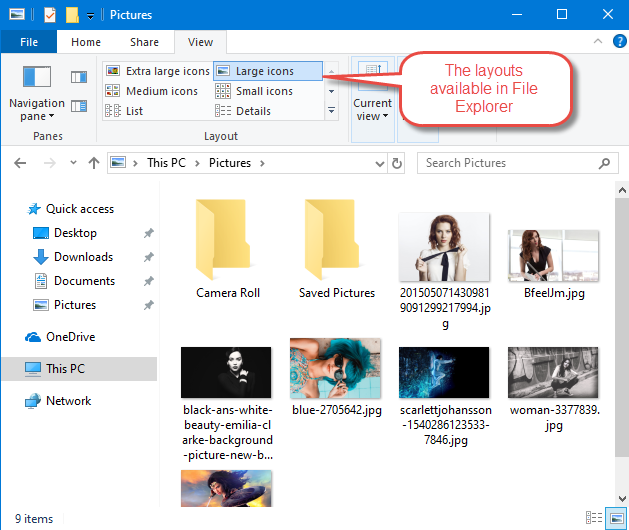
The view templates are assigned automatically by Windows depending on the content of each folder, but you can also force one of these templates on a folder. In each of the folder view templates, you can switch between different views (or layouts): Extra Large Icons, Large Icons, Medium Icons, Small Icons, List, Details, Tiles, and Content.
The Layouts in File Explorer
You can customize the layouts to add or omit detail, and then apply them as the standard for the selected folder view template. To learn more about the differences between these layouts and how to work with them, read: 7 ways to efficiently use the views from Explorer (in all Windows versions).
The default viewing template in File Explorer allows you to change the following features so that you can apply them automatically to all folders with the same template:
The columns displayed in the Details view (layout)
The Group by field
The sorting of the files
The default view (or layout)
Things you can change about how you view a folder
How to select a folder's viewing template for customization
Once you decide which default viewing template you want to customize, open File Explorer and navigate to a folder where you want this template applied.
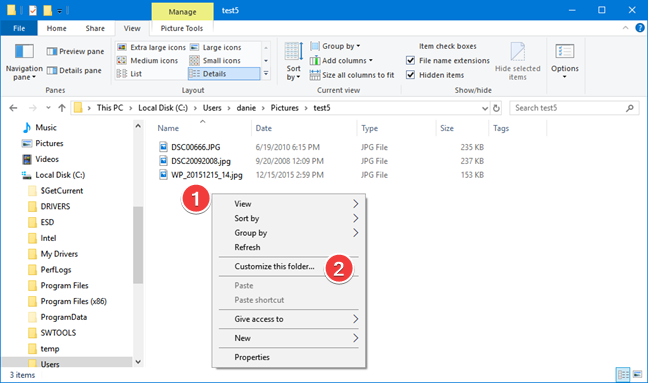
Since Windows chooses the viewing template automatically based on the content of the folder, check the template applied, and set the one that you want to use. To access the folder properties, right-click inside the File Explorer window and, in the context menu, choose "Customize this folder."
Open Customize this folder in File Explorer
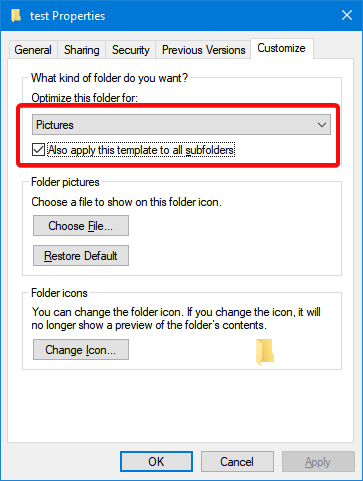
In the Properties window, the Customize tab is selected. Verify the template used for the folder and, if needed, change it to the one you want to configure. In our example, we customize the Pictures template. If you have subfolders where you want to use the same template, check the box which says "Also apply this template to all subfolders."
Check the viewing template used for your folder
Press OK to close the Properties window.
How to configure a folder's viewing template in File Explorer
Now that you have assigned the viewing template that you want to use for a folder, it is time to configure it. For our example, we set the following configuration:
The columns displayed in the Details view (layout): add Horizontal resolution, Dimensions
The Group by field: Dimensions
The sorting of the files: Date
The default view (or layout): Medium icons
Keep in mind that the order of the changes in customizing the view is essential. The Group by settings changes the sorting automatically, and the layout needs to be set last. The Group by setting works only with the fields included in the Details layout, so we include Dimensions as a field we want to use so that we can also use it as a grouping criterion. But enough background information, let's see how it is done:
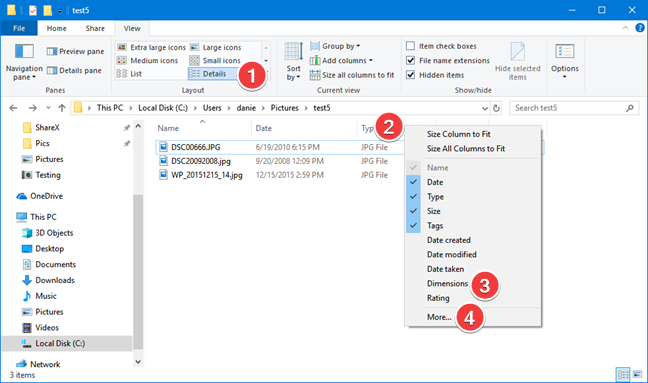
First, select Details for the current layout, in the View tab on the File Explorer ribbon. Then, right-click or tap and hold on the field names shown above the files found inside the selected folder. Since Dimensions is already displayed we select it right away. If the field you want is not shown (as is the case with Horizontal resolution) open the full list of fields by choosing More.
Select the fields shown in the Details view in File Explorer
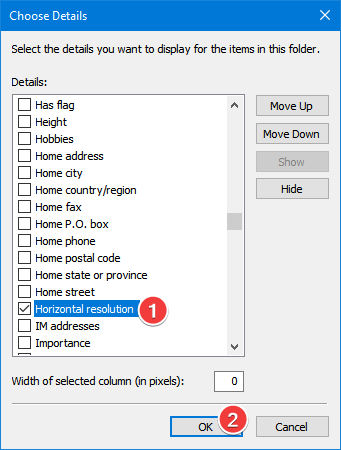
Scroll down until you find the field that you want, and click or tap the checkbox next to its name. Press OK to close the Choose Details window, when you are done selecting the fields that you want to see.
Select an extra field to show in the Details view of File Explorer
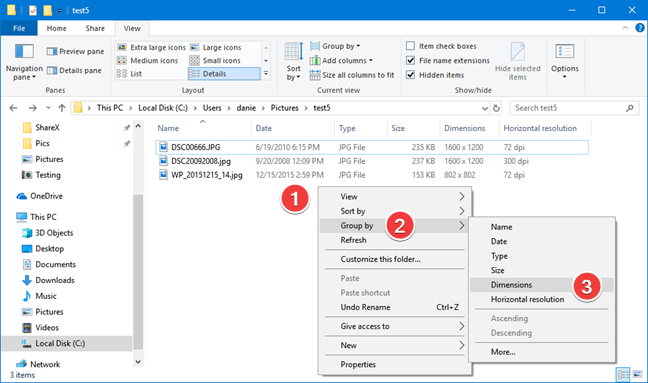
Right-click or tap and hold in the open area on the right side (avoid any files), and choose Group by in the context menu. In the submenu that opens up, choose the field that you want to use for grouping.
Select the "Group by" field in File Explorer
The sorting is modified automatically to match the Group by setting.
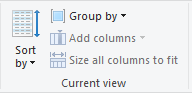
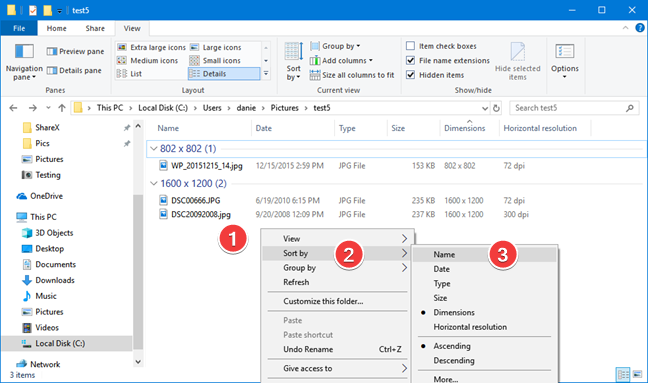
Right-click or tap and hold in the open area on the right side of File Explorer, and choose Sort by in the context menu. Then, choose the field that you want to use for sorting. You can repeat the procedure and change the order (Ascending or Descending).
Select the "Sort by" criterion in File Explorer
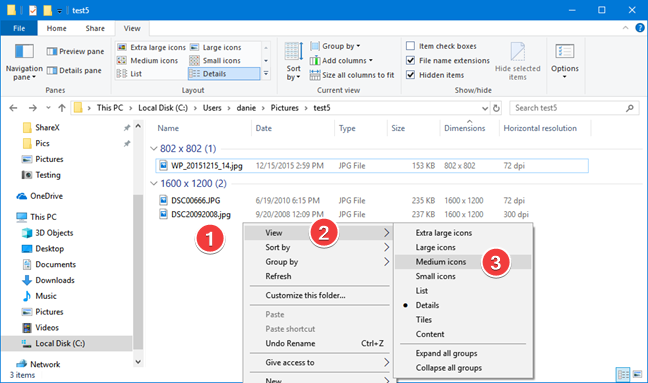
Lastly, choose which view (layout) you want to use for your template. Right-click or tap and hold in the open area on the right side, and choose View in the context menu. Choose the desired view (layout) in the submenu.
Select the view in File Explorer
The settings for the viewing template are complete. The changes apply right now only to the current folder. We need one more step to transfer them to a real template that is going to be used automatically for all the folders that use the same template.
How to apply your customization to all the folders that are using the same viewing template
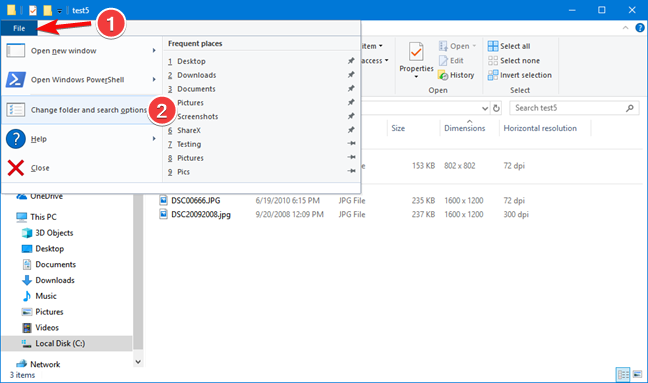
To apply the changes you made in the previous section so that they are applied to all the folders with the same viewing template, you have to open the Folder Options window, while the folder you just customized is still open. In Windows 10 and Windows 8.1, click or tap File in the top-left corner of the File Explorer window, and choose "Change folder and search options."
Open Change folder and search options in File Explorer
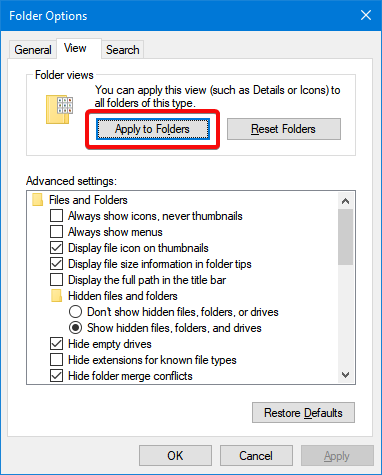
In the Folder Options window, select the View tab, and press the Apply to Folders button.
Apply the template changes to all folders using the same template
Keep in mind that the change applies to all the folders that use the same view template (Pictures in our example). If you want to change another template, you can repeat the procedure using another folder that you want to use, with the next template that you want to set.
Which viewing templates do you want to modify?
Since File Explorer is one of the most used apps in Windows, you want to make sure it is tuned according to your style of using files. Instead of making the same layout changes over and over again, you can now make them once and expect to see them every time you open a folder with the same type of content. Let us know which changes to the viewing template that are most important to you. Is there a field that you want to show or use for sorting or grouping? Do you want bigger or smaller icons for your pictures? Let us know in a comment below.
1. WANT to be able to have all folders of the same type have there icon changed based on latest icon used for that folder. An option could be offered to allow change for this folder only (or better allow multiple selections before entering properties and making changes. Offer choice to override ALL previous modified folders or only those using specific icon.
mike ·
What If I want it to who only certain details in the details view automatically?
Ian ·
Finally got “Dimensions” as a permanent header in File Explorer.
Grateful thanks.
Ian
Anonymous ·
Happy to help. Do not hesitate to subscribe to our newsletter, for more useful tutorials.
Liz ·
Thank you, this just saved me a lot of time and stress as a slightly OCD personality who tried to do this manually. Thank you.
Garry ·
I have nothing under Control Panel named “Appearance and Personalization”.
harry ·
thanks
Jesus Mybalzich ·
I’ve been frustrated with having to redo my column choices each time I open my music folder. You’ve cut the Gordian knot for me. Thank you so much.
Paul Reinig ·
I’m wondering if you can help me out here. All of a sudden the view in my folders switched from two columns to three and it’s driving me crazy how to get it back to two. I’ve searched google for answers and but am not finding anything on this topic. I had on the left what’s on my pc and on the right the same thing. Now suddenly there’s a third column that says “Select a file to preview”. Any help in getting back to 2 columns would be greatly appreciated. Thanks.
OW ·
Constantly resizing windows explorer columns, so I can see long file names, is really just a First World problem. That doesn’t stop it from being a serious annoyance every day, however. So, thanks for posting this.
Sarah Mc ·
This was very helpful. I needed to add Tags to my default detail view. Thank you!
Ciprian Adrian Rusen ·
You are welcome.
Dennis ·
I was adding the ‘dimensions’ column to folders showing images, but kept having to re-apply it; seems this has (hopefully!) fixed it – thank you 🙂
PS Just for some feedback, I don’t like your Captcha option: ads are ads, I get that – but captchas are enough of a pain in the a*se anyway, without having ads added to them, too 🙁
Rolf Bercht ·
Well, this method works, but for reasons I can not figure out, the settings are frequently lost, i.e. I’m back to defaults.
Specifically, I killed all the type columns everywhere and set everything to general rather than picture, video etc. It works, but … gets reset ever so often.
doug k ·
How can I drag an email for example to a windows folder and automatically have windows insert the present date into the beginning of the file name without having to type same?
David Whitehurst ·
Is there a way to do this programatically? I have project folders that i have created metadata to show project manager and client. Would like to set this for the users so they dont have to.
Alan ·
Whenever I plug in an external drive, Win7 sets the template to something like ‘Music’. I have changed the Music template to Name, modification date, type and size, and on the local disk this works. However external disks still show ‘Artist’, etc. In the external disk, the folders don’t have the tab for the theme, and after resetting, the option to change all like this is greyed out. Is there a way to just completely disable the Themes? (I cannot install any software on this machine to replace explorer)
Deanna ·
thank you, this was very helpful!
Morten Olsen ·
It worked for me. But how do I put a folder (and its sub folders) back to default templates?
Dorothy ·
Perfect – thank you – this will save me so much time – I had to keep scrolling down to re-set seeing dimensions – now it is set for all – I am so grateful.
Michael ·
This does NOT work for ftp folder / drives. It always switches back to “tiles”. Noone needs tiles.
Ciprian Adrian Rusen ·
Windows doesn’t know how to customize this for FTP locations. You are stuck with “tiles”.
Craig Smith ·
Yeah, but where are the default choices in the right click pane set from? I would like to change “Author” back to “Owner” as in xp style explorer. I don’t want to have to open another window and scroll down to and check the box for “owner”. It used to be available on the first right-click pane that came up in XP.
I am on a big network & I need to see the “owner” not the “author”.
keith ·
hi thanks this is good info and it works so far but the further i drill down into the folders it stops working, also the step where you say to click apply to folders that tab is greyed out for me
ha14 ·
Thanks for the tips, is it possible to save word documents by adding user name in the save as (automatically), i know that the user name can be obtained from the property window.











Discussion (25)
1. WANT to be able to have all folders of the same type have there icon changed based on latest icon used for that folder. An option could be offered to allow change for this folder only (or better allow multiple selections before entering properties and making changes. Offer choice to override ALL previous modified folders or only those using specific icon.
What If I want it to who only certain details in the details view automatically?
Finally got “Dimensions” as a permanent header in File Explorer.
Grateful thanks.
Ian
Happy to help. Do not hesitate to subscribe to our newsletter, for more useful tutorials.
Thank you, this just saved me a lot of time and stress as a slightly OCD personality who tried to do this manually. Thank you.
I have nothing under Control Panel named “Appearance and Personalization”.
thanks
I’ve been frustrated with having to redo my column choices each time I open my music folder. You’ve cut the Gordian knot for me. Thank you so much.
I’m wondering if you can help me out here. All of a sudden the view in my folders switched from two columns to three and it’s driving me crazy how to get it back to two. I’ve searched google for answers and but am not finding anything on this topic. I had on the left what’s on my pc and on the right the same thing. Now suddenly there’s a third column that says “Select a file to preview”. Any help in getting back to 2 columns would be greatly appreciated. Thanks.
Constantly resizing windows explorer columns, so I can see long file names, is really just a First World problem. That doesn’t stop it from being a serious annoyance every day, however. So, thanks for posting this.
This was very helpful. I needed to add Tags to my default detail view. Thank you!
You are welcome.
I was adding the ‘dimensions’ column to folders showing images, but kept having to re-apply it; seems this has (hopefully!) fixed it – thank you 🙂
PS Just for some feedback, I don’t like your Captcha option: ads are ads, I get that – but captchas are enough of a pain in the a*se anyway, without having ads added to them, too 🙁
Well, this method works, but for reasons I can not figure out, the settings are frequently lost, i.e. I’m back to defaults.
Specifically, I killed all the type columns everywhere and set everything to general rather than picture, video etc. It works, but … gets reset ever so often.
How can I drag an email for example to a windows folder and automatically have windows insert the present date into the beginning of the file name without having to type same?
Is there a way to do this programatically? I have project folders that i have created metadata to show project manager and client. Would like to set this for the users so they dont have to.
Whenever I plug in an external drive, Win7 sets the template to something like ‘Music’. I have changed the Music template to Name, modification date, type and size, and on the local disk this works. However external disks still show ‘Artist’, etc. In the external disk, the folders don’t have the tab for the theme, and after resetting, the option to change all like this is greyed out. Is there a way to just completely disable the Themes? (I cannot install any software on this machine to replace explorer)
thank you, this was very helpful!
It worked for me. But how do I put a folder (and its sub folders) back to default templates?
Perfect – thank you – this will save me so much time – I had to keep scrolling down to re-set seeing dimensions – now it is set for all – I am so grateful.
This does NOT work for ftp folder / drives. It always switches back to “tiles”. Noone needs tiles.
Windows doesn’t know how to customize this for FTP locations. You are stuck with “tiles”.
Yeah, but where are the default choices in the right click pane set from? I would like to change “Author” back to “Owner” as in xp style explorer. I don’t want to have to open another window and scroll down to and check the box for “owner”. It used to be available on the first right-click pane that came up in XP.
I am on a big network & I need to see the “owner” not the “author”.
hi thanks this is good info and it works so far but the further i drill down into the folders it stops working, also the step where you say to click apply to folders that tab is greyed out for me
Thanks for the tips, is it possible to save word documents by adding user name in the save as (automatically), i know that the user name can be obtained from the property window.