




If your PC suddenly becomes slow and Task Manager shows WSAPPX using high disk or CPU, you are not alone. This process is related to the Microsoft Store and app installations. While it is a legitimate Windows service, it can sometimes consume excessive system resources.
This guide explains what WSAPPX is and how to fix high disk usage caused by it in Windows 10 and Windows 11.
What Is WSAPPX
WSAPPX is a system process that handles Microsoft Store app installation, updates, and removal.
It includes services such as:
- AppX Deployment Service
- Client License Service
These services manage app packages downloaded from the Microsoft Store.
Why WSAPPX Causes High Disk Usage
High disk usage may occur when:
- Microsoft Store apps are updating in the background
- A large app is being installed
- The system is verifying app licenses
- Windows recently received an update
In many cases, the high usage is temporary.
Fix 1: Wait for the Process to Finish
If apps are updating, WSAPPX may use disk resources temporarily.
Steps:
- Open Task Manager
- Check if Microsoft Store is updating apps
- Wait a few minutes
Once updates finish, disk usage usually drops.
Fix 2: Disable Automatic Microsoft Store Updates
Stopping automatic updates may reduce background activity.
Steps:
- Open Microsoft Store
- Click your profile icon
- Select Settings
- Turn off App updates
You can update apps manually when needed.
Fix 3: Run Disk Check
Disk errors may increase system process load.
Steps:
- Open Command Prompt as administrator
- Type:
chkdsk C: /f
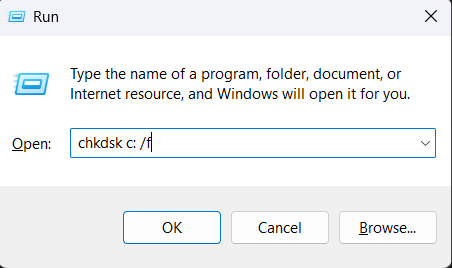
- Press Enter
- Restart your PC if prompted
This scans and fixes disk errors.
Fix 4: Use System File Checker
Corrupted system files can cause abnormal behavior.
Steps:
- Open Command Prompt as administrator
- Run:
sfc /scannow
- Wait for the scan to complete
- Restart your PC
This repairs corrupted Windows files.
Fix 5: Check for Windows Updates
Outdated system files can trigger resource spikes.
Steps:
- Open Settings
- Go to Windows Update
- Click Check for updates
- Install available updates
- Restart your system
Updates often fix performance bugs.
Fix 6: Disable AppX Deployment Service Temporarily
This method is not recommended for regular users, but can be tested.
Steps:
- Press Windows + R
- Type services.msc
- Find AppX Deployment Service
- Right-click and select Stop
Do not permanently disable it, as it manages Store apps.
Fix 7: Perform a Clean Boot
Background programs may conflict with Store services.
Steps:
- Press Windows + R
- Type msconfig
- Go to the Services tab
- Select Hide all Microsoft services
- Disable remaining services
- Restart your PC
If disk usage improves, a third-party app may be causing the issue.
Is WSAPPX a Virus
No, WSAPPX is a legitimate Windows process. However, malware can disguise itself with similar names. If suspicious, run a full antivirus scan.
Final Thoughts
WSAPPX high disk usage is usually temporary and linked to Microsoft Store app activity. In most cases, simply waiting resolves the issue. If it continues, disabling automatic updates or repairing system files can help restore normal performance. Always ensure your Windows installation is updated and your disk is healthy.
FAQs
Is it safe to end WSAPPX process
Ending it may interrupt app installations. It is better to let it finish.
Why is WSAPPX using 100 percent disk
It is usually installing or updating Microsoft Store apps.
Can I disable WSAPPX permanently
It is not recommended because it manages Store apps.
Does WSAPPX affect Windows 11
Yes, it can appear on both Windows 10 and Windows 11.
Will upgrading hardware fix this issue
A faster SSD can reduce noticeable disk spikes, but software fixes are usually enough.

Discussion (0)
Be the first to comment.