Event Viewer is one of those tools in Windows that are hidden treasures. It can show logs about pretty much everything that happened on your computer, and it can help you troubleshoot any problems your computer might have. However, the information it shows can often be overwhelming in amount and details. Fortunately, it also offers ways of sorting and filtering all that information so that you can limit it only to what you are interested in. In this tutorial, we will explore how to create and save custom views, so you can keep an eye on any kind of logged information that you are interested in:
How to access the Custom Views in Event Viewer
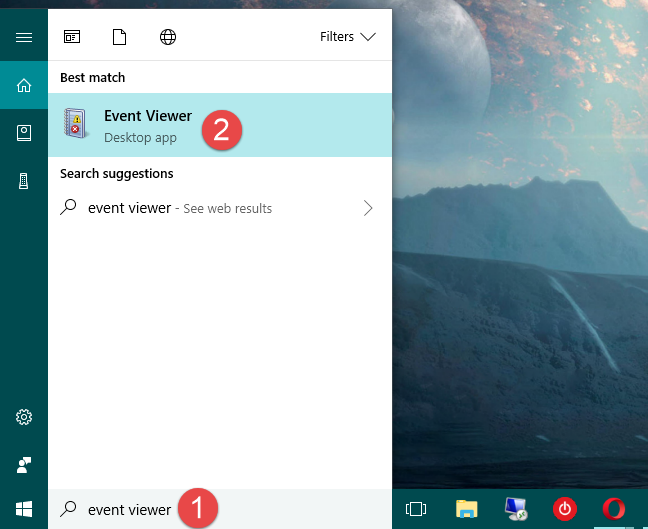
There are many ways to open Event Viewer in Windows, and we have talked about all of them in detail, here: How to start the Event Viewer in Windows (all versions). However, if you do not have the time to read that guide, a fast way of launching Event Viewer is by typing "event viewer" into the search box from Windows 10, in the Start Menu search box from Windows 7, or on the Start screen, if you are using Windows 8.1.
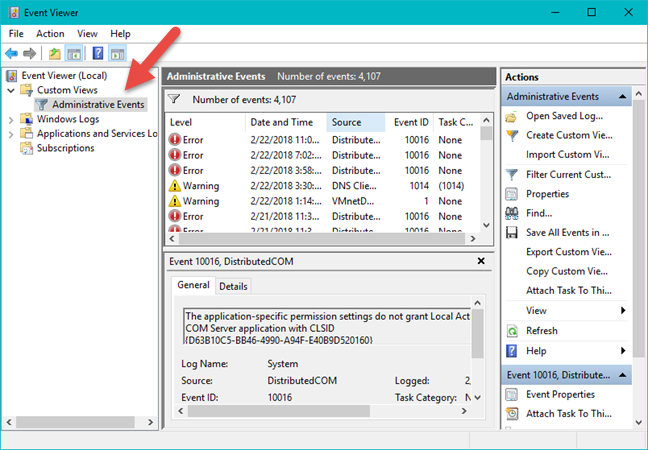
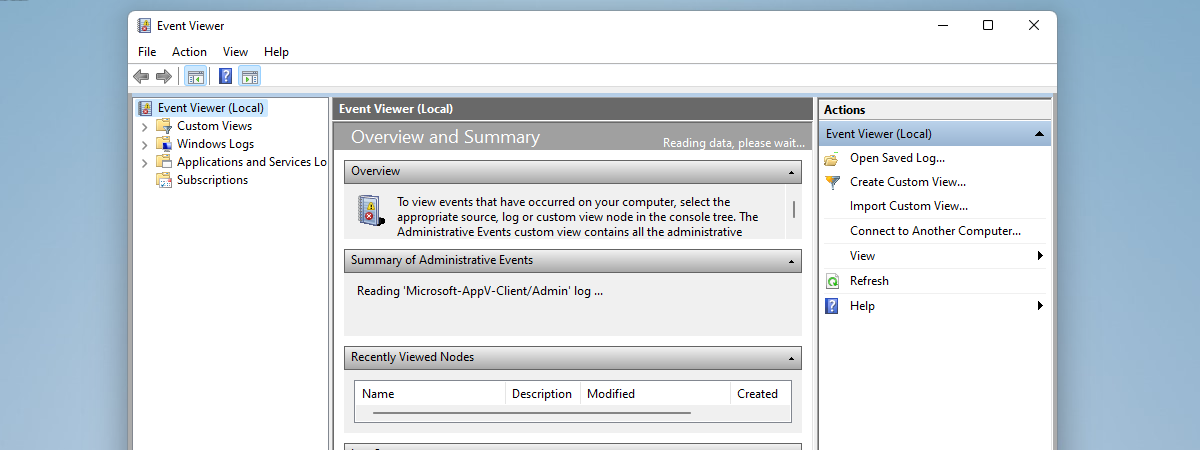
When you launch Event Viewer, it may take a moment to appear, as all the logs are being initialized. You can see that the first menu item in the left pane is Custom Views. Click or tap on that, and you should see that Windows has already provided one custom view: Administrative Events. Click or tap on it.
What are the Custom Views from Event Viewer?
The Administrative Events view was created to show you all the Critical, Error, and Warning events from all the Windows logs, so you should get a massive list of events with ominous tags. However, if your computer did not crash and your software did not fail to work correctly, these ominous messages do not mean there is anything ominous going on. They are just for your information, and in most cases, Windows has already dealt with the problem before you even saw the messages.
So what, exactly, is a Custom View, and why would it be worth creating one of your own? Consider this situation: you suspect that there is something wrong happening with one or more of your hard drives. To find out if Event Viewer recorded any warnings about it, you would have to scroll through the logs for quite a while. What if you could ask Event Viewer to create a special view that would display only the hard drive warnings in the Security log? That view is called a Custom View. Now let's see how to create one:
Step 1. Create a Custom View in Event Viewer
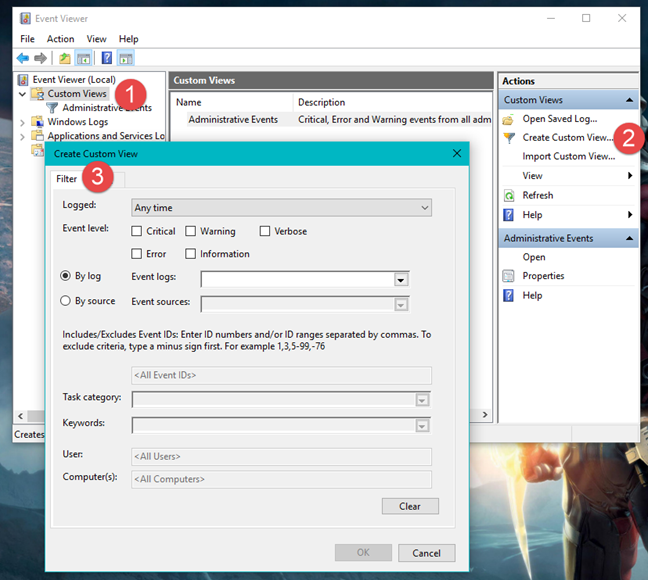
In Custom Views, click on "Create Custom View" in the right pane, to open a "Create Custom View" window. Keep the default Filter tab selected (the XML tab is beyond the scope of this tutorial).
Step 2. Select the time frame for the events shown in the Custom View
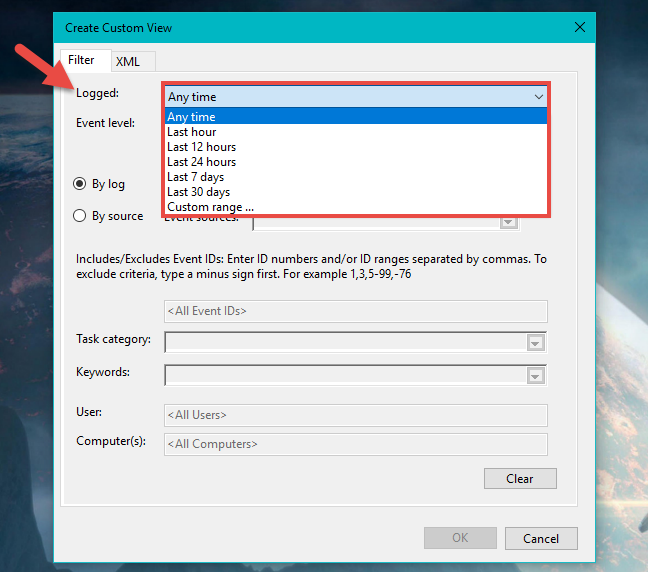
In the Logged drop-down list, select the time frame that you to use for the Custom View. You can use one of the predefined times or choose a custom range. If you want to create a Custom View with all the events ever recorded by Windows, choose "Any time."
Step 3. Select the event level that is included in your Custom View
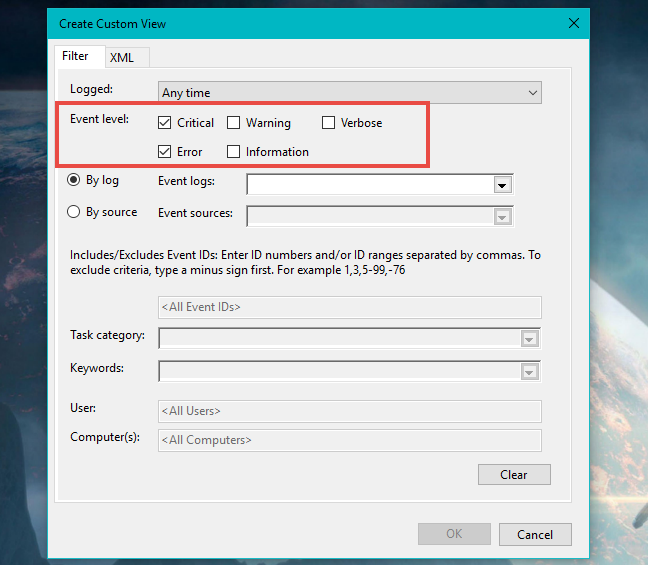
Next, you can select the Event level for the events that are going to be shown in your Custom View. You can choose to include one, some or all of the events classified as:
- Critical: events that require your immediate attention, and generally mean that an application or system component failed or stopped responding.
- Error: events that show problems exist, but which are not necessarily critical to the welfare of the application or of system components.
- Warning: events that indicate potential problems, but which do not mean problems are sure to happen.
- Information: events that are simply sending bits of information about their operation.
- Verbose: shows detailed information about events.
If you are interested in creating a Custom View for troubleshooting a device or an application from your computer, you should probably choose to filter the events by an Event level equal to Critical and Error. That should keep your Custom View small and easier to work with.
Step 4. Choose in which event logs or event sources you want the Custom View to search for information
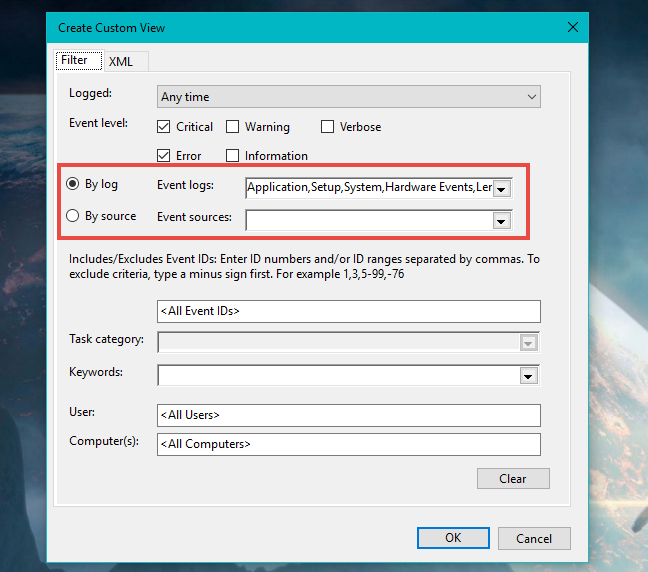
Next, you must select the logs or the sources that are used for creating the Custom View. You can choose to filter information:
- By log: lets you select the "Windows Logs" and the "Applications and Services Logs" that you want to use. The "Windows Logs" include Application, Security, Setup, System, and Forwarded Events, and you can read more about them in this tutorial: How to work with the Event Viewer in Windows. The "Applications and Services Logs" include logs created by applications installed on your computer, and they can be different for everyone, depending on what programs you are using.
- By source: filters the events in more detail, according to their specific sources. Usually, that means that you can filter events by the applications or programs that have created them.
Step 5. Filter the events shown in your Custom View by ID, task category, keywords, users and computers
Event Viewer also lets you further customize your Custom View by adding a few other additional filters:
- Event IDs: each event recorded in Event Viewer get its own Event ID, which is a number that uniquely identifies it. If you want, you can specify Event ID numbers and ranges that are to be included.
- Task category: can be used only if you chose to filter the events By source at the previous step, and the categories available differ according to the source.
- Keywords: are predefined by Windows, so you cannot enter your own words - you can select which of them are to be used for filtering events.
- User: if there are multiple user accounts on your computer, you can make the Custom View include only events recorded on specific user accounts.
- Computer(s): is used on servers, on which system administrators can select the computers from which to gather events in the Custom View.
Step 6. Finalize and save your Custom View
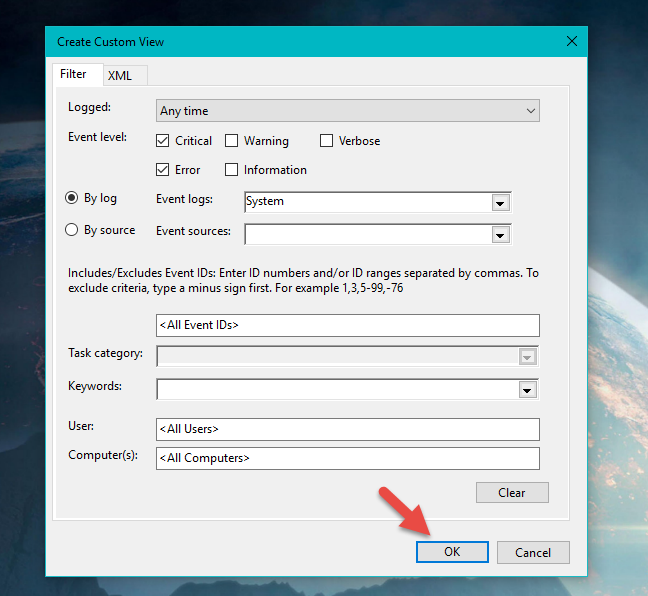
Once you have finished customizing everything about your Custom View, click or tap on OK.
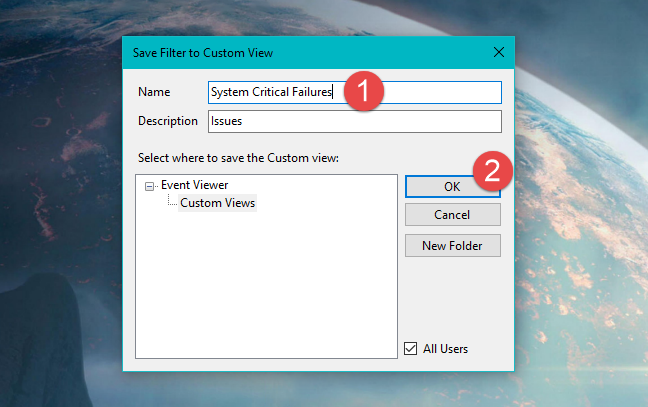
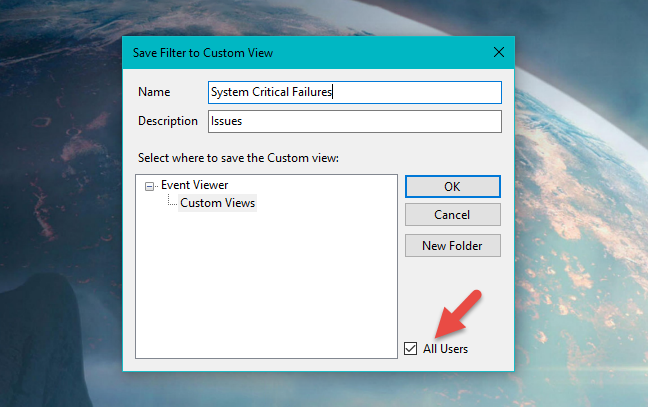
The next box asks you to give your Custom View a name. Type it, add a description if you like (it is optional) and select the Event Viewer folder in which you want to save it. By default, that is Custom Views, but you can create a New Folder if you want, using any name you prefer. When done, click or tap OK.
Note that the default is to have your custom views available to all users of your computer. If there are other people who use your computer and you do not want them to have access to this filter, uncheck the All Users box in the lower right corner.
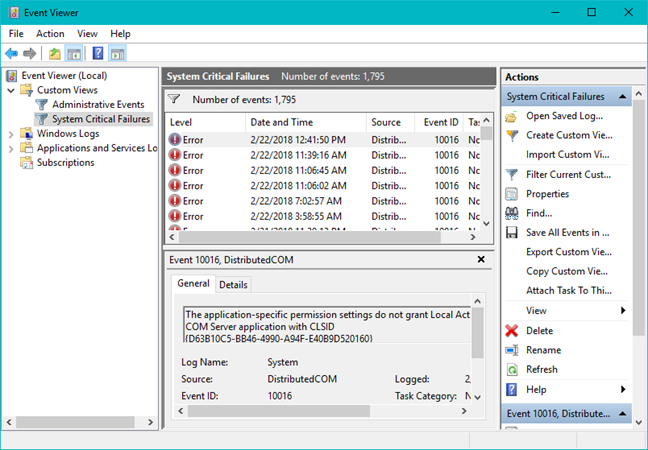
After you have pressed OK, your new custom filter appear in the left pane. Click or tap on it, and see your selected items appear in the center pane.
How to save Custom Views logs in Event Viewer
Let's say you wanted to keep track of specific events. One reason you might wish to do this is to check to see if some of your hardware is generating a lot of errors, which might mean it will soon need to be replaced.
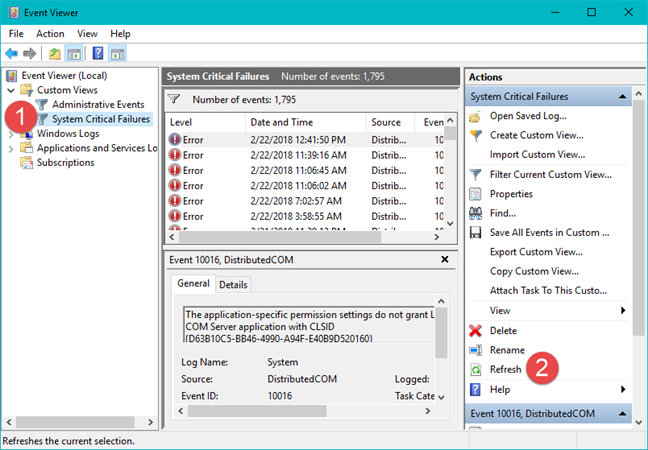
Let's take for example the "System Critical Failures" custom view that we have created. Click on the custom view in the left pane of Event Viewer, and then, just to be sure, click on Refresh in the right pane, to make sure you have the latest information.
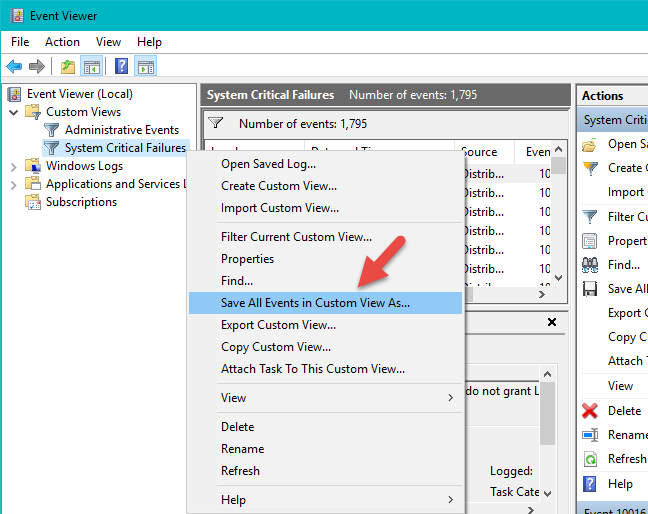
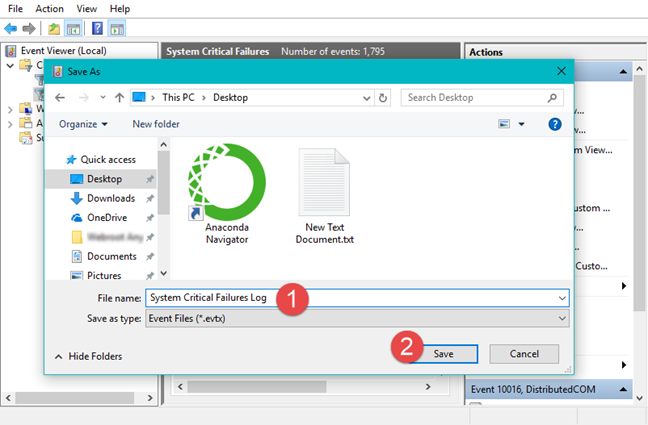
Right-click on your Custom View, which in our case is "System Critical Failures," and from the menu (or from the right pane, which is a duplicate of the right-click menu) choose "Save All Events in Custom View As."
The box that pops up lets you choose an appropriate file name and a location where you want this log to be saved. The event is saved using the ".EVTX" suffix and double-clicking on it opens it up in Event Viewer.
How to export Custom Views in Event Viewer
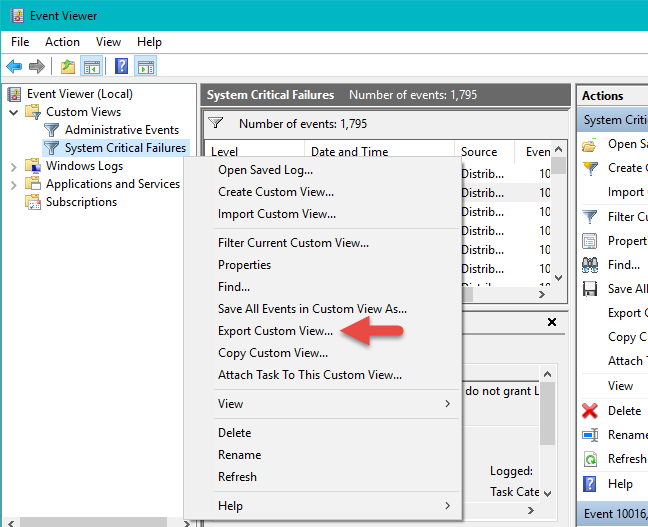
If you want to save your Custom View as a file which you can then use on another computer to create the same event logs, you can export it as an XML file. To do that, in Event Viewer, right-click or tap and hold on the Custom View that you want to export and, in the right-click menu, choose "Export Custom View."
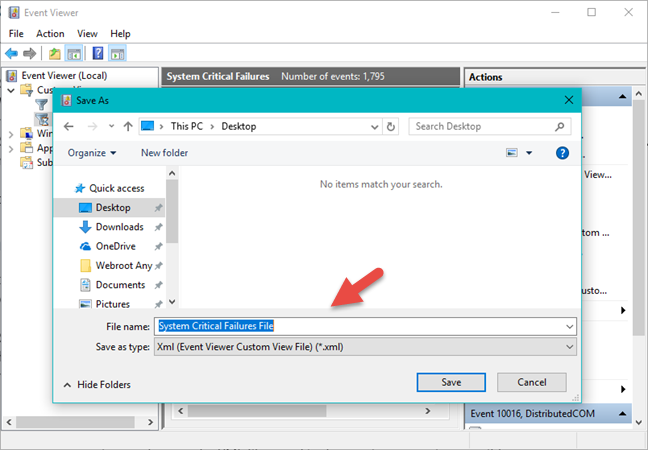
In the Save As dialog window, type a name for the Custom View XML file and select the folder in which you want to export it.
How to import Custom Views in Event Viewer
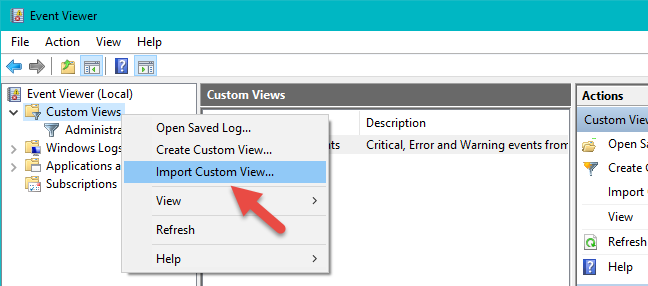
If you have a Custom View saved as an ".XML" file, you can import it in Event Viewer, on the same or even on another computer that also runs Windows. To do that, in Event Viewer, click or tap on Custom Views in the left pane, and then click or tap on "Import Custom View" in the right-click menu. Note that you can find the same option in the panel from the right side of Event Viewer.
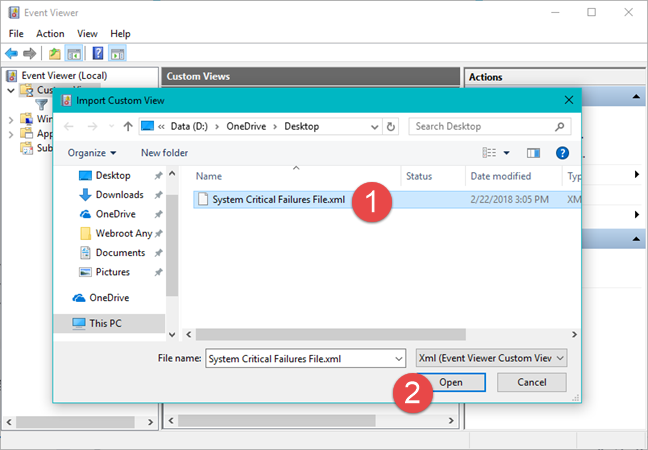
Navigate to the folder in which the XML Custom View file is found, select it and then click or tap on Open.
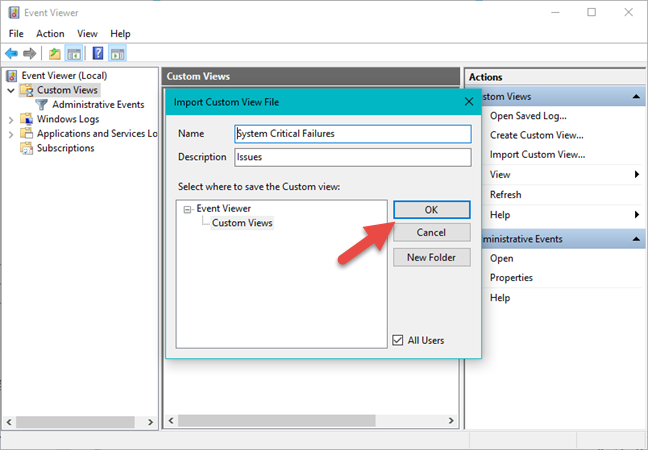
In the "Import Custom View File," you can see the details of the Custom View that you are importing. Click or tap on OK.
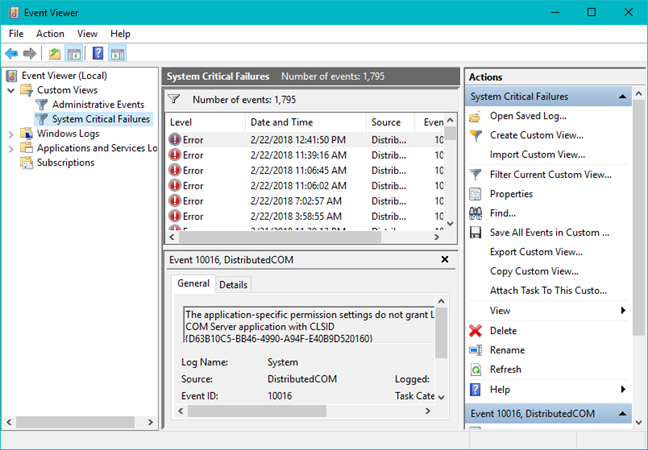
The Custom View file is now imported and displayed in the left pane of Event Viewer, showing you all the events filtered through it.
Conclusion
Windows makes so many things so easy that we never need to think about what is going on in the background. Taking a look at the logs with the Event Viewer can give you an idea of all the housekeeping that you never see, and help you appreciate just how well Windows works. It is well worth taking a look at what you can do, even if you do not do anything more than look. Do you think the Event Viewer could be a useful tool for you? Please leave a comment and share your opinions.


 23.02.2018