Do you know how to find the IP addresses of your DNS servers? Would you like to learn how to do that? If you are a Windows 11 or Windows 10 user, there are many methods to find the addresses of the DNS servers that your computer or device is using. You can find this information in the Settings app, by running a command in PowerShell, and by other means. For more details on this subject, read this tutorial:
NOTE: If you don’t know what DNS servers are, you might want to read this article first: What is DNS? How is it useful?. If you got here looking for ways to change your DNS servers, here’s How to change DNS settings in Windows.
1. How to find your DNS servers in Windows 11 via Settings
If you’re using Windows 11, the Settings app offers one of the easiest ways to determine your DNS. So, start by opening Settings: you can launch it quickly by clicking/taping on its Pinned button from the Start Menu or using the Windows + I keyboard shortcut.
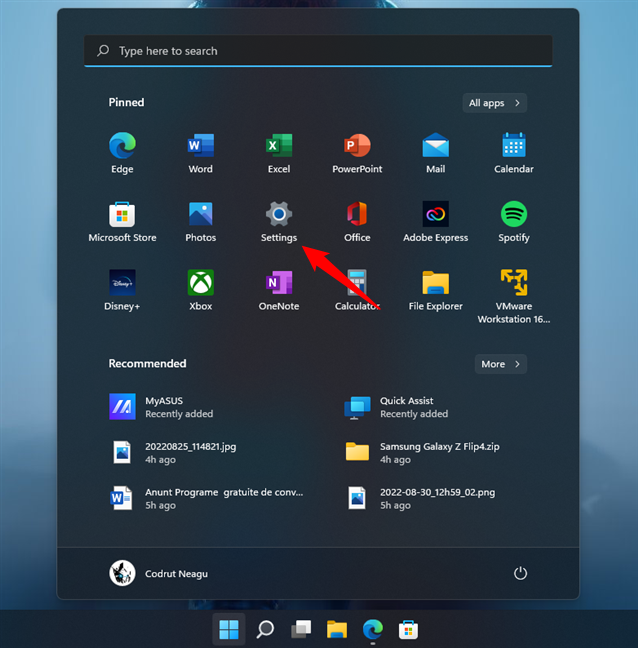
The Settings shortcut from Windows 11's Start Menu
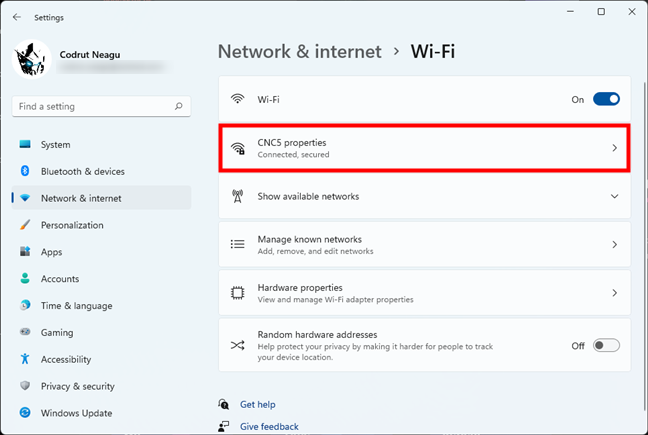
In the Settings app, select Network & internet on the left sidebar, and click or tap Properties on the right, next to the name of your current network connection.
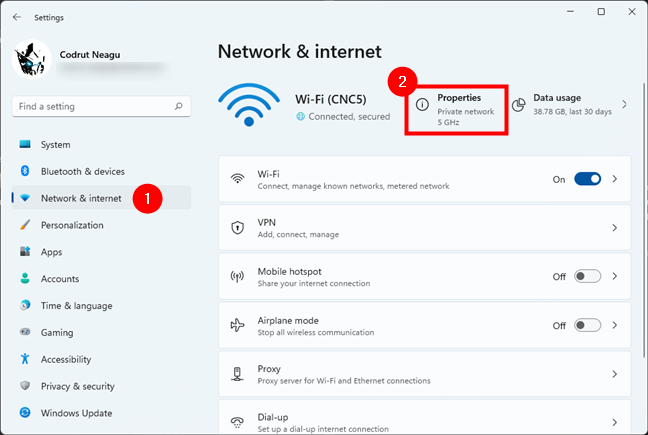
Opening the Properties of current network connection
Alternatively, in the list on the right of the Settings app, click or tap on the entry corresponding to your network connection type. If you connect via Wi-Fi, press Wi-Fi; if you connect through a wired network connection, click or tap Ethernet.
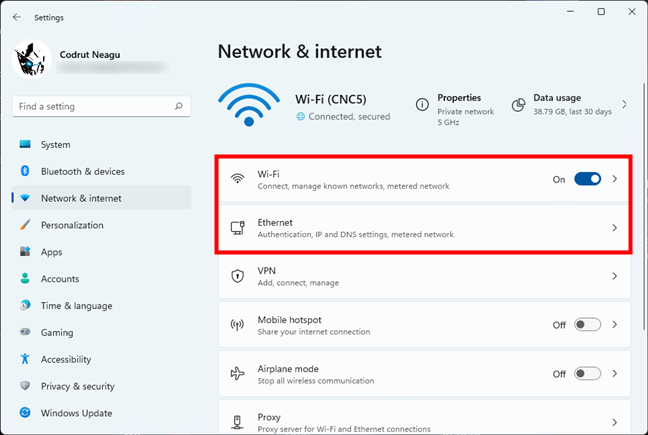
Access the settings for Wi-Fi or Ethernet
Either way, you’ll get to a page that shows all your Wi-Fi or Ethernet network connections, depending on which one you accessed. Click or tap on the name of your connection to see its details.
The network connection currently in use
On the network connection’s page, scroll down to the bottom of the page. There, you’ll find what your IPv6 DNS servers and IPv4 DNS servers are.
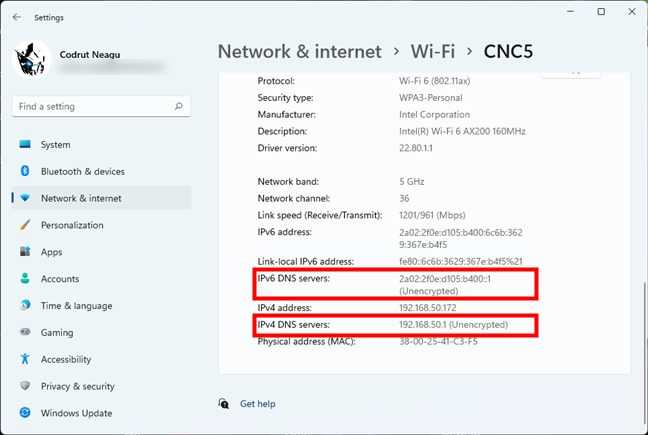
Windows 11 DNS servers are listed in the Settings app
TIP: Here’s how to find your public IP address in Windows 11 and Windows 10.
2. How to find your DNS servers in Windows 10 via Settings
Similarly, one of the most straightforward ways to find your DNS in Windows 10 is to check your network connection information in the Settings app. Start by opening Settings: click or tap on its button from the Start Menu or press Windows + I on your keyboard.
The Settings button from Windows 10's Start Menu
In the Settings app, open the Network & Internet category.
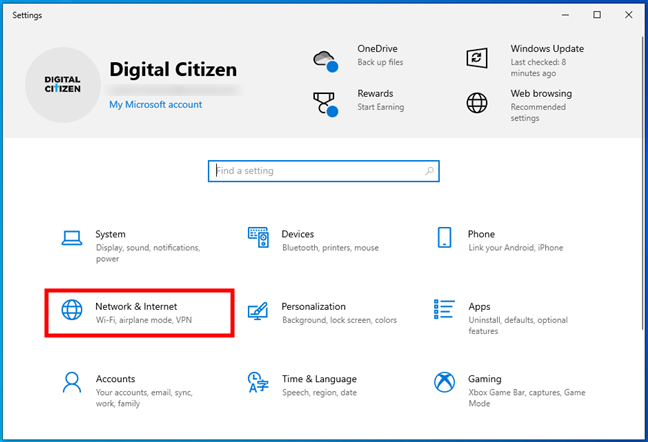
The Network & Internet category from Windows 10's Settings
On the left side of the window, select the network connection for which you want to check the DNS settings. If you’re using a wired network connection, you should select Ethernet. Otherwise, if you’re using a wireless network connection, go to Wi-Fi. Then, click or tap on your network connection on the right side of the window.
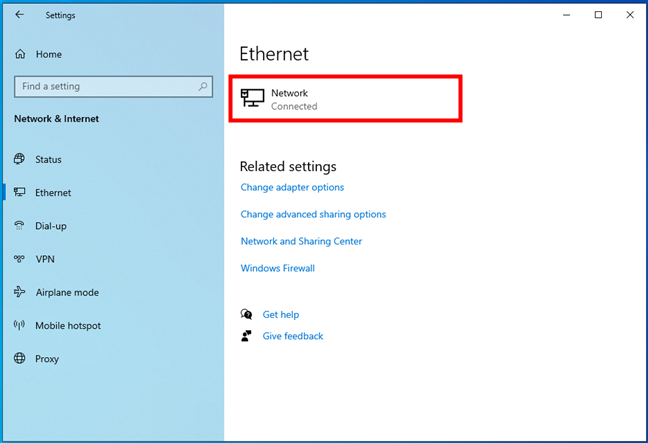
The network to which the Windows 10 PC is connected
This opens a page that shows the details of your network connection. Scroll down to get to the Properties section. Look at the information displayed there, and you should find the details of your DNS: both the IPv4 DNS server address and the IPv6 DNS server address.
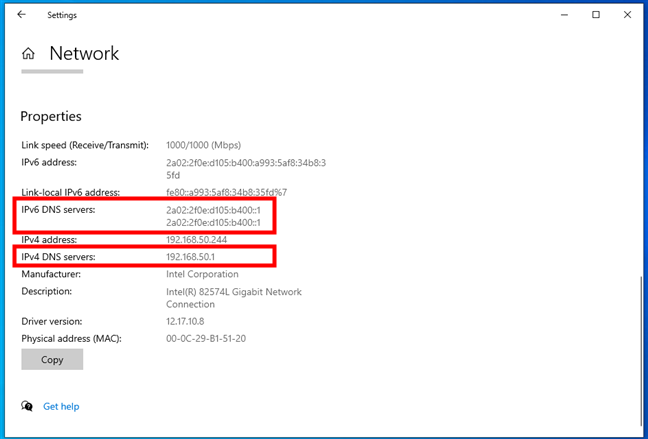
The DNS servers used by the network connection
3. How to find your DNS in Windows 11 from the Advanced network settings
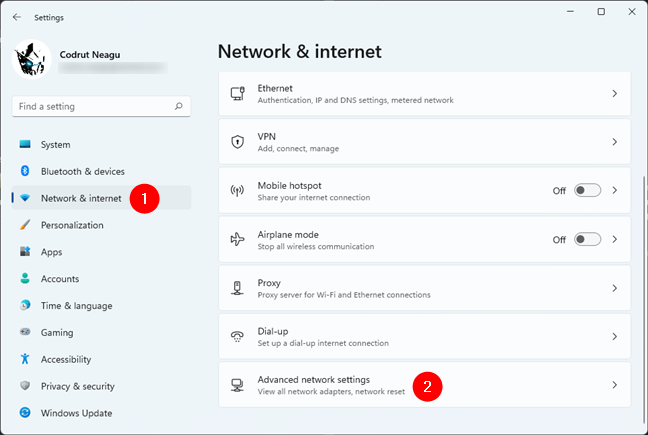
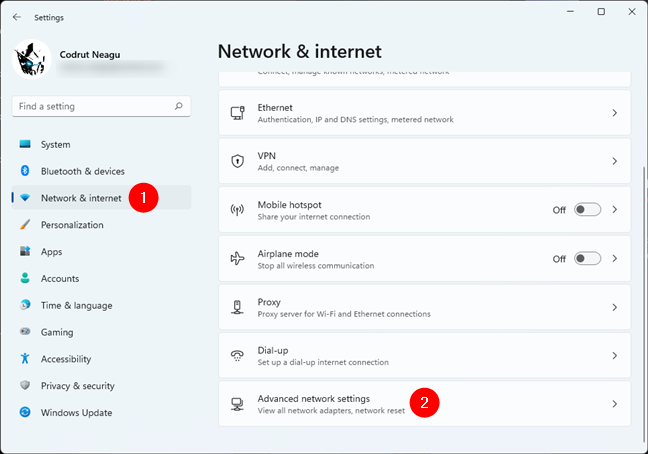
There’s also another place in Windows 11’s Settings app where you can find what your DNS is: the Advanced network settings. Launch Settings (Windows + I), head to Network & internet and click or tap on Advanced network settings at the bottom of the list on the right.
How to open Advanced network settings in Windows 11
On the Advanced network settings page, look for your network card in the Network adapters list. When you find it, click or tap on its name or the small arrow to its right.
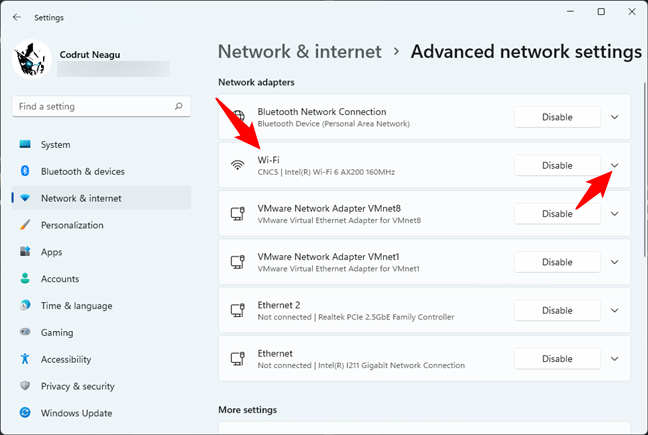
Click or tap on the network adapter currently in use
This will make Settings show you additional information and options for the selected network adapter. Click or tap on View additional properties.
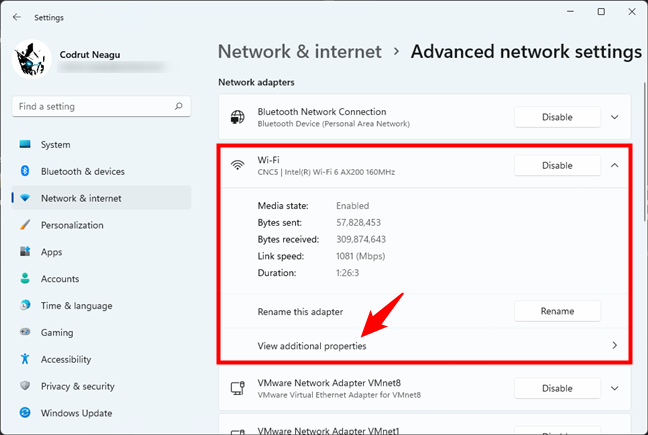
View additional properties of a network adapter
The Settings app will then let you see additional properties of the network adapter you selected earlier. Among them, you’ll also find the DNS servers used by your Windows 11 PC.
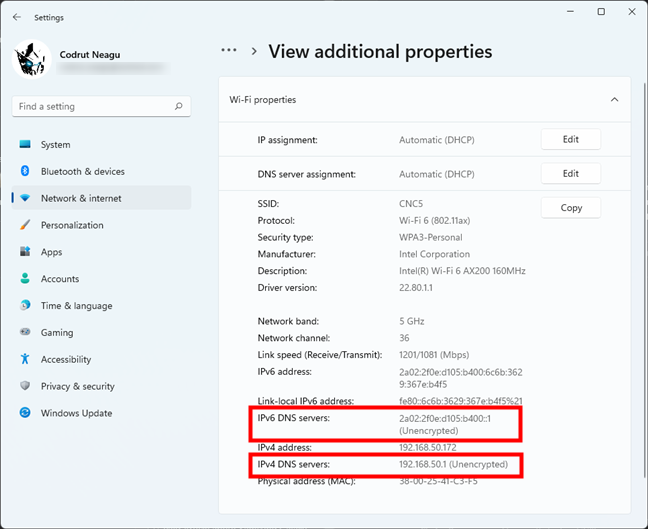
How to check what DNS servers are used by Windows 11
4. How to find your DNS from the Network Connections window
The Network Connections window offers you another way to check your DNS settings in both Windows 11 and Windows 10.
If you’re using Windows 11, launch Settings (Windows + I), select Network & internet on the left sidebar, and click or tap Advanced network settings on the right.
Open Advanced network settings in Windows 11
Scroll down and click or tap the More network adapter options link under Related settings.
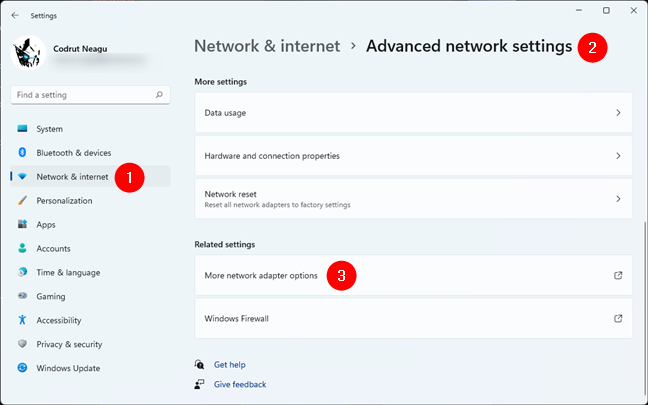
More network adapter settings
If you’re using Windows 10, open the Settings app and go to Network & Internet. Then, click or tap the Change adapter options button on the Status page.
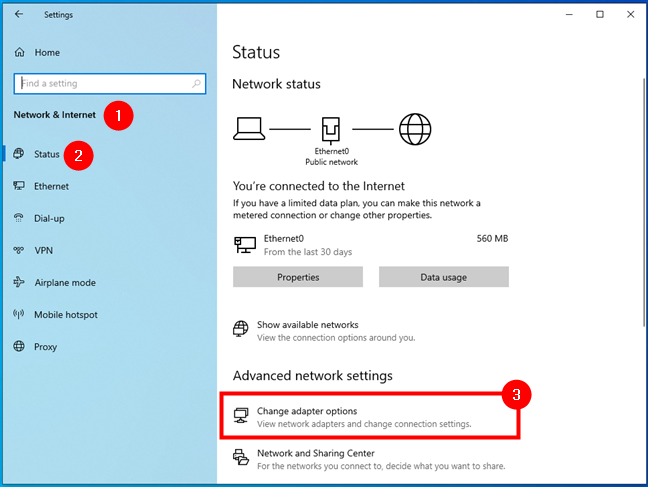
The Change adapter options button from the Status page
Whether you use Windows 11 or Windows 10, the earlier steps open the Network Connections window. Inside it, double-click or double-tap on the network adapter for which you want to find the DNS settings. In our case, that would be the Wi-Fi network adapter highlighted below.

Opening the Status of a network connection
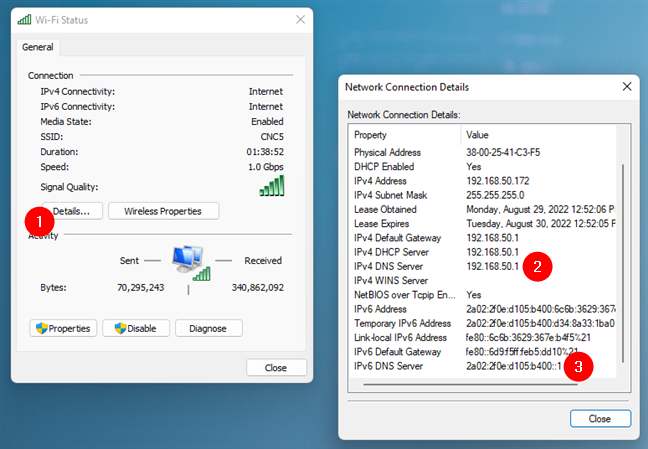
The previous action opens another window that shows you the Status of the selected network adapter. On it, click or tap on the Details button from the Connection area. Then, in the Network Connection Details window, you can find which DNS servers your Windows 11 or Windows 10 computer or device is using. They are listed next to IPv4 DNS Server and IPv6 DNS Server.
The DNS servers used by a network connection
5. How to find your DNS using the Network and Sharing Center
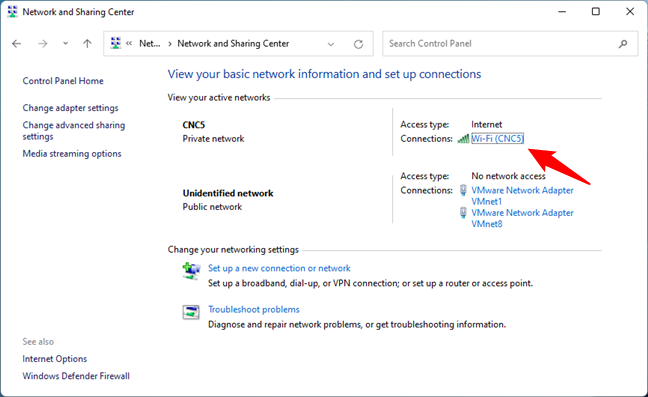
Another way to find the IP addresses of your DNS servers is via the Network and Sharing Center. And it works the same way in Windows 11 and Windows 10. Open the Network and Sharing Center (Control Panel > Network and Internet > Network and Sharing Center) and click or tap on the network adapter you use to connect to the internet. In our case, for example, that would be the Wi-Fi adapter.
Opening the Status of a network connection from the Network and Sharing Center
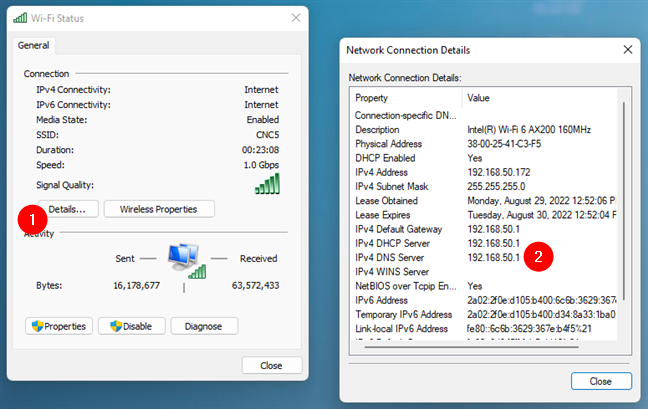
This opens the same Status window we’ve shown you in the previous method in this article. Click or tap on the Details button. Then, the Network Connection Details window shows you the DNS servers used by your Windows 11 or Windows 10 computer or device in the text lines called IPv4 DNS Server and IPv6 DNS Server.
The IP addresses of the DNS servers
6. How to find your DNS with the ipconfig command
We have a slightly faster way of finding out which DNS servers you use on your Windows 11 or Windows 10 computer or device. Open the standalone Command Prompt or PowerShell, or open a tab for either of them in Windows Terminal. Then, in the command-line environment, run this command:
Then, look through the information displayed, and you should find both the IPv4 and IPv6 DNS servers used by all your network adapters.
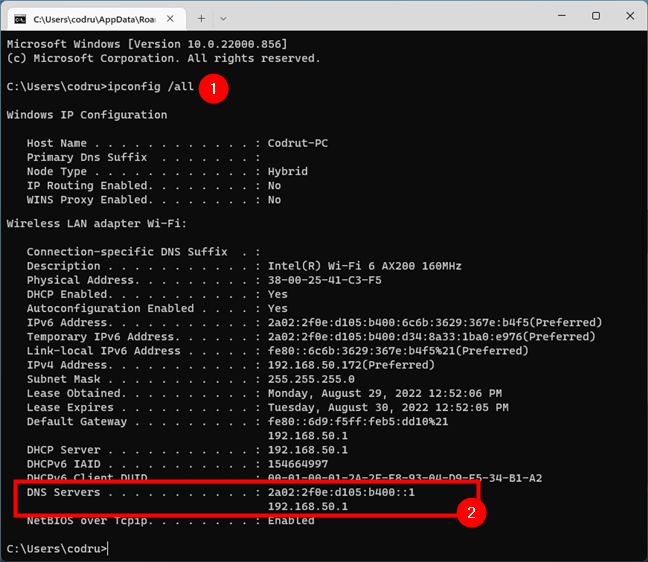
Running the ipconfig command to find the DNS servers in CMD
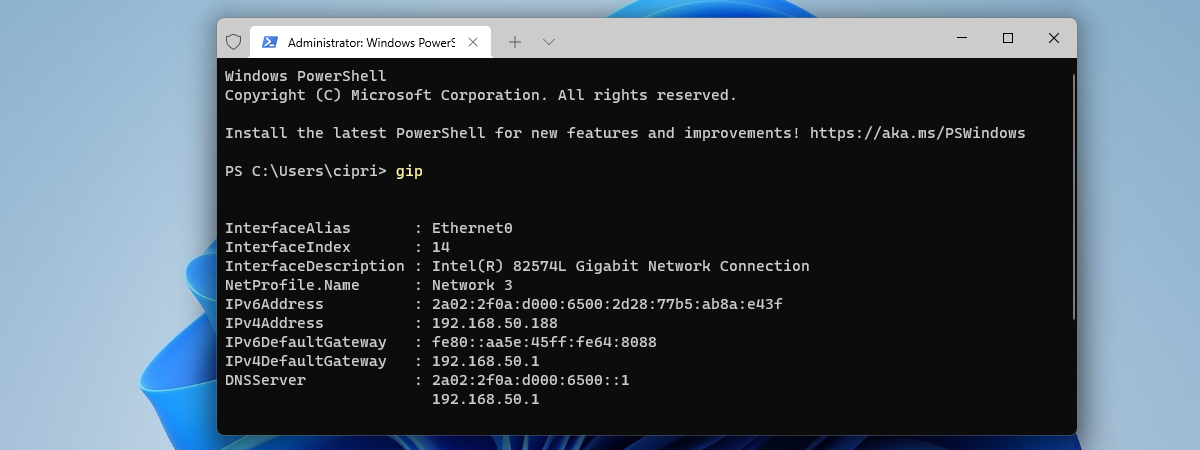
7. How to find your DNS servers with a dedicated PowerShell command
In the end, probably the fastest way to find your DNS servers in either Windows 11 or Windows 10 is offered by PowerShell. Open it, and run this command:
This will instantly show you all the DNS servers used by all your network adapters (both IPv4 and IPv6).

Find the DNS servers in PowerShell
That’s it!
What’s your favorite way of finding your DNS servers?
Now you know not one or two but seven different methods of finding out the IP addresses of your local DNS servers. Which is your preferred one? Do you know others that we might have missed? Don’t hesitate to leave a comment below and let us know.