When accessing network shared folders from your Mac is a difficult task to do, the only solution you have left is to map a network shared folder from your Windows 7 or Windows 8 computer, so that the Mac always remembers its IP address and the credentials required to login. Here's how it works
Prerequisites - What To Do Before It Will Work
This procedure won't work if the user accounts defined on your Windows computers have no password set. You must set a password for them, in order for the mapping to be performed successfully.
Then, your Windows and Mac computers should be part of the same workgroup. Here's how to change the workgroup settings in Windows 7, Windows 8 and Mac OS X:
- How to Change the Workgroup in Mac OS X for Easy Networking
- How to Change the Workgroup in Windows 7 & Windows 8
Then, file sharing needs to be appropriately set up on all network computers. Here are a some guides to help you:
- How to Share Folders from Mac OS X with Windows 7 & Windows 8 PCs
- Set Up Windows 7 & Windows 8 to Share with Mac OS X & Ubuntu Linux
You also need to learn the IP address of the Windows 7 or Windows 8 computer you want to access. This tutorial will help you learn it: 4 Ways to Learn a Computer's IP Address in Windows 7 & Windows 8.
How to Mount a Windows 7 & Windows 8 Shared Folders in Mac OS X
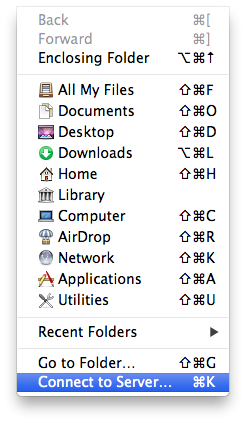
Open the Finder. Then, click Go and select Connect to Server.
The Connect to Server window is opened. In the Server Address field, type smb:// followed by the IP address of the Windows computer you want to connect to.
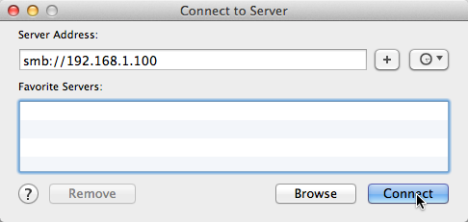
Click Connect and you are asked for a user name and password to connect to that computer. Select Registered User and provide the details of a user account existing on the Windows computer, that has access to the shared folder you want to mount.
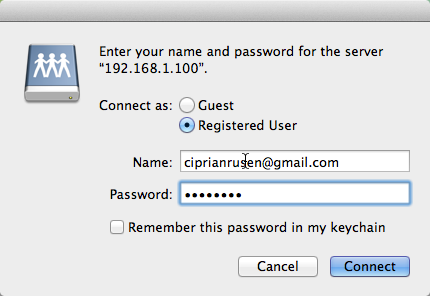
NOTE: If you are using a Microsoft account on your Windows 8 computer, type the email address and password for it. If you are using a local account, type the name of that user account and its password.
Check the box near "Remember this password in my keychain", if you don't want the Mac to ask you for these credentials each time you access the mounted folder.
Then, click Connect. You are now asked to select which volume you would like to mount, from all the available shared folders.
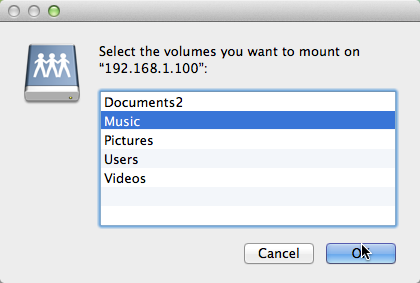
Select the shared folder you would like to mount and click OK. The Finder now opens the folder you selected.

You will now notice a funny quirk of the Mac OS X: it now lists the Windows computer you accessed twice: once using its name and once using its IP address. 🙂
Conclusion
As you can see, mounting a folder shared by a Windows computer on your network, is relatively easy to do. For reasons known only to Apple, mounting a shared folder works more often than accessing network computers and their shared folders, using the Finder.
If you are looking for other useful networking tips between Mac OS X, Windows 7 and Windows 8, check some of the articles recommended below.