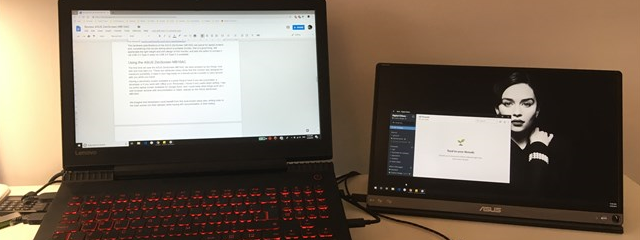
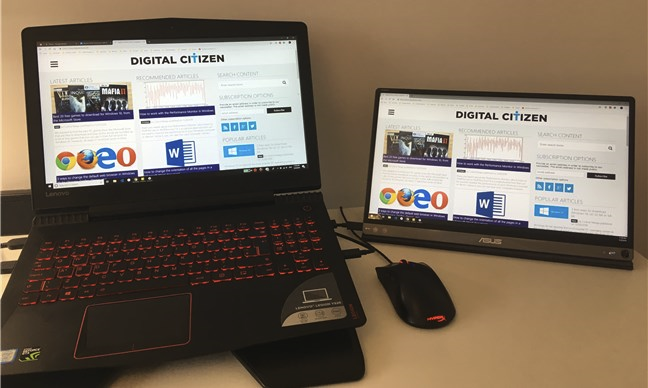
If you're working from home and you brought your laptop from your office, you might want to connect a second monitor to it. A larger screen with more space on it can definitely improve your productivity, not to mention that it's better to have two screens on which you can work at the same time. Did you ask yourself: "How do you connect a monitor to a laptop and use both screens?" Regardless of your reasons, if you want to learn how to connect a second monitor to a laptop or tablet with Windows 10, here's how to do it:
1. How to connect a second monitor to a laptop using HDMI
HDMI, which comes from High-Definition Multimedia Interface, is a technology that allows electronic devices to transport both video and audio streams to compatible computer monitors, TVs, video projectors, and other similar devices, using dedicated cables.
If you have a laptop with an HDMI port, you can use it to connect an external monitor and even TVs or video projectors. It's one of the best ways to do it, as HDMI provides an excellent balance between performance, video quality, and ease of use. Many modern laptops have at least one HDMI port available on them, so there's a good chance yours has one too.
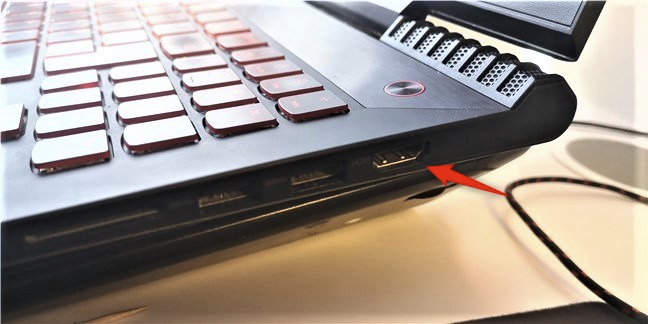
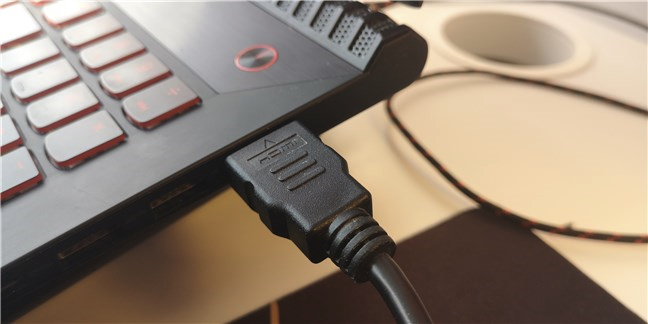
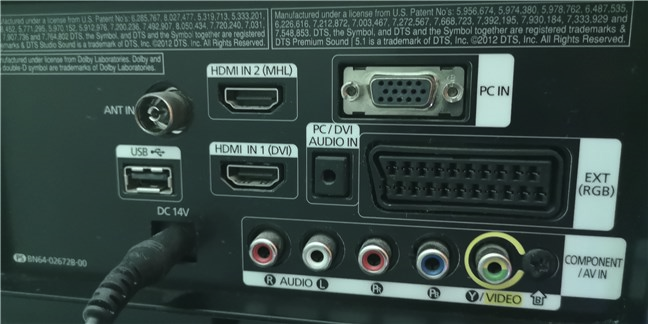
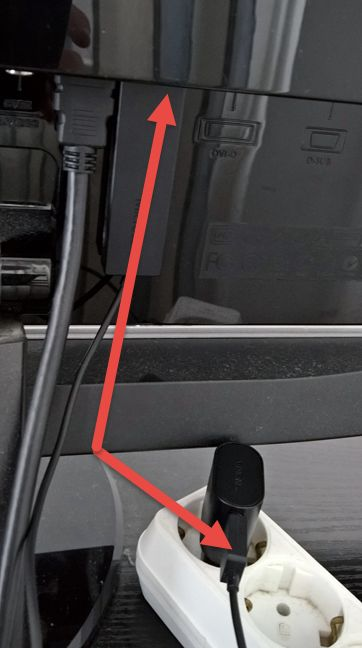
Look at your laptop to see if you do have an HDMI port on it. HDMI ports are rectangular, with two right angles and two corners that are cut away. Here's what an HDMI port looks like:
Secondly, check whether your external computer monitor has an HDMI port on it. It's usually found on its back, but some can also have HDMI ports on their sides.
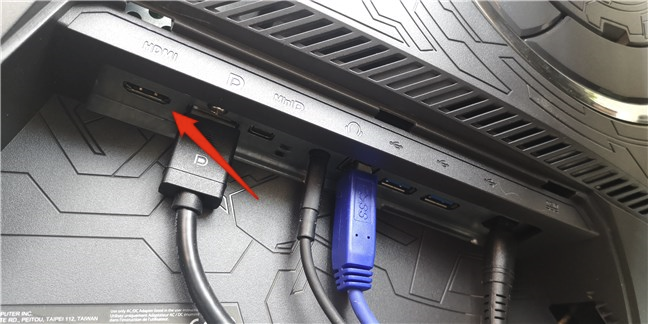
If both your laptop and your external monitor have HDMI ports, use an HDMI cable to connect them.
Depending on how your Windows 10 laptop and your external monitor are configured, now you might see that the monitor already displays some images. However, in most cases, you still need to configure a few settings to make the external monitor work properly.
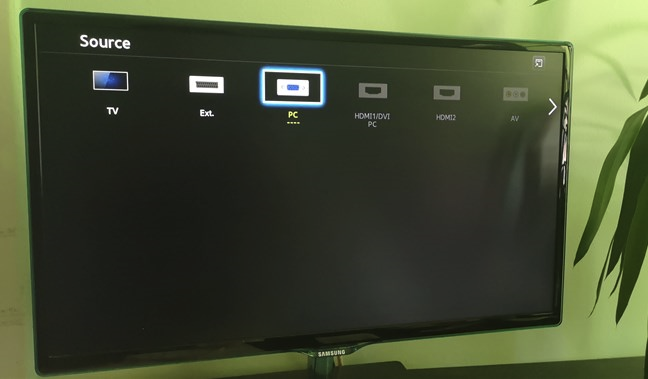
On your external monitor, look for a physical button that's labeled Source. If you find one, push it repeatedly until the monitor shows HDMI as the source of input. If there is no such button, open the monitor's OSD (On-Screen Display) and navigate through the menus to find the input source. When you find it, select HDMI.
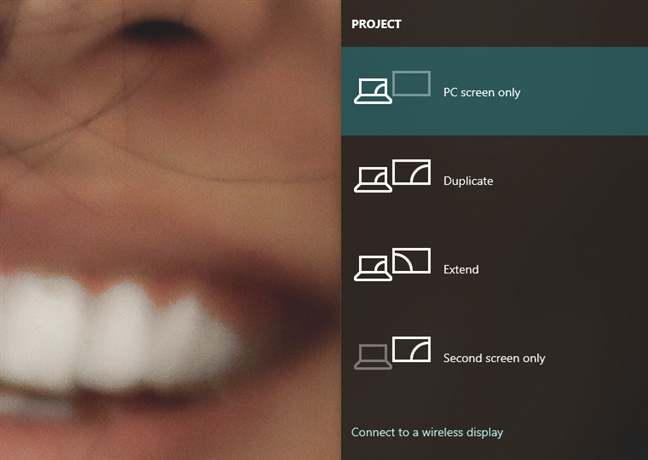
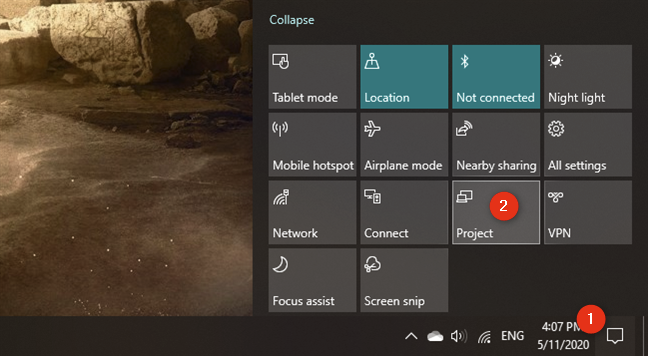
Next, you have to configure Windows 10 to let you use both displays according to your preferences. The easiest way to adjust the settings is to use Windows 10's Project feature. Simultaneously press the Windows + P keys on your keyboard, or open the action center, Expand the quick actions, and click or tap the Project button.

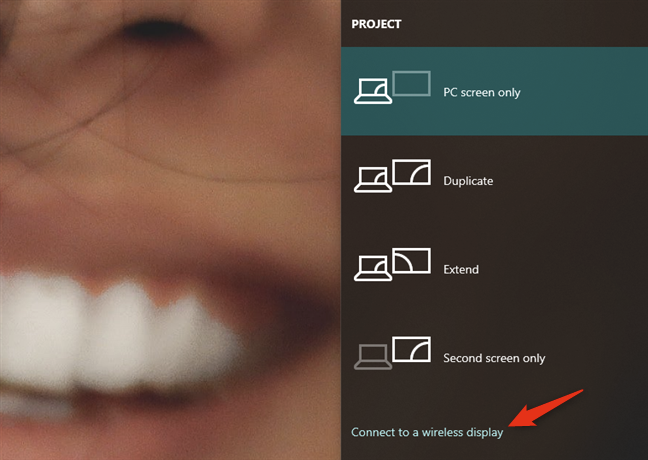
Then, Windows 10 should give you several options for how to use your displays: PC screen only, Duplicate, Extend, and Second screen only. Select the one you prefer by clicking or tapping on it. If you want to use both screens, you should choose either Extend or Duplicate.

Extend increases the size of your Windows 10 desktop to cover both displays, so that's likely what you want if you need more screen estate to work on. This is the option that lets you drag and drop windows and apps from your laptop screen to your external monitor and the other way around.

Duplicate, on the other hand, only mirrors your laptop's screen on the external monitor, which can be useful if you want to show others what you're doing on your laptop.
If you want to further customize the way your external monitor works together with your laptop, like adjust the resolution of the external monitor or set the order of the screens if you extend your desktop, read: Change the screen resolution and make text and icons bigger in Windows 10.
2. How to connect an external monitor using other types of ports and cables (USB-C, DisplayPort, DVI, VGA, S-Video)
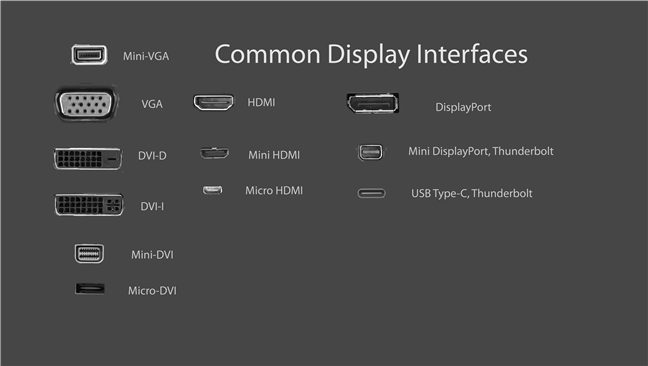
If you don't have HDMI on your laptop, you might have another type of video port on it. The reasons for laptop manufacturers to include other types of video ports differ. Some choose to use smaller video ports such as USB-C or faster and more capable DisplayPort ports. If you own an old laptop, it might not have any of the video ports we've mentioned, instead coming with older types of ports such as DVI, VGA, or even S-Video.
Look on the back and the sides of your laptop and check for the following details to correctly identify the type of ports available on your laptop:
- DisplayPort: looks similar to HDMI but only one of its corners is cut diagonally, while the other three corners all have right angles
- Mini DisplayPort: a DisplayPort that's much smaller in size, but otherwise looks the same as a regular DisplayPort
- USB-C: Is a tiny port with a rectangular shape and rounded corners
- DVI: larger than DisplayPort or HDMI, with a rectangular shape and usually colored white
- VGA: looks like a trapezoid and it's usually colored in blue
- S-Video: has a circular shape and usually a black color
Repeat the same process to see what types of video ports are available on your external monitor. After you've identified what video ports are available on both your laptop and external monitor, there are two situations in which you can find yourself:
You have the same video ports available on the laptop and external monitor. In this case, you need to find a cable that matches the ports. For example, if both your monitor and your laptop have DisplayPorts, you can use a DisplayPort cable to connect them. This is the best situation, as all you need to do is get a cable that matches your video ports and use it to connect the external monitor to your laptop.
The laptop and the external monitor don't share a common video port. In this case, connecting the external monitor to your laptop is a bit trickier, but not impossible. What you need is an adapter to convert the video signal from your laptop to the external monitor.
Depending on what video ports you have on your laptop and monitor, you might need a DisplayPort to VGA, HDMI to DisplayPort, USB-C to HDMI, VGA to HDMI, DVI to HDMI, or Mini DisplayPort to DisplayPort adapter. You can find adapters in electronics shops for almost any type of video connection, and they're fairly cheap. Once you've got the adapter, plug it into the corresponding port on your laptop. Then plug an appropriate cable between the adapter and the external monitor.
For example, if your laptop has an old VGA port and your monitor an HDMI port, you can plug a VGA to HDMI adapter in your laptop's VGA port, and then an HDMI cable between the adapter and your external monitor.
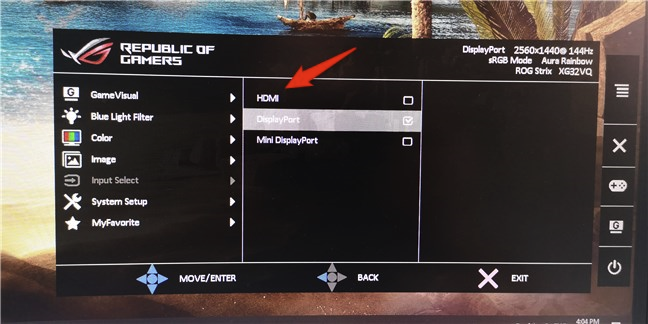
Once you've managed to connect your laptop to your external monitor, you might see that the monitor already displays the same things as your laptop's screen. However, more often than not, you still have to select the monitor's input source. On your external monitor, use its Source button (if it has one) or its OSD (On-Screen Display) to find the input Source setting and select the one that matches the port on the monitor that you're using. For example, if you're using a DisplayPort cable, select the Input that bears the same name.

If you're using a VGA cable, select VGA or PC. The name of the video connection can differ depending on the manufacturer of your external monitor, so if you don't get it right the first time, try the other Source option available. In the end, when you get the right one, video from your laptop should appear on your external screen.
Next, you can select the way in which Windows 10 uses your screens. First, open the Project tool. You can do that in the notifications panel*: Expand* the quick actions and press the Project button. Alternatively, you can also use the Windows + P keyboard shortcut.

Windows 10's Project feature shows you a few ways in which you can use your external monitor together with your laptop's screen: PC screen only, Duplicate, Extend, and Second screen only. Select what you prefer: if you want to use both your laptop's screen and your external monitor, choose Extend or Duplicate.
Extend expands your desktop so that it spans across both screens. If what you want is more space on your desktop and to be able to drag windows and apps from one screen to the other, select this option. Duplicate mirrors the laptop's screen on the external monitor. In some situations, this can prove useful, like when you want others to be able to watch on the external monitor what you're doing on your laptop.
TIP: Did you know that you can also snap Windows apps side by side and split the screen, when you're using a dual-monitor setup?
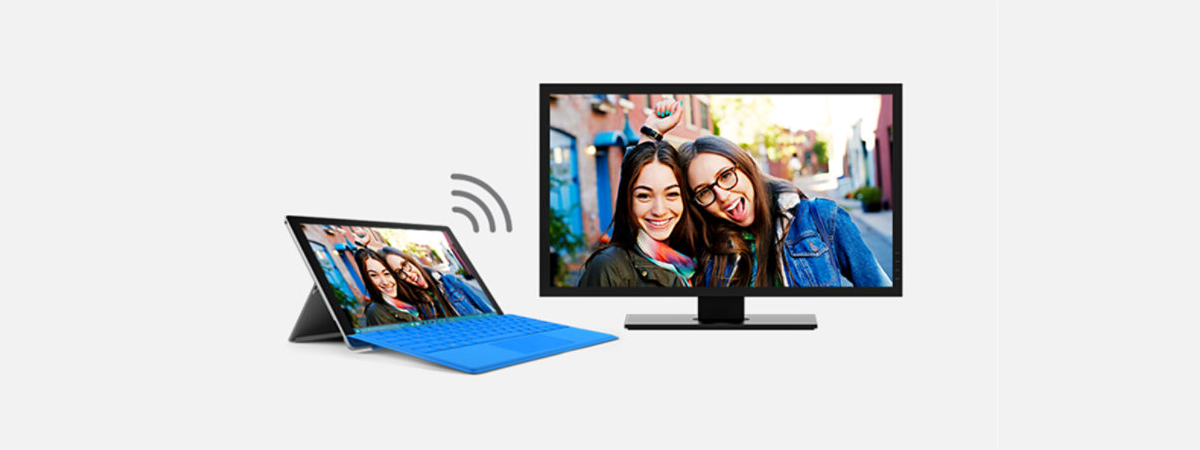
3. How to connect an external monitor (or TV) to a laptop using a wireless connection
Some higher-end external monitors also support wireless connections, using a technology called Miracast. We've already published articles on what Miracast is and how to use Miracast to project from Windows 10 to a TV or monitor. You can read those if you want in-depth explanations. However, if you don't have time to read additional material, here's what you have to do to establish a wireless connection between your laptop and an external monitor (or TV) that supports Miracast:
Turn on your Miracast-enabled external monitor or smart TV. Keep in mind that, on some monitors (and smart TVs), you might also have to check their settings to make sure that wireless connections are enabled on it. Those settings might bear different names, and they might also be found in different places in your external monitor (or smart TV) menus, depending on its manufacturer.
NOTE: If your external monitor or TV doesn't have built-in support for Miracast, you can also buy and use a Miracast dongle such as a Microsoft Wireless Display Adapter, Belkin Miracast Video Adapter or an ASUS Miracast Wireless Display Dongle. In this case, your external monitor (or TV) must have an HDMI port available. The Miracast adapter must also be charged using a USB port on your display or via a regular USB charger like those you use for your smartphones.
Once you've made sure that the external monitor (or TV) is on and that the Miracast features are enabled on it, go to your Windows 10 laptop. On it, open the Project panel: in the notifications panel, Expand the quick actions, and then press the Project button. A faster way is to use the Windows + P keyboard shortcut.
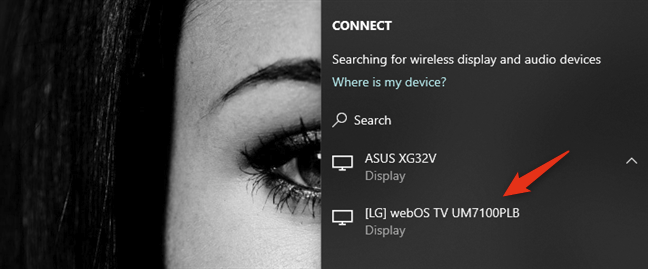
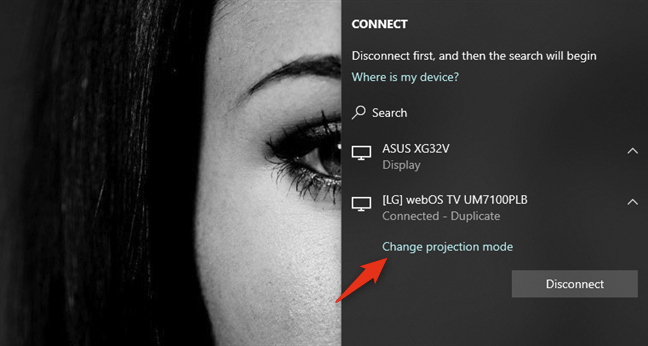
Windows 10's Project should show up as a panel on your desktop's right side. In some cases, it might automatically start "Searching for wireless displays and audio devices." If it doesn't, click or tap the "Connect to a wireless display" link.
When your laptop finds the external monitor (or TV), it shows it on a list in the Project panel. Click or tap on it, and then wait for the wireless connection to be established. Note that. On some TVs, you might also have to confirm that you want to connect them to your Windows 10 laptop using Miracast.
Once the wireless connection has been established, the external monitor (or TV) should display images from your laptop. To choose how the external monitor (or TV) works, either click/tap on "Change projection mode" or go back to the Project panel, and select what you prefer between the available display modes: PC screen only, Duplicate, Extend, and Second screen only.
If you want to use both your laptop's screen and the external monitor (TV), select either Extend or Duplicate. Extend your laptop's screen if you want your desktop to span across both displays so that you can drag and drop windows and apps from one to the other. Choose Duplicate if you want to mirror your laptop screen on the external monitor (or TV).
Are you using an external monitor on your Windows 10 laptop?
Now you know how to add a second monitor, or even a TV, to your laptop. Do you find it easier to work on two screens at the same time? Did you encounter any problems when trying to connect your external monitor? We'd love to hear from you and, if you need our help, reach us using the comments below.