You can use system recovery tools to fix most of your computer problems. However, there are times when you'll need to address such issues manually, for example, when your Windows computer won't boot. In these cases, you can use a tool named Bootrec.exe. It can help you troubleshoot and repair things like the EFI Bootloader, master boot record (MBR), the boot sector, or the Boot Configuration Data (BCD) store. Here's how it works in all modern versions of Windows:
NOTE: This guide covers Windows 11, Windows 10, and Windows 7. However, the tools presented and the instructions apply to other Microsoft operating systems too, including Windows 8.1.
Bcdboot & Bootrec - The ultimate repair tools for boot problems in Windows
It doesn’t matter what Windows version you have, whether your PC runs on BIOS or UEFI, or whether your system drive uses MBR (Master Boot Record) or GPT. If your operating system has trouble booting and Startup Repair can't fix the problem, it's worth trying the Bcdboot and Bootrec tools. With their help, you can repair your EFI Bootloader or Master Boot Record (MBR), write a new boot sector, rebuild the Boot Configuration Data (BCD) and add missing Windows installations to the boot configuration data.
If you need to know what all these mean, here’s an explanation for each of them:
- EFI Bootloader - represents special files stored on a dedicated EFI partition. UEFI uses this partition to load the bootloader (EFI\Microsoft\Boot\bootmgfw.efi), which in turn handles the booting of Windows. If this partition is damaged or if the files on it - the EFI Bootloader - are corrupted, your computer can’t start Windows. EFI Bootloader is found on devices that use UEFI and (usually) GPT-partitioned drives and is most common on Windows 11 and Windows 10 modern computers.
- Master Boot Record (MBR) - the first sector of your system drive. Its purpose is to tell the computer’s BIOS where to look for the operating system so that it can start it. Obviously, MBR is usually found on older computers using BIOS and older operating systems such as Windows 7.
- Boot sector - the region of the disk that contains the code to be loaded into the RAM memory, that is necessary to load the operating system. A boot sector must have a specific disk signature to be seen by BIOS as a boot sector. If this signature is corrupted or has been changed, the BIOS will not be able to find the boot sector and won't be able to load the necessary instructions for finding and starting the operating system. In Windows 7 and older versions of Windows, the boot sector loads the Windows Boot Manager, accesses the Boot Configuration Data, and uses this information to load the operating system. On newer computers running on UEFI and using newer versions of Windows such as Windows 11 or Windows 10, the UEFI firmware provides backward compatibility by reserving the first sector on the partition, but only uses it if you boot in legacy BIOS using CSM (Compatibility Support Module).
- Boot Configuration Data (BCD) - The BCD is a database of boot-time configuration data that is used by the Windows Boot Manager. The Boot Configuration Data is stored in a data file that has the same format as the Windows Registry found on the EFI system partition (on UEFI/GPT systems) or on the active partition (on legacy BIOS/MBR systems).
Step 1. Start the Command Prompt using a recovery drive
In order to be able to use Bootrec.exe and repair the EFI Bootloader or the MBR, you'll have to use Command Prompt. We’ve already covered how to access it here: How to open Command Prompt when Windows doesn't boot (3 ways).
However, for the sake of being complete, here’s what you have to do, in short:
Because you already have startup issues, it's obvious that you won't be able to simply run it from Windows. You need to use a system repair disc or a recovery drive that was created on a working Windows computer.
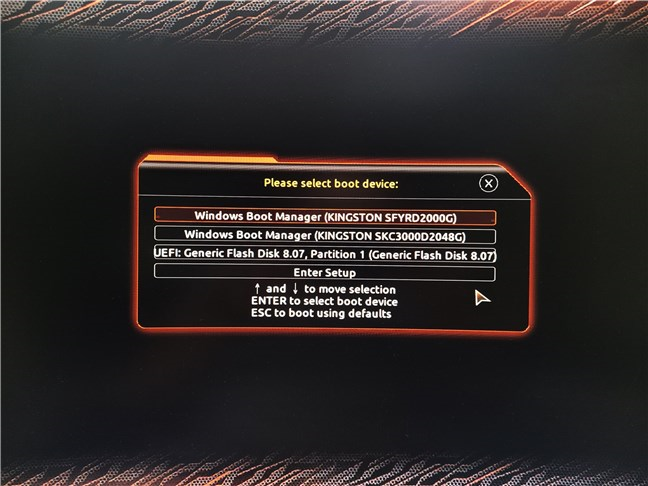
Once you have the recovery drive/disc, boot from it. Plug it in and start your Windows computer or device. Immediately after it starts, press the boot device selection key on your keyboard. It’s usually the F12, F11, or the Escape key, but it could be another as well, depending on the manufacturer of your device’s mainboard. Doing that will make your computer display a boot priority selection menu. Use the arrow keys on the keyboard to select the recovery drive. Then, press Enter and, when asked to press any key to boot from that drive, do so.
Boot from the recovery drive
If you are using Windows 11 or Windows 10, once your PC boots from the USB drive, you will be asked to choose the keyboard layout you want to use. When this happens, click or tap on the layout that matches your keyboard. On the next screen, you should click or tap on Troubleshoot (Reset your PC or see advanced options).
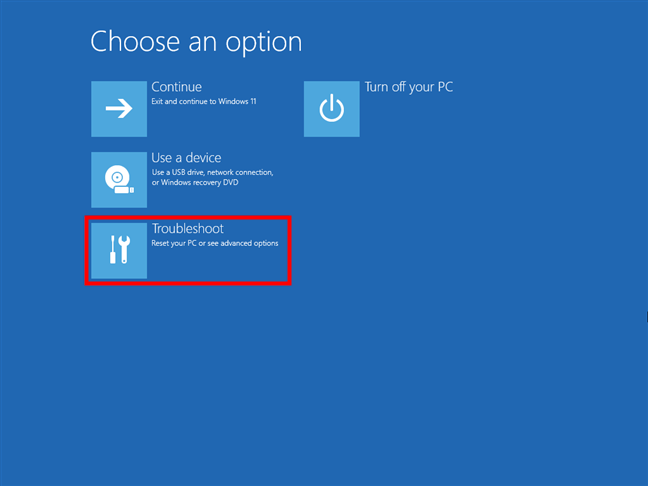
Choose Troubleshoot
Select Advanced options on the Troubleshoot screen.
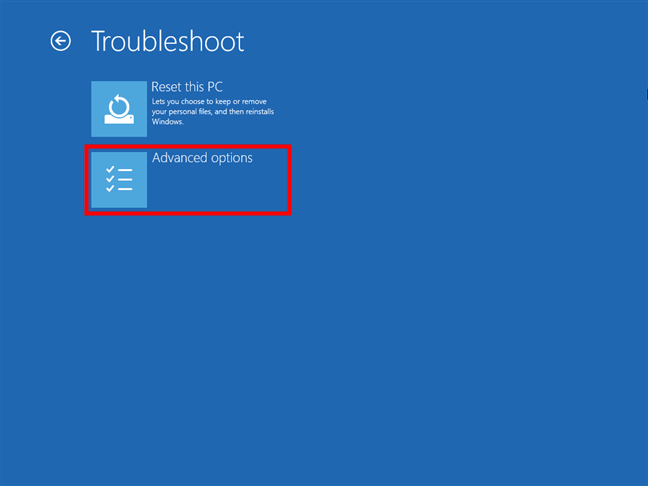
Select Advanced options
On the Advanced options screen, click or tap on Command Prompt.
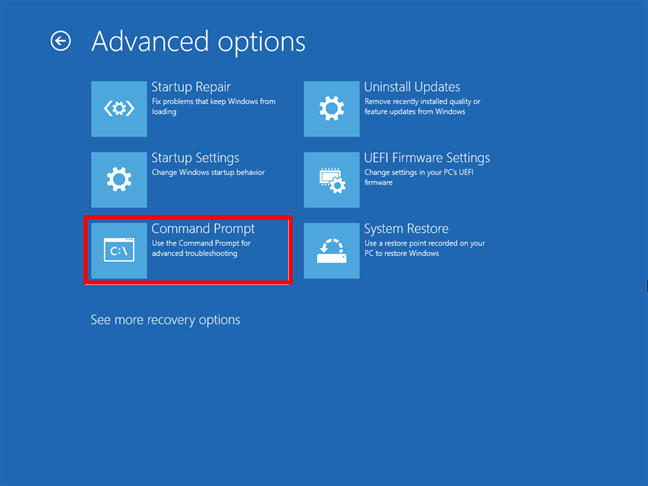
Open Command Prompt
If you are using Windows 7, the system repair disk will first scan for available Windows installations. Select the Windows 7 installation that you want to repair and click Next.
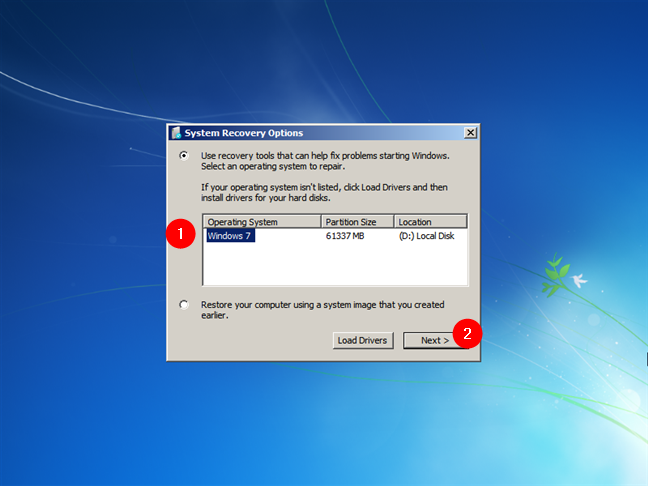
Select Windows 7
Then, when the list of available System Recovery Options is shown, click on Command Prompt.
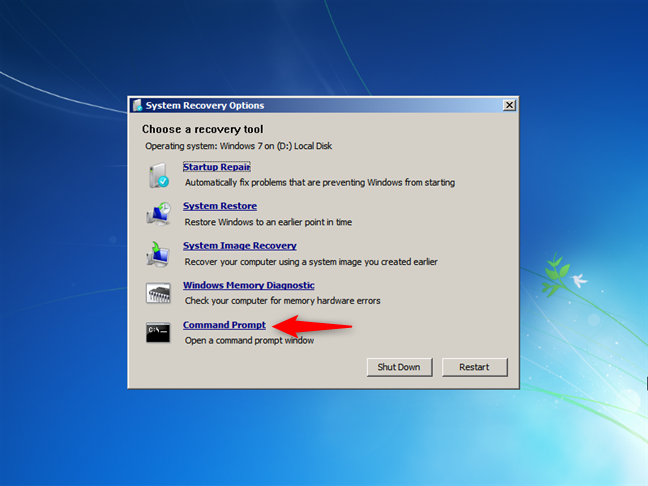
Launch Command Prompt
Step 2. Use Command Prompt to fix issues with your PC’s boot records
Once you’ve started Command Prompt on your problem computer, you can use some advanced tools in it to repair the boot records. Read the next section to see how to repair the EFI Bootloader on a computer with UEFI and GPT drives (Windows 11 and Windows 10), or the one after it to see how to fix your MBR on computers running on BIOS with MBR drives (Windows 7).
2.1 How to repair the EFI Bootloader for Windows 11 & Windows 10 (UEFI systems with GPT-partitioned drives)
In order to repair your EFI Bootloader, you’ll first have to mount the EFI System Partition, the one that holds its files. The tool that lets you do that is diskpart so, in Command Prompt, run the following command:
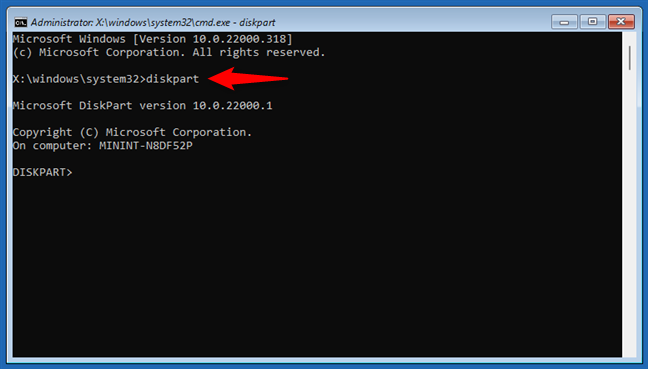
Run diskpart in CMD
Type and run the next command to select the first drive on your computer:
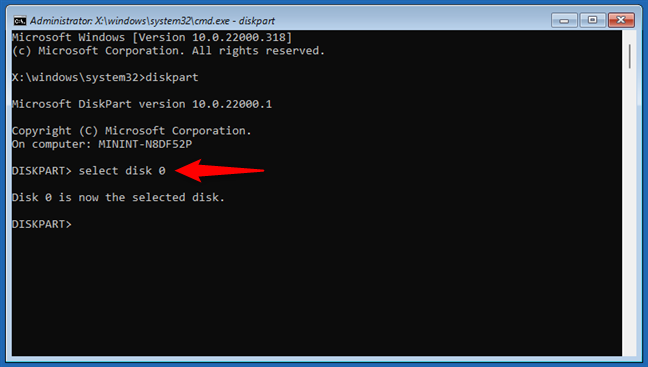
Select the primary drive
Now run the next command to list all the volumes:
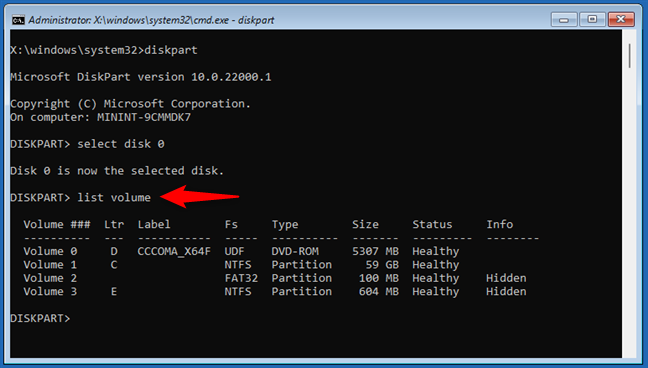
List the volumes on the drive
Identify the EFI system partition on your drive. It’s the one marked as Hidden and formatted using the FAT32 file system. Usually, its size is small: 100MB. Once you’ve found it in the list, run the next command replacing [number] with the actual number of your EFI system partition from the list:
For example, in our case, that is:
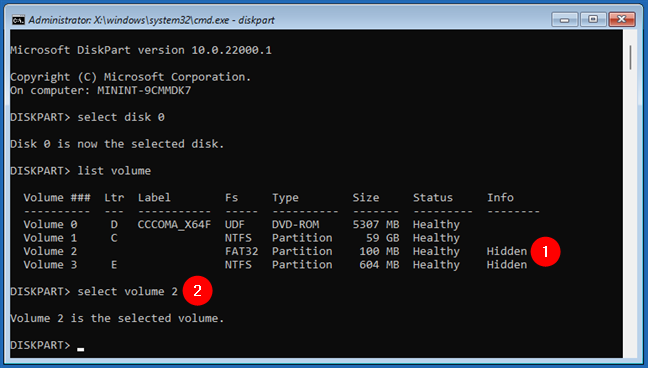
Select the EFI system partition
Now it’s time to mount the EFI system partition. To do that, we need to assign it a letter, and the command for that is:
Use any letter that’s not already in use - you can see which ones are used in the list of volumes displayed earlier in Command Prompt. For example, we chose the letter Z:
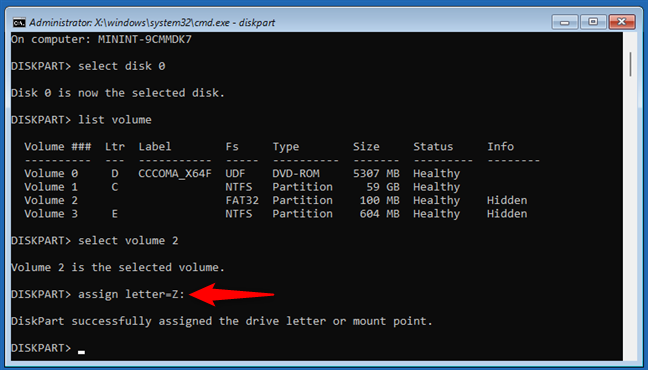
Assign a letter to the EFI partition
Next, exit diskpart by running the command:
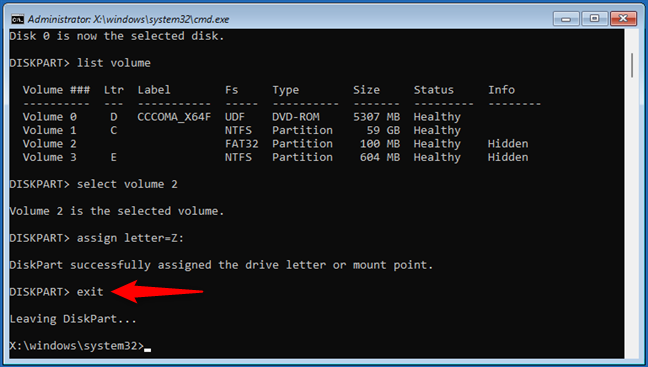
Exit diskpart in CMD
TIP: If you want to learn more about diskpart, check this guide: How to use diskpart, chkdsk, defrag, and other disk-related commands.
Now, it’s time to repair the boot records. To do that, there are two commands you need to run. First, this one:
Make sure you replace [drive letter] with the letter you’ve assigned to your EFI system partition. In our case, as we chose to use the letter Z: the command looks like this:
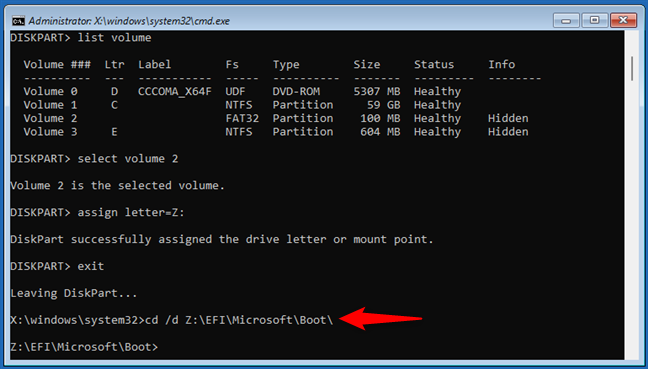
Navigate to the EFI system partition
Next, you’re going to have to rebuild the BCD store (Boot Configuration Data). The last command you should run to finish repairing your EFI Bootloader is this:
Make sure you replace [EFI system partition letter] with the drive letter you’ve assigned to your EFI partition earlier. For example, in our case, that was the letter Z, so the command we’d have to run is:
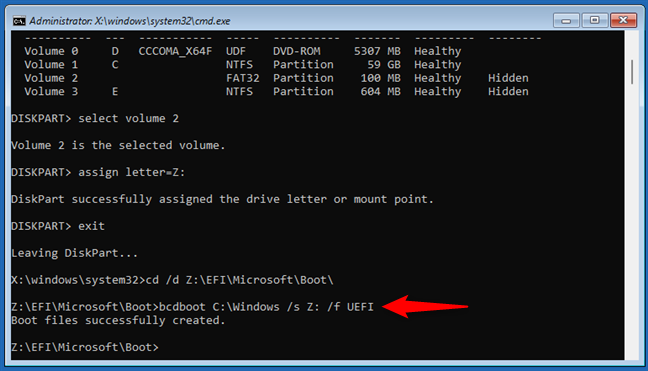
Repair the EFI Bootloader
And this is all. Now, you should reboot your computer and, hopefully, it will be able to start correctly again.
2.2 How to repair your MBR (UEFI CSM or BIOS systems with MBR-partitioned drives)
If you’re using a computer with BIOS or UEFI in legacy mode (CSM), and you’ve partitioned your system drive using MBR (Master Boot Record), here are the steps you need to make to repair its boot:
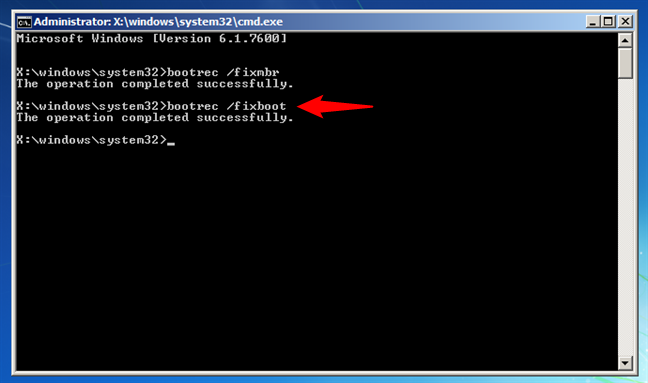
After you’ve launched Command Prompt, type and run this command:
The /FixMbr parameter is the one that allows Bootrec to repair the corrupted or damaged Master Boot Record (MBR). Usually, you will use this parameter when you are faced with one of these error messages: “Operating System not found”, “Error loading operating system”, “Missing operating system,” or “Invalid partition table”.

Fix the MBR
The second command you’ll want to run in Command Prompt is:
Fix the boot records
The /FixBoot parameter writes a new boot sector to the system partition that is compatible with your Windows version.
Then, you’ll need to rebuild the BCD (Boot Configuration Data). It contains a detailed list of what is supposed to load at startup. Microsoft indicates that a boot error can also be caused by missing or damaged files in the BCD. The /rebuildbcd parameter of the Bootrec command can be very useful when you must fix some errors by completely rebuilding the BCD. To completely rebuild the Boot Configuration Data, run this command:
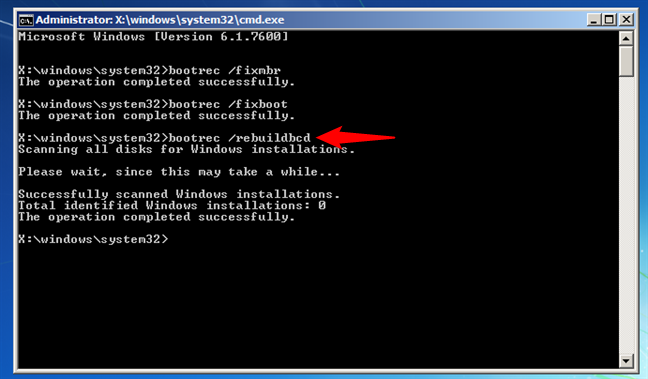
Rebuild the Boot Configuration Data
If your computer has multiple operating systems installed, but not all of them are available, use the /ScanOS option like this:
Using this parameter on Bootrec.exe will launch a scan on all disks for any Windows installations that are not currently included in the Boot Configuration Data (BCD). In the screenshot below, you can see how this scan process might look.

Scan for additional operating systems
If the bootrec.exe /scanos command returns results, you will be able to continue the repair process. In the end, you will get the lost Windows installation back into the secure BCD table, thus making it bootable again. For that, clean the Master Boot Record (MBR) again using the bootrec /fixmbr command. Then, type and run the command:
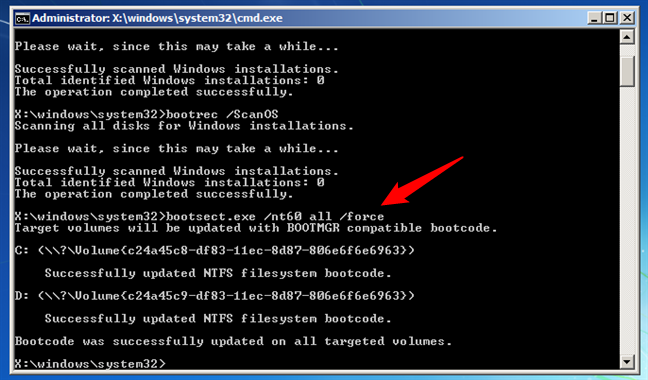
Repair the boot issues on all drives
The /nt60 parameter applies the master boot code that is compatible with BOOTMGR. The /all argument updates the master boot code on all partitions. The /force parameter forcibly dismounts the volume(s) during the boot code update so that the Bootsect.exe tool does not gain exclusive volume access. Running all these commands will create a new MBR and tell it to use the correct Windows boot loader in order to load that specific installation from your drive.
TIP: For further (official) information, you might want to check Microsoft’s documentation here: Use Bootrec.exe in the Windows RE to troubleshoot startup issues.
Did you manage to repair the boot problems on your Windows PC?
As you can see from this guide, Windows has some powerful tools for troubleshooting and fixing problems with your computer's boot records. Did our guide manage to help you repair your PC? Do you know other ways to fix issues with boot records? Don’t hesitate to let us know in a comment below.